Prerequisites
- Products: Liquid UI WS, Liquid UI Server or Local DLL, Client Software
- Commands: del(), title(), _title, return(), enter()
Purpose
Learn how to change UI dynamically on the same SAP screen, based on data passed as an array, and convert it into a hierarchical tree structure.

Note: You need to place the commonFunctions.sjs file in your scripts folder and it must be loaded in the SAPLSMTR_NAVIGATION.E0100.sjs file.
User Interface
////Create the files SAPLSMTR_NAVIGATION.E0100.sjs and commonFunctions.sjs inside your script folder for the customizing SAP Easy Access screen.
//Now, let's start adding the Liquid UI script to the above files and save them.
Customization
- Logon to SAP and delete the image container using the del command on the SAP Easy Access screen, as shown below.
// Deletes an image container on the easy access screen
del("X[IMAGE_CONTAINER]");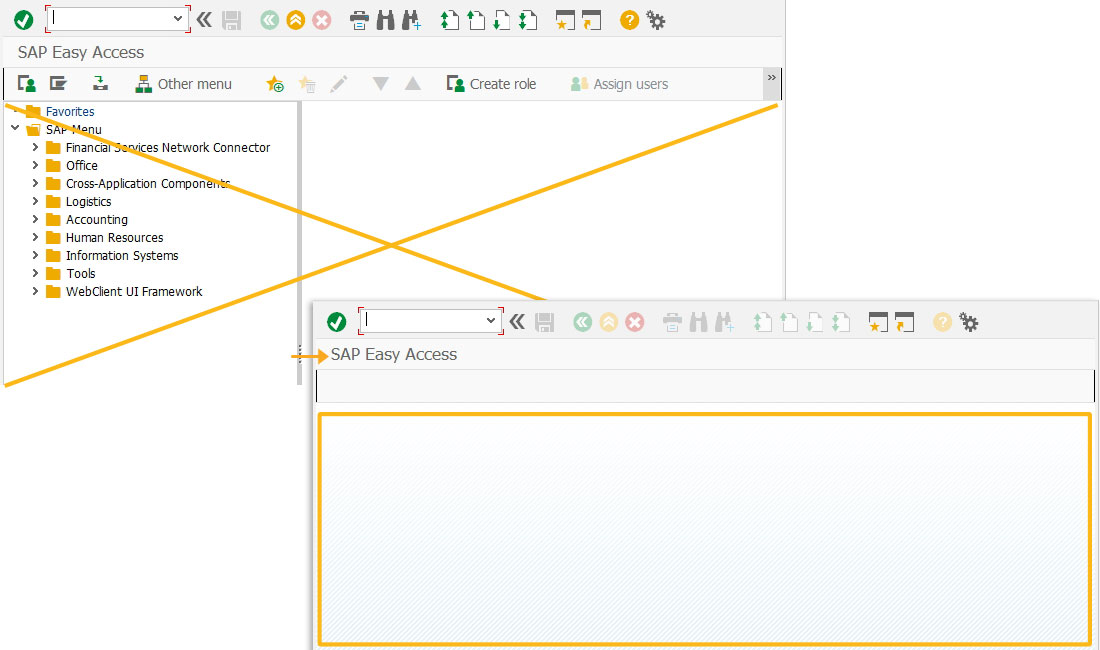
- Add an isBlank condition to check the function, pass the separator, and then customize the screen as per requirement.
if(isBlank(first_time)){
    first_time = "X";
createTree(testData,",");   // Pass separator to the function and use that
} - Use load command to add commonFunctions.sjs file; this allows you to access the functions included in it.
// 'commonFunctions.sjs' is required to be installed
load('commonFunctions.sjs'); - Now, add the following Liquid UI code to the SAPLSMTR_NAVIGATION.E0100.sjs file, and save it.
drawUI();

// This data may come from -
// a. Fixed File
// b. RFC Call
// The data from File or RFC needs to be built into an array similar to below
// "Parent,Child,Value,Tcode"
testData = [];
testData[0] = "1000,Uni Coiler A,K1-A,";
testData[1] = "Root,1000,K1,";
testData[2] = "1000,Uni Coiler B,K1-B,";
testData[3] = "2000,TEST_CASING A,100-100,";
testData[4] = "1000,Uni Coiler C,K1-C,";
testData[5] = "Uni Coiler A,Uni Coiler A South East,K1-E-SE,";
testData[6] = "TEST_CASING A,Boiler 1,100-200,MM03";
testData[7] = "Uni Coiler A,Uni Coiler A North East,K1-E-NE,";
testData[8] = "Uni Coiler A South East,Uni Coiler A South East 1,K1-E-SE-1,";
testData[9] = "Uni Coiler A South East 1,Uni Coiler A South East 1A,K1-E-SE-1A,MM02";
testData[10] = "TEST_CASING A,Boiler 2,100-300,";
testData[11] = "Uni Coiler A South East 1,Uni Coiler A South East 1B,10030388,IW22";
testData[12] = "Root,2000,100,";
testData[13] = ",Root,,";        // ROOT - Not displayed on screen
testData[14] = "2000,TEST_CASING B,100-100,IW23";
testData[15] = "3000,New Hire,1001-10,PA40";
testData[16] = "Root,3000,,"; - Now, add the following Liquid UI code to the commonFunctions.sjs and save it.
// Function to trim blank spaces at the end of the string
String.prototype.trim=function(){return this.replace(/^\s+|\s+$/g,'')};

// Function to check if the string value is blank
function isBlank(jvar){
   if(typeof jvar == 'string') {
      jvar = jvar.trim();
   }
   if(typeof jvar == 'undefined') {
      jvar = '';
   }
   return(jvar == 'undefined' || jvar == undefined || jvar == null || jvar == "" || jvar == void 0);
}

// Function to paint the User Interface
function drawUI(){
    if(!isBlank(current.getChildren())){
        title(current.name);
        for(x=0; x<current.getChildren().length; x++){
            pushbutton([(x+1)*2,10], current.children[x].name, "?", {"size":[2,30], "process":changeCurrent, "using":{"new_current":current.children[x]}});
        }

        // If the option to go back is possible
        if(current.getParentNode() != null){
            pushbutton([TOOLBAR],"@9S@BACK","?", {"process":changeCurrent, "using":{"new_current":current.getParentNode()}});
        }
    } else{
        tcode = current.txcode;
        value = current.val;
        if(!isBlank(tcode)){
            enter({"process":navigateToTransaction, "using":{"l_tcode":tcode, "l_val":value}});
        } else{
            message('E: No transaction specified');
            first_time = '';
            enter('?');
        }
    }
}

// Function to perform some action on the last level
// Navigates to the transaction code and uses the value passed
function navigateToTransaction(param) {
    var tcode = param.l_tcode;
    first_time = '';
    enter('/n'+tcode);

    onscreen '*'                // Rest of the navigation logic based on Transaction code
        title(_title);
        if(tcode == 'MM02'){
            set('F[Material]',param.l_val);
        } else if(tcode == 'MM03'){
            set('F[Material]',param.l_val);
            goto MM03_PROCESS;
        } else if(tcode == 'IW22'){
            set('F[Notification]',param.l_val);
            goto IW22_PROCESS;
        }
        enter('?');
        goto SCRIPT_END;

    onscreen 'SAPLMGMM.0600'
    MM03_PROCESS:;
        enter();
        goto SCRIPT_END;

    onscreen 'SAPLIQS0.0100'
    IW22_PROCESS:;
        enter();

    SCRIPT_END:;
}

// Function to initialize the Node containing name, value and transaction code
function Node(name,val,txcode){
    this.name = name;
    this.val = val;
    this.txcode = txcode;
    this.children = [];
    this.parent = null;

    this.setParentNode = function(node){
        this.parent = node;
    }
    this.getParentNode = function(){
        return this.parent;
    }
    this.addChild = function(node){
        node.setParentNode(this);
        this.children[this.children.length] = node;
    }
    this.getChildren = function(){
        return this.children;
    }
}

// Function to refresh and paint the new screen, based on button click
function changeCurrent(param){
    current = param.new_current;
    enter("?");
}

// Function which creates the tree structure from an array and the data separator passed to it.
function createTree(arr,separator){
    // Create the root
    for(i=0; i<arr.length; i++){
        arrTemp = arr[i].split(separator);
        if(isBlank(arrTemp[0])){
            rootNode = new Node(arrTemp[1],arrTemp[2],arrTemp[3]);
            arr.splice(i,1);        // Delete the element in the array
            break;
        }
    }

    index = 0;
    while(arr.length > 0){          // While elements are in the array
        if(isBlank(arr[index]))        // Reached the end of the data array, break out of while loop
            break;

        arrTemp = arr[index].split(separator);

        result = inTree(rootNode,arrTemp[0]);        // Check whether the Parent is in the Tree
        if(!isBlank(result)){
            result.addChild(new Node(arrTemp[1],arrTemp[2],arrTemp[3]));        // Add the child
            arr.splice(index,1);                // Delete the element in the array
            index = 0;
        } else{
            index++;
        }
    }
    current = rootNode;
}

// Function which checks to see if the Parent Node exists in current tree
function inTree(rtnode,parent){
    var nodeStack = [];
    nodeStack.push(rtnode);

    while(nodeStack.length > 0){                // Always 1 as 'nodeStack' contains the ROOT node
        processNode = nodeStack.pop();            // 'processNode' points to the beginning of the node

        if (processNode.name == parent) {
            return processNode;                    // Returns once the node is found and adds to the tree
            break;
        } else if (processNode.children.length>0) {
            for (ii = 0; ii < processNode.children.length; ii++) {
                nodeStack.push(processNode.children[ii]);
            }
        }
    }
    return '';                                    // Return an empty string if parent not found in the tree
}
SAP Process
- Refresh the SAP Easy Access screen, and then it displays the following screen.
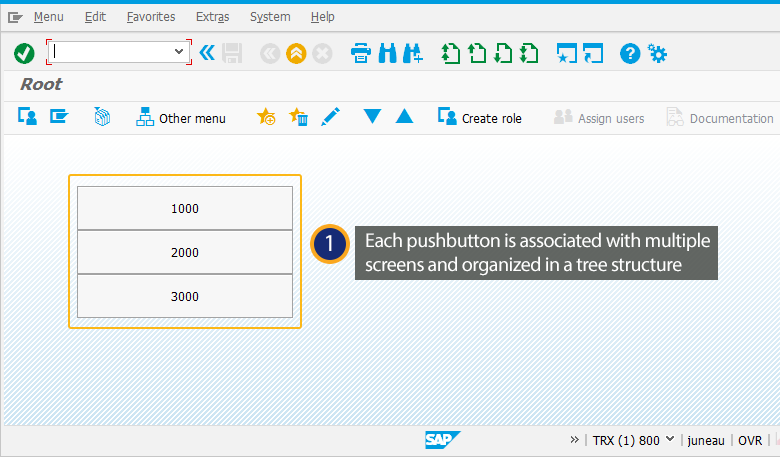
- Click on the first pushbutton (1000) to navigate all the way and land on the MM02 (Create Material (Initial Screen)). Again clicking on any of the pushbuttons located on the 1000 sub-screen will navigate you to their respective sub-screens, as shown in the image below.
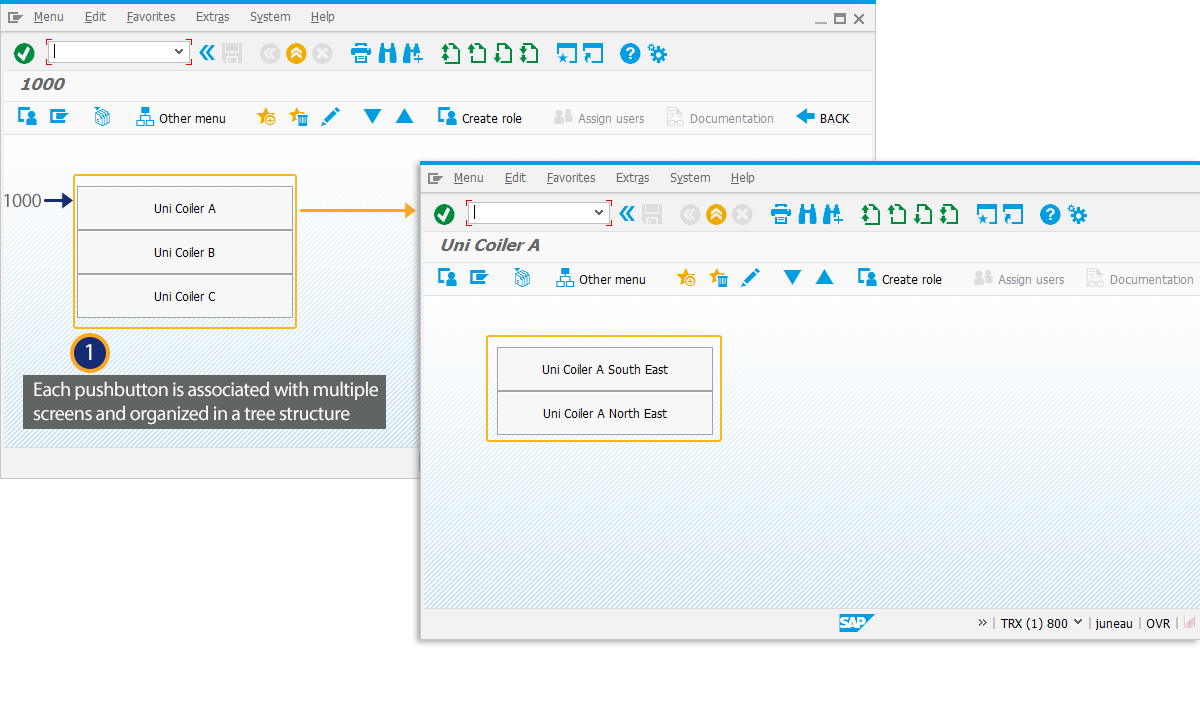
- Clicking on the Uni Coiler A push button on the 1000 screen will navigate you to the respective sub-screen Uni Coiler A, as shown in the image below.
- Accordingly, clicking on the Uni Coiler A South East 1 pushbutton located on the Uni Coiler A sub-screen will navigate you to the respective sub-screen, as shown in the image below.
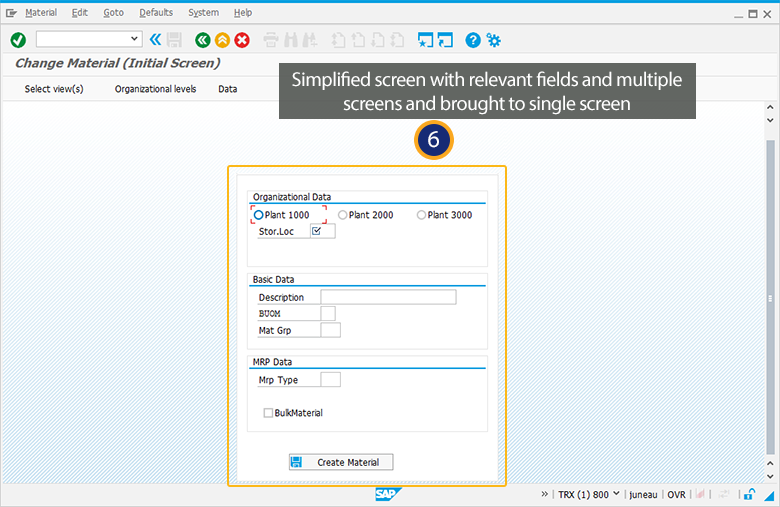
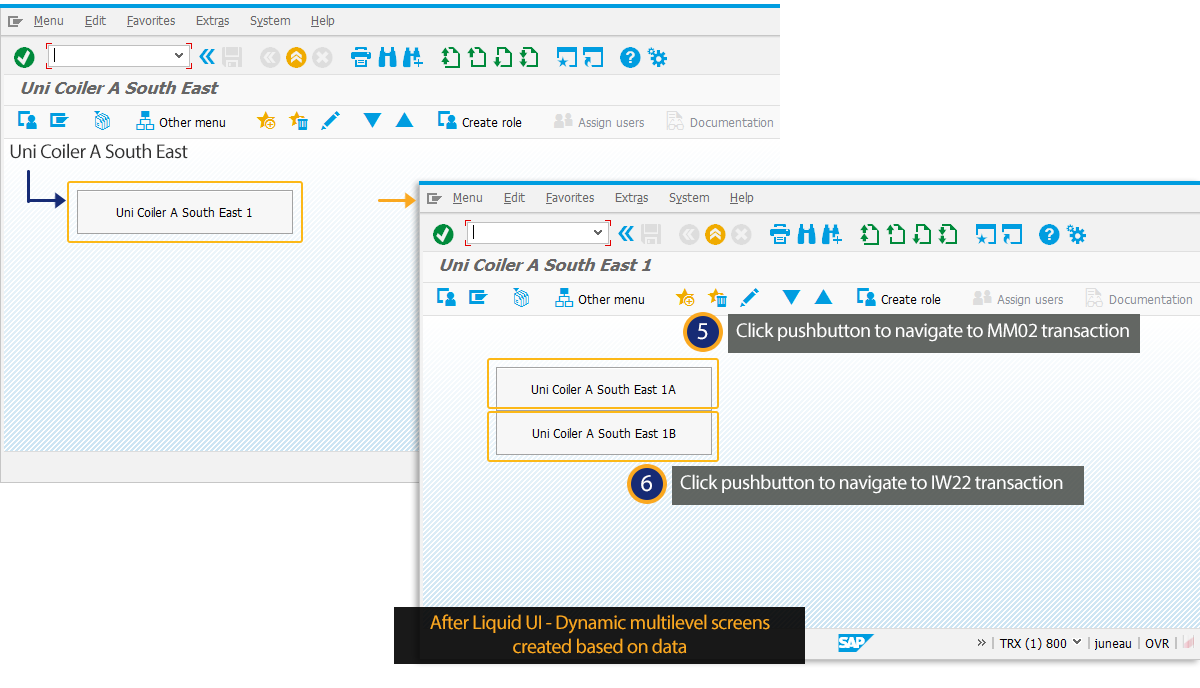 Here, the simplified screen contains the required fields gathered from multiple screens to create a material.
- Clicking on the Uni Coiler A push button on the 1000 screen will navigate you to the respective sub-screen Uni Coiler A, as shown in the image below.
- Likewise, clicking on the second and third push buttons (2000 and 3000) will navigate you to their respective sub-screens, and again clicking on any of the pushbuttons located on their sub-screens will navigate you to their further sub-screens.


