You can customize your Liquid UI for Android according to your requirements using the options available under the navigation drawer, as explained below:
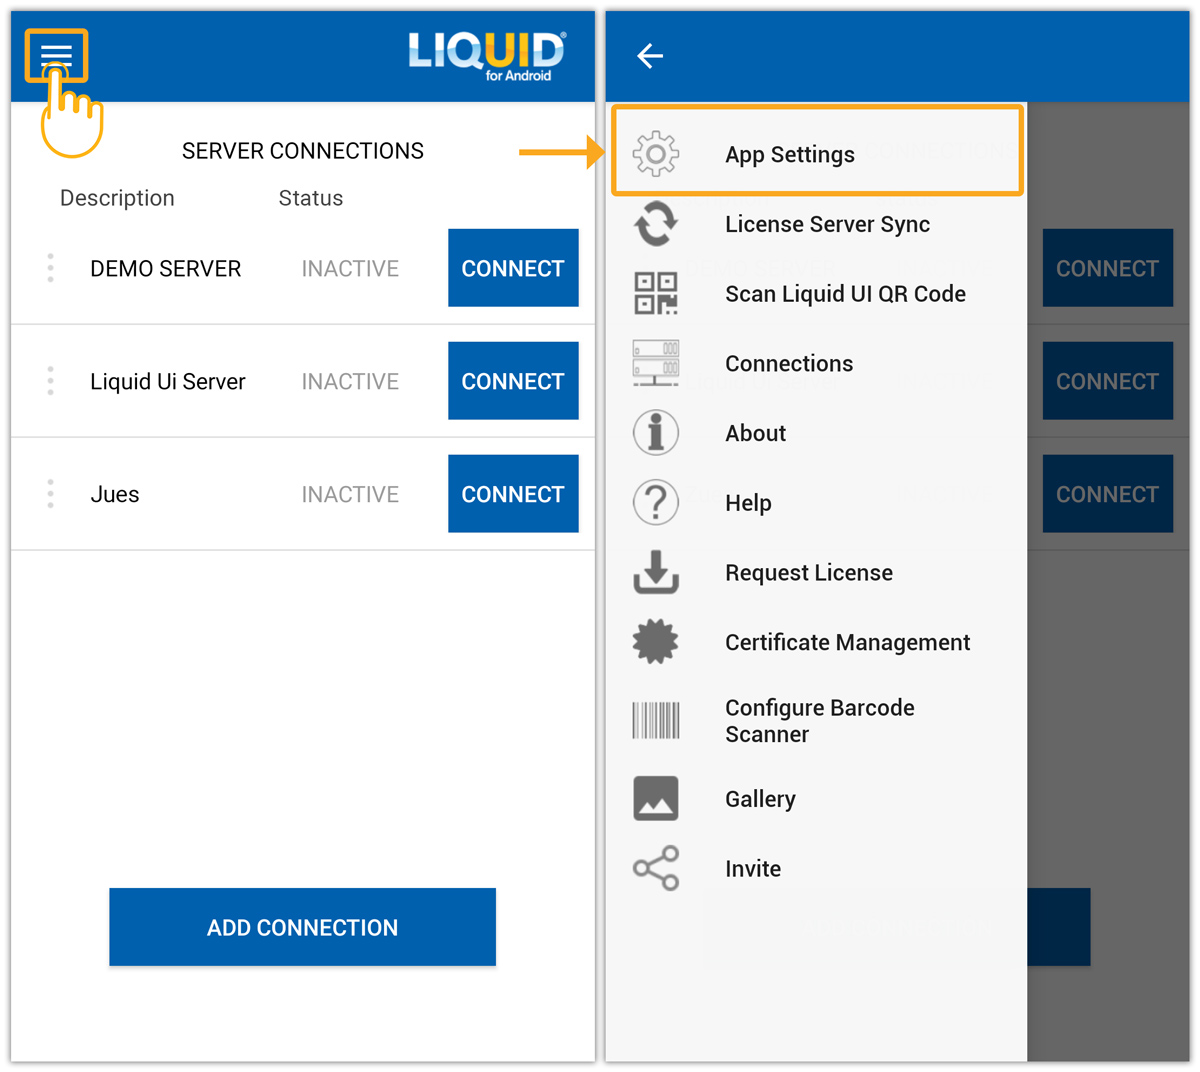
- Open the Liquid UI for Android app tap on the Navigation Drawer, and click App Settings.
- You will be navigated to the Insider screen, which contains the basic application data and settings to customize, as shown below.

- The Insider screen contains two sections - About and SAP SETTINGS, as shown below.
About
The About section contains information about the Liquid UI app and License details, defined as follows.
- Copyright - Contains the copyright information of the Liquid UI for Android.
- Version - Version number of the currently installed Liquid UI Client release.
- Website - Contains the URL for Synactive's website - www.guixt.com.
- Patent - Lists the patent numbers currently held by Synactive Inc.
- Registered To - Lists the name of the registered owner. Only licensed versions will display this information.
- License - Specifies the license type and its expiration date and time. Currently, there are four possible specifications, which are as follows.
- sy9 license
- sy3 license
- In-app license
- Portal (Enterprise) License
- Copyright - Contains the copyright information of the Liquid UI for Android.

Note: To view the enhanced menu options, please add your SAP Server details by clicking CONNECT TO MY SAP.
SAP SETTINGS
This section has settings through which you can modify the application functions.
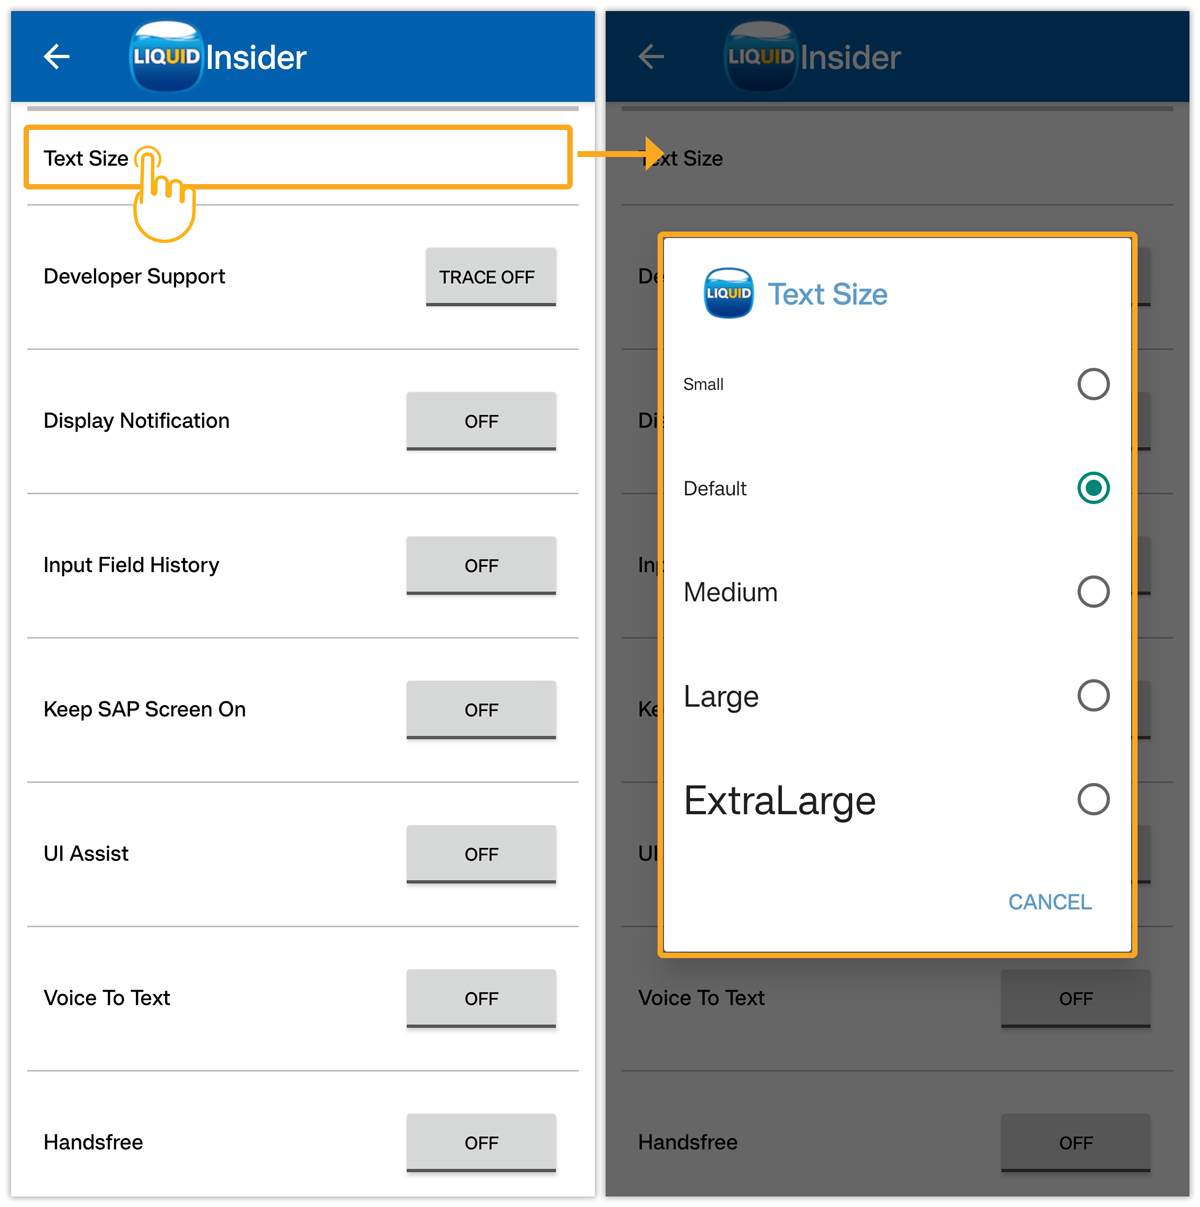
- Text Size
Tap this entry to display a screen with text size options. This is useful for those who need to increase the font size for easy reading, as well as those who are farsighted and require smaller text on the device. Five settings range from small to extra-large. The default size is between small to medium. To select a size, tap its name or the corresponding radio button. Once chosen, the entire text will be converted to the new size.
- Developer Support
This setting allows you to turn on trace logging and email the logs to Synactive. Trace files help you in resolving the issues that occurred while using the Liquid UI app.
- TRACE ON the developer support to save the generated log files. When you TRACE ON next time the Improvement Manager window will appear asking if you want to send the trace files to Synactive.
- Click Yes to send the trace files.
- Click Logging to know more about Developer Support.

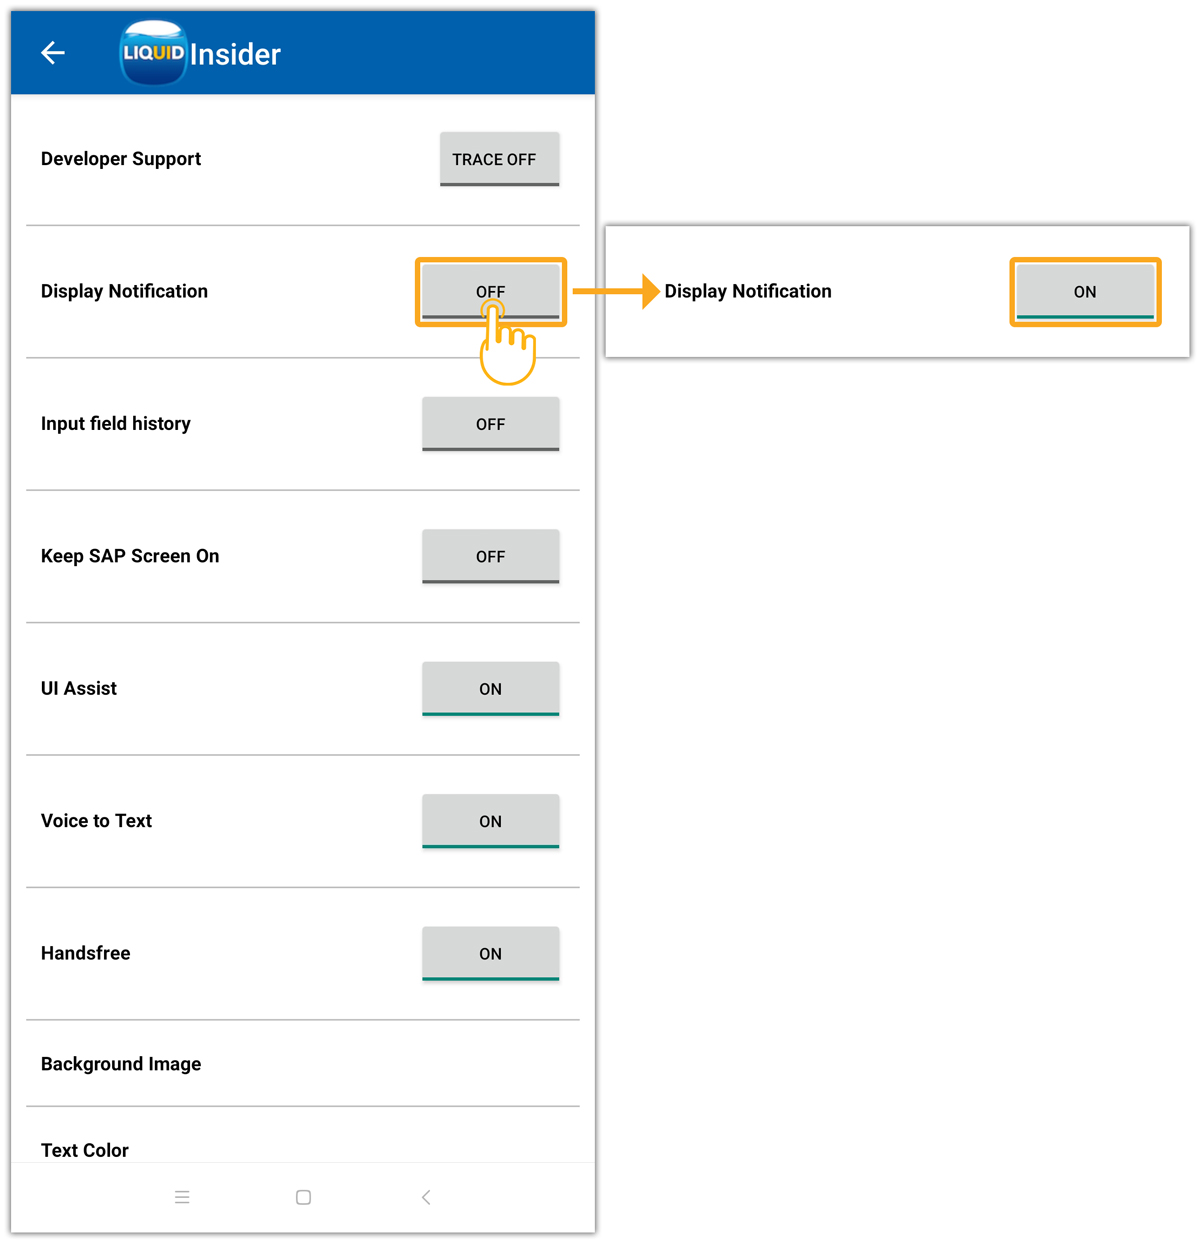
- Display Notification
This option prevents your device screen from locking during inactivity, keeping it alive. This will enable you finish your task where you left off.
Note: If this option is set to Off, the newer versions of Android OS (Lollipop and above) will close the SAP connection when the app is running in the background.
 Click here to learn more about Liquid UI Notifications.
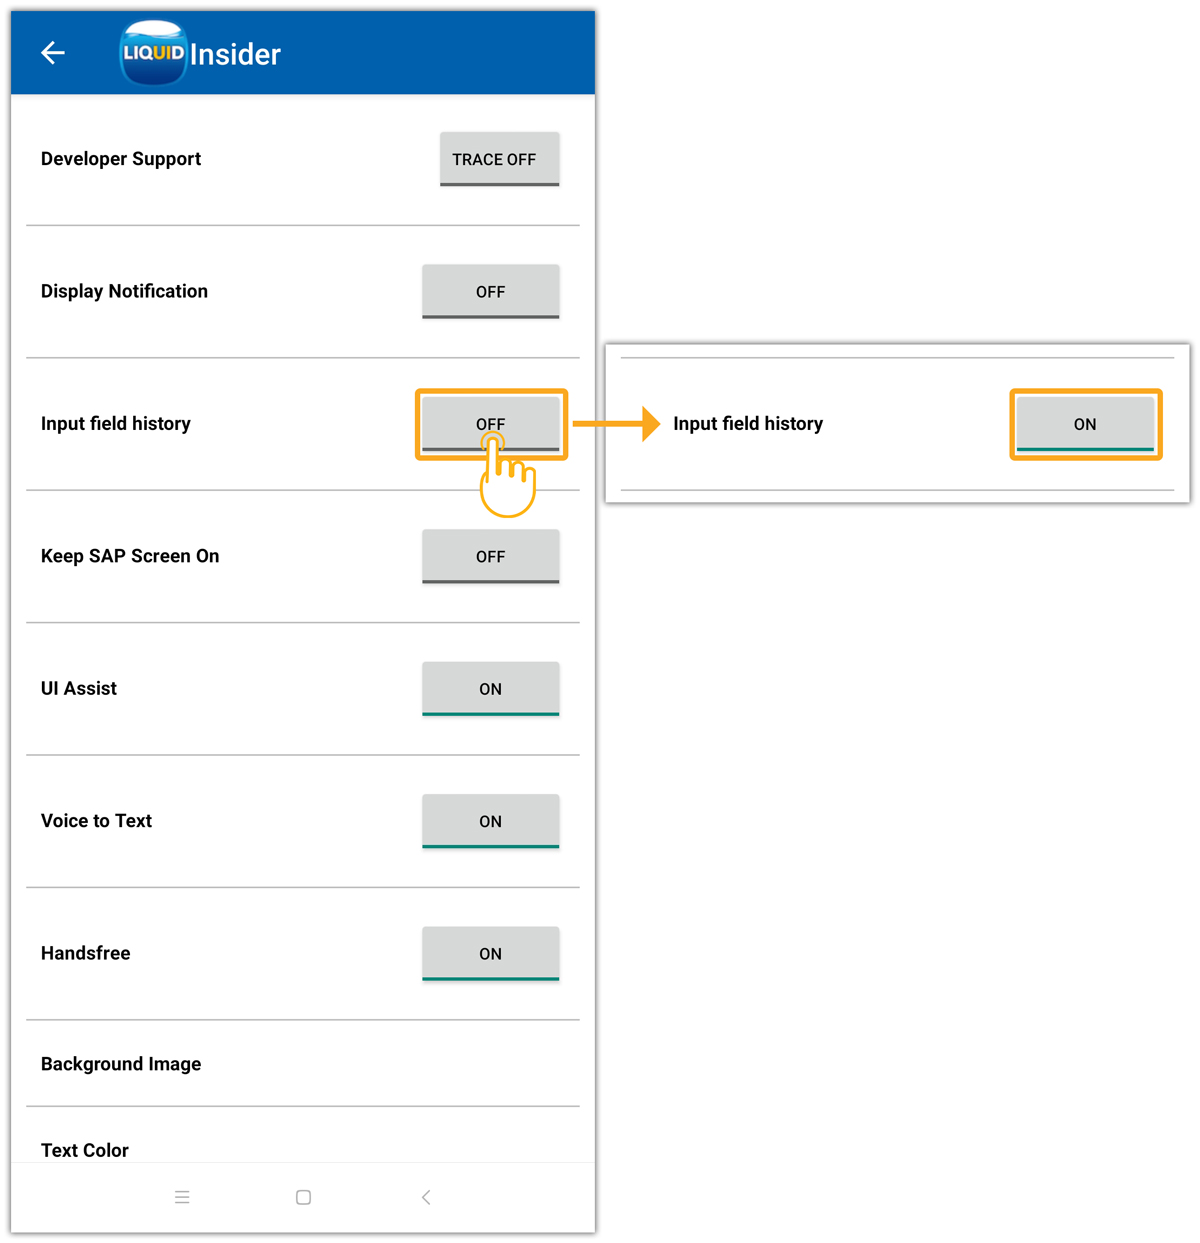
 - Input Field history
This setting allows you to enable a history option for the Input Field to access previously entered information in the Input Fields.
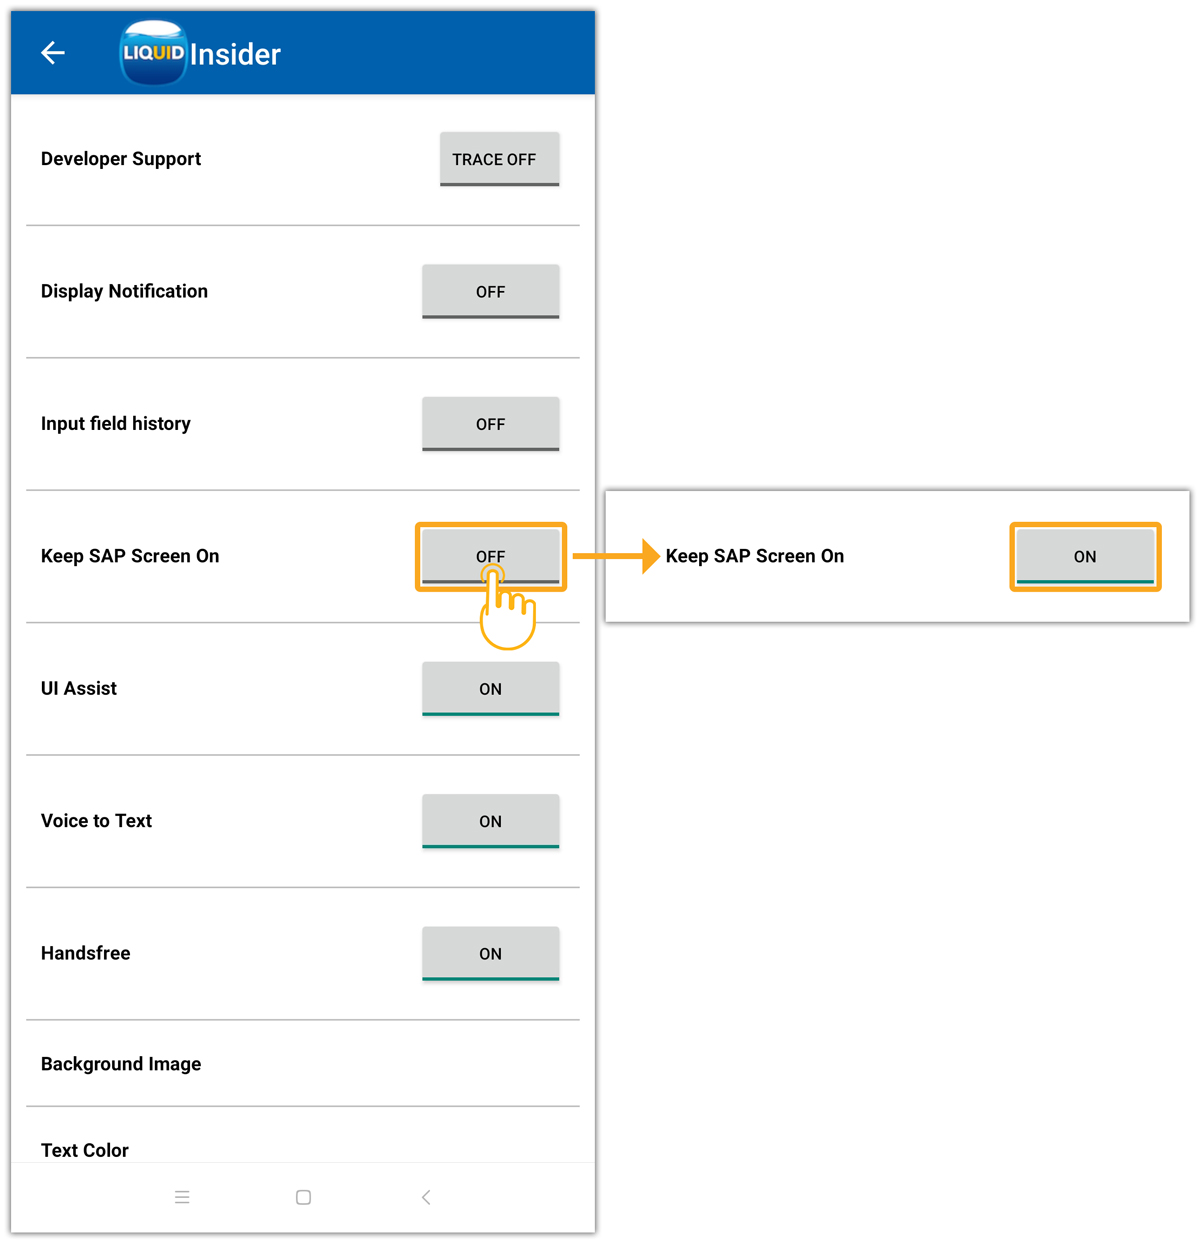
- Keep SAP Screen On
This option will keep your device screen alive and prevent it from getting locked even during inactivity. This is required to keep your SAP server connection alive and retain your work where you have stopped.
Note: If this option is set to Off, the newer versions of Android OS (Lollipop and above) will close the SAP connection during inactivity when the screen is locked or running on a low battery.
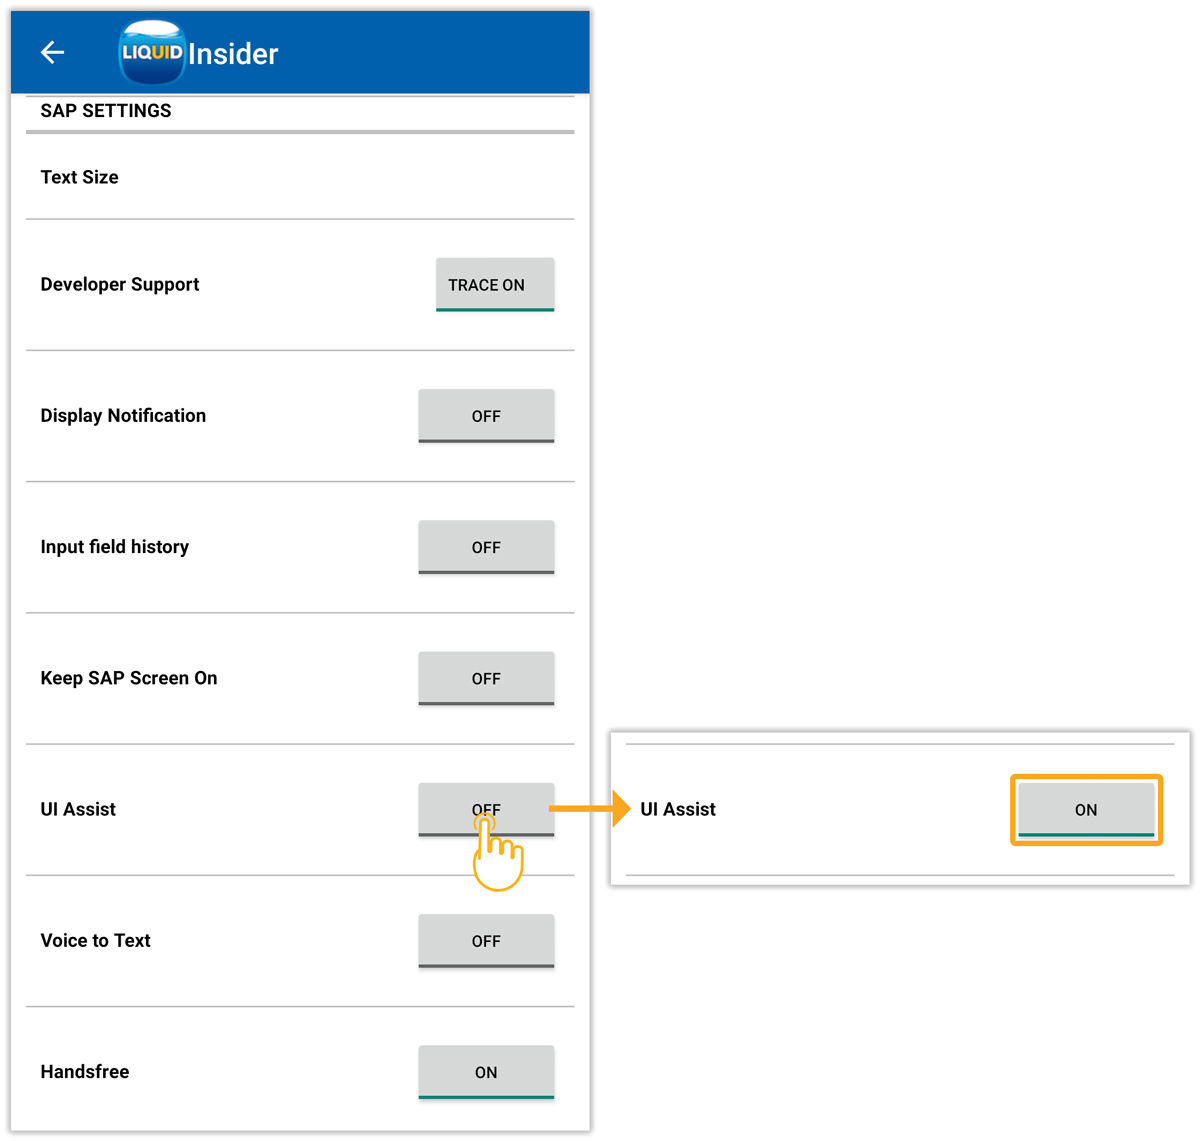
- UI Assist
Enabling this option allows the users to enter the values easily and update them in the tables on SAP screens.
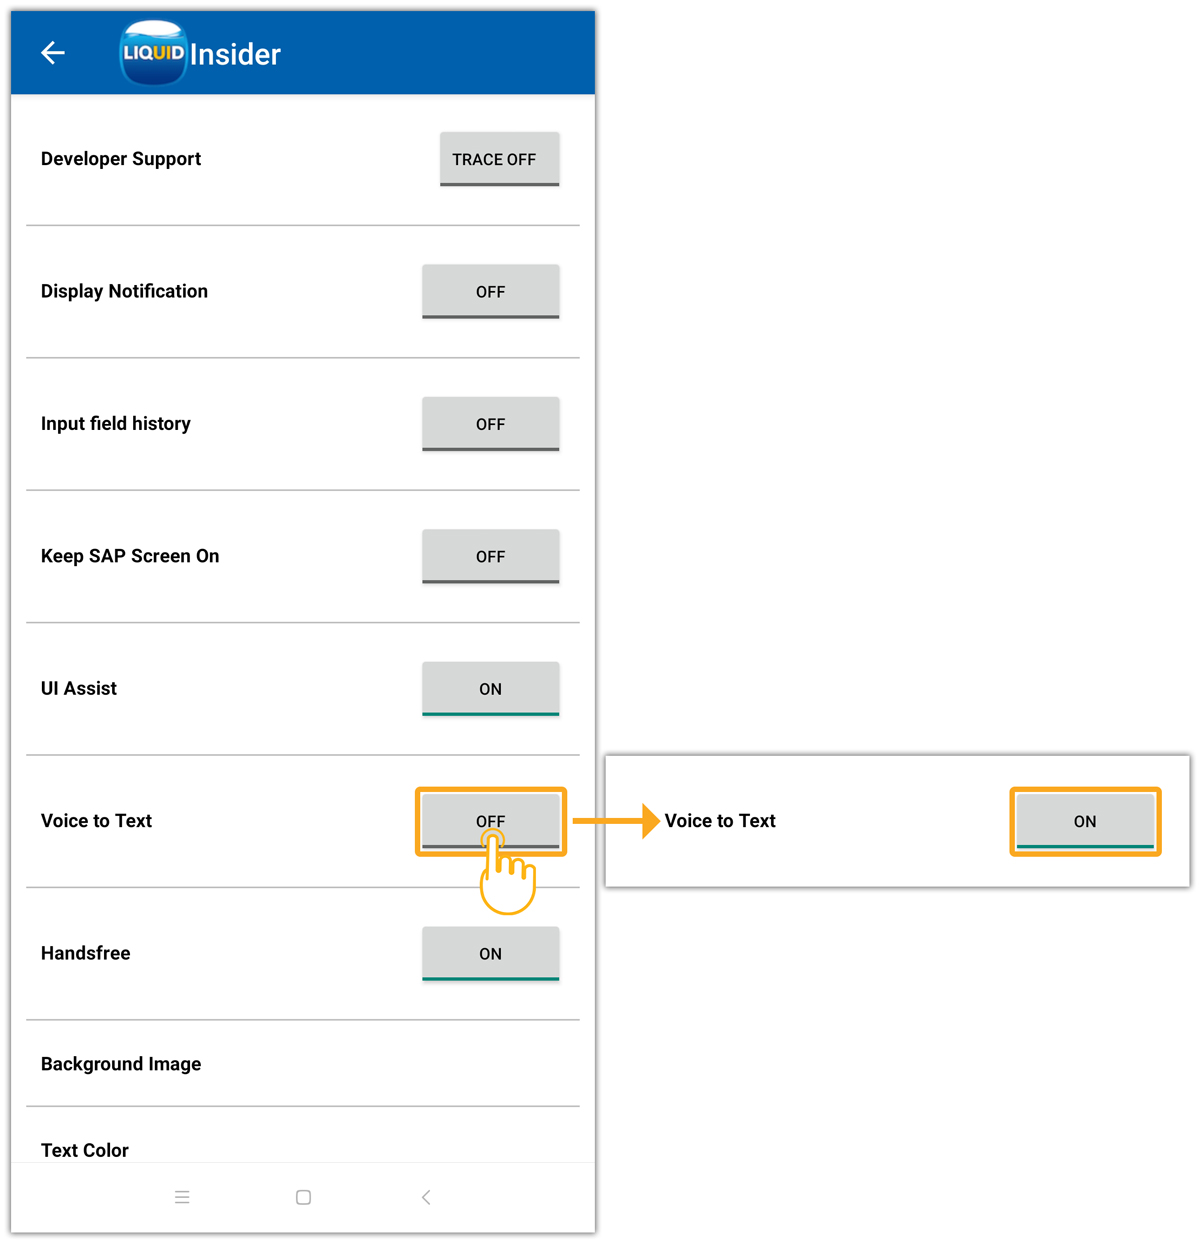
- Voice to Text
This option helps you execute SAP transactions, including data entries, executing commands, run reports, and post transactions through voice commands – resulting in faster execution of tasks.
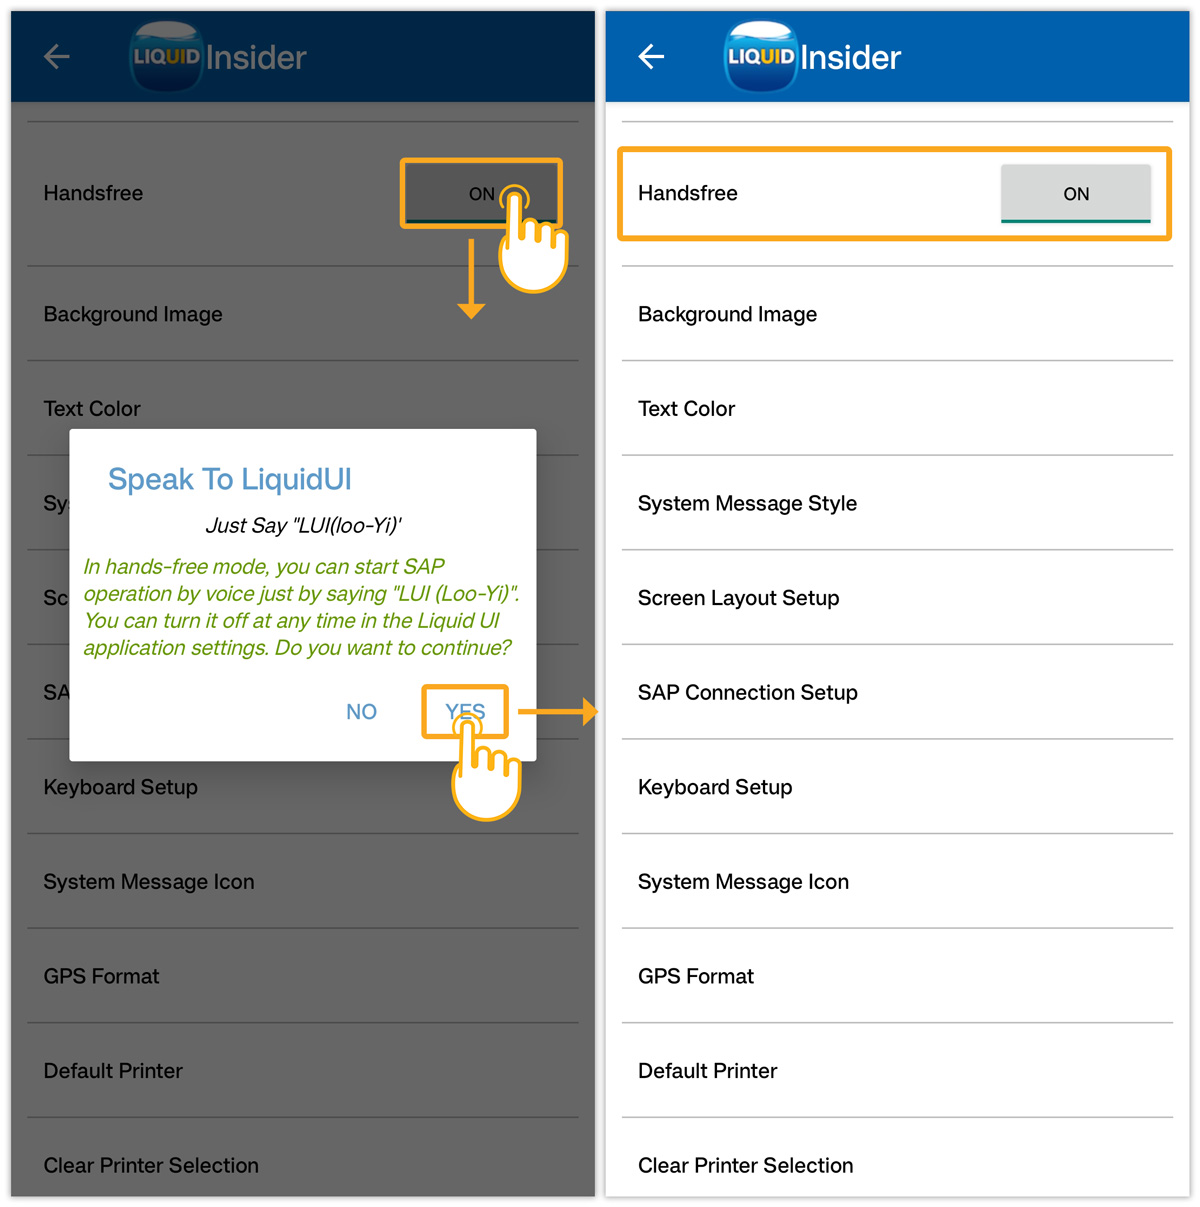
- Handsfree
Enabling this option will help users perform actions through voice commands, ultimately freeing hands and driving efficiencies.
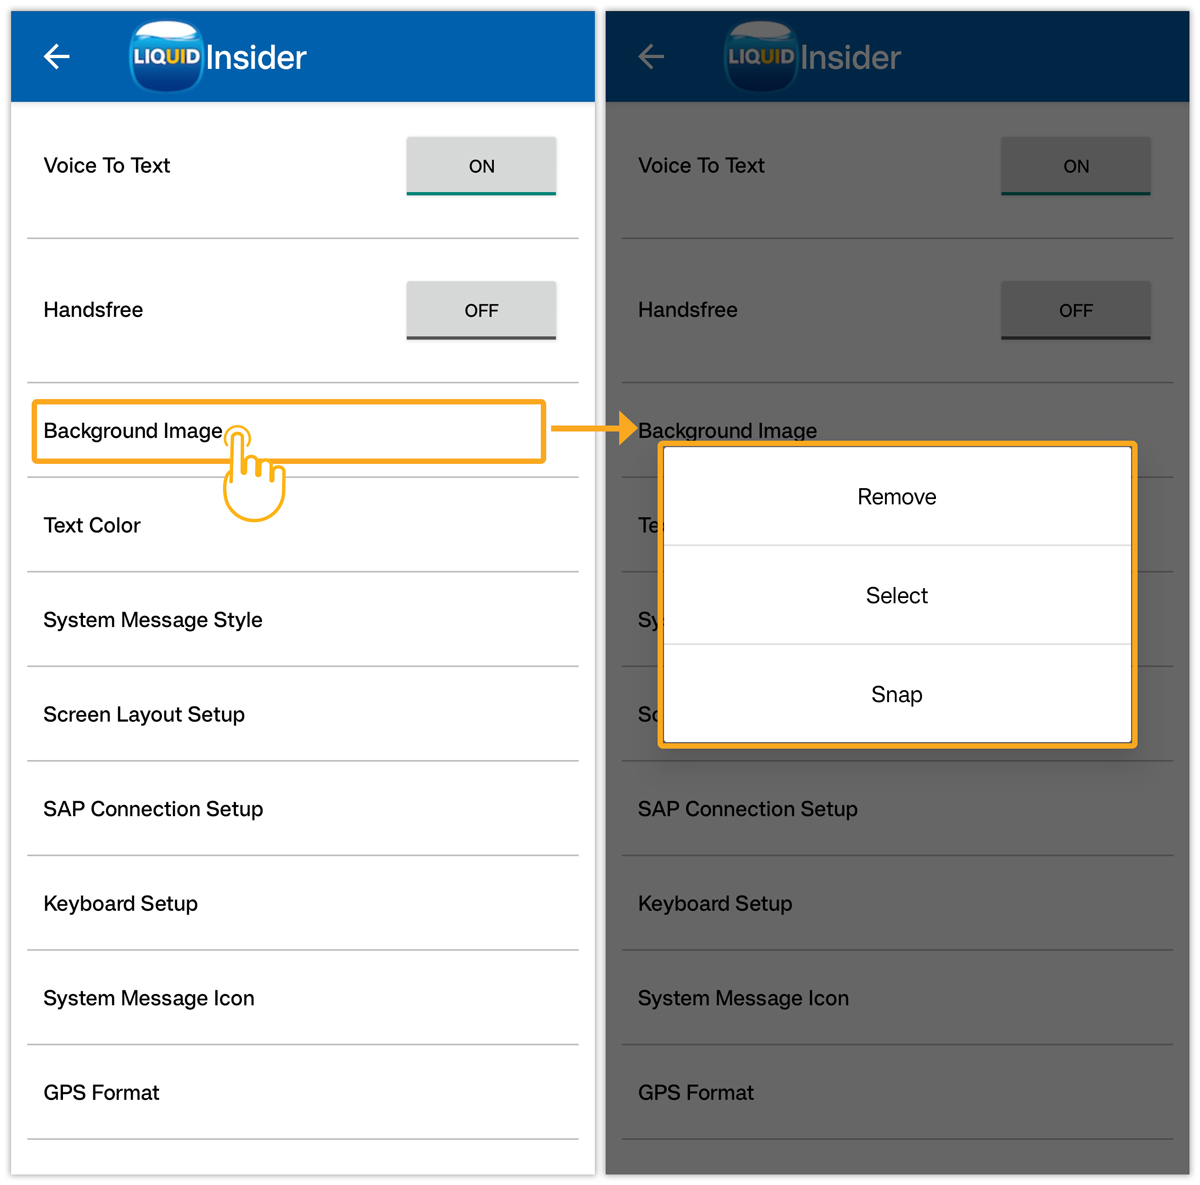
- Background Image
This setting lets you change the custom background image in SAP using three options- Remove, Select, and Snap. The options are explained below.
- Remove: This option lets you remove the background image that is currently set. If no image is currently selected, clicking the Remove option will close the dialog.
- Select: This option lets you choose an image from your device's Image Library to use as the background.
- Snap: This option lets you use the built-in camera to take an image to use as the background.
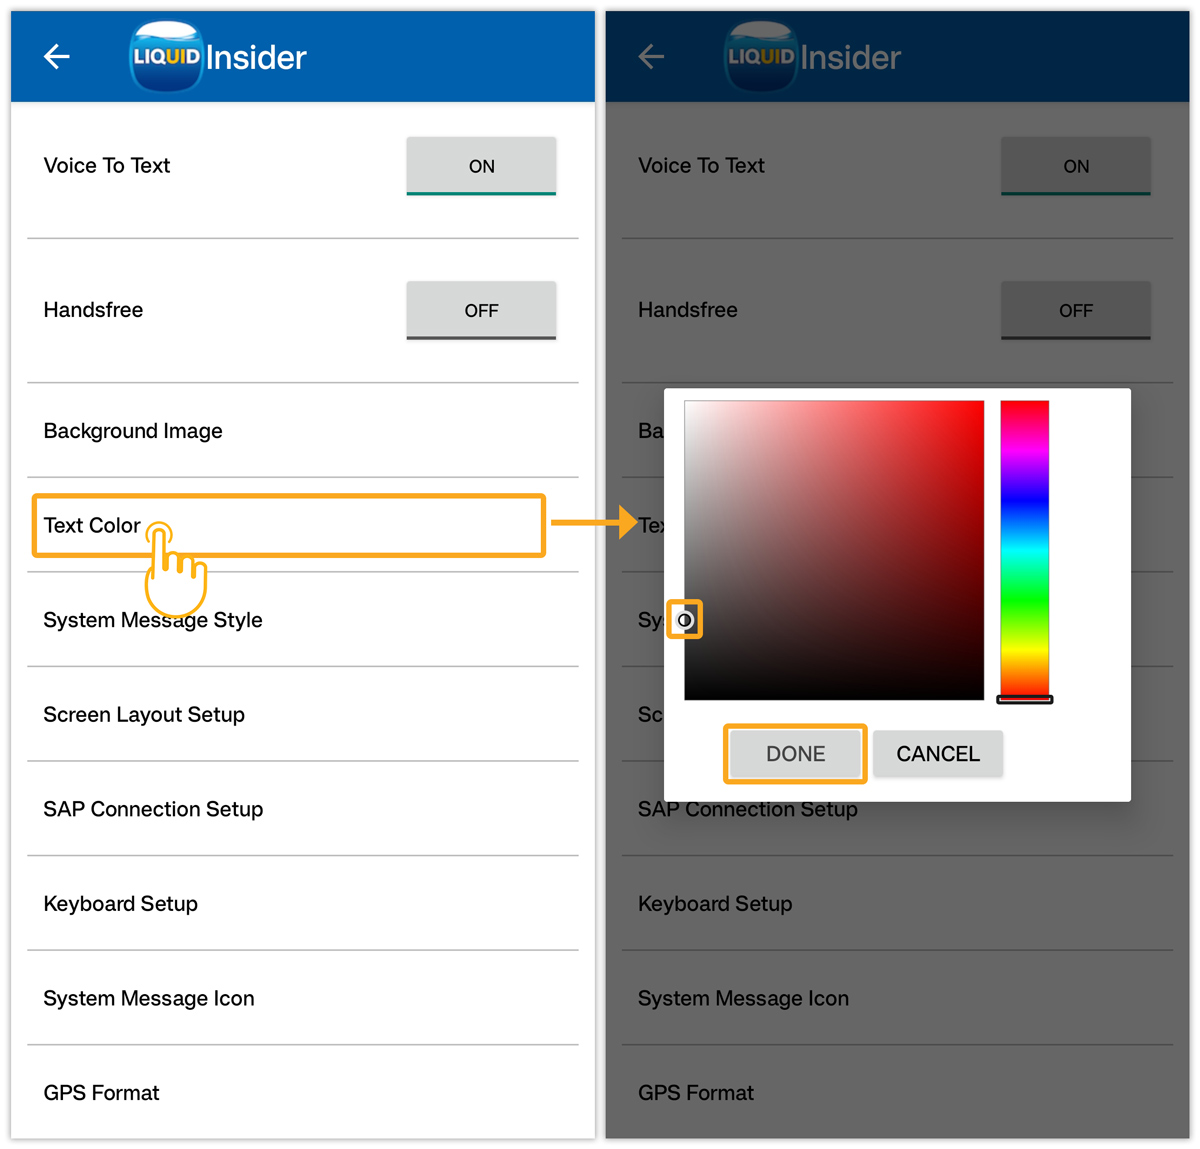
- Text Color
This setting allows you to display a color palette where you can change the color of the onscreen text that appears on the SAP screen. Once you have chosen a color, click the DONE button to close the palette. Then, the text will be displayed in the chosen color.
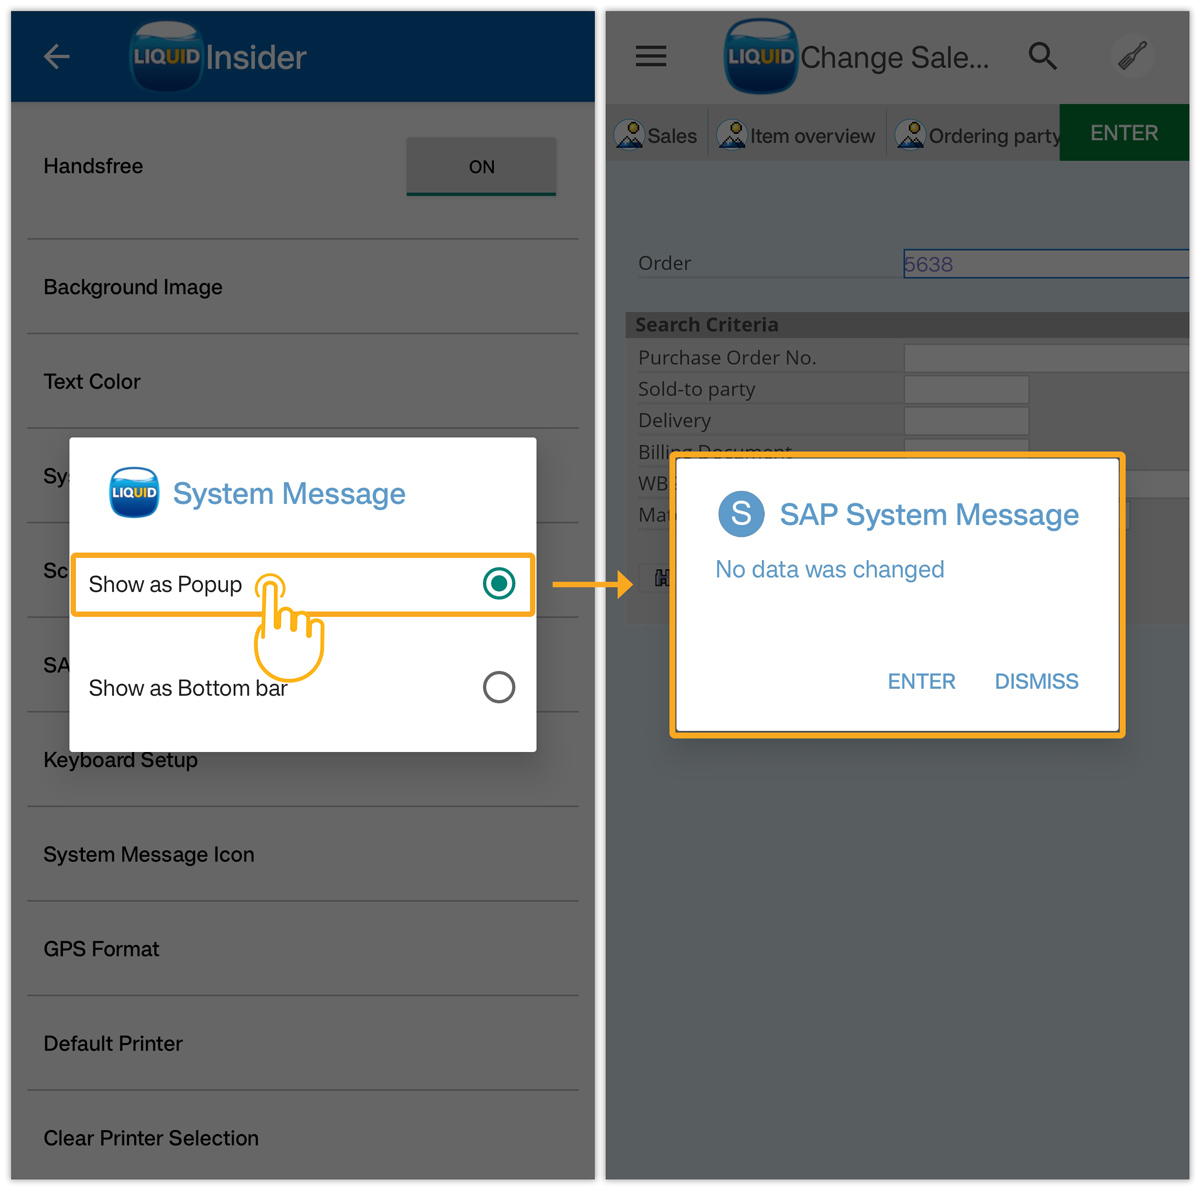
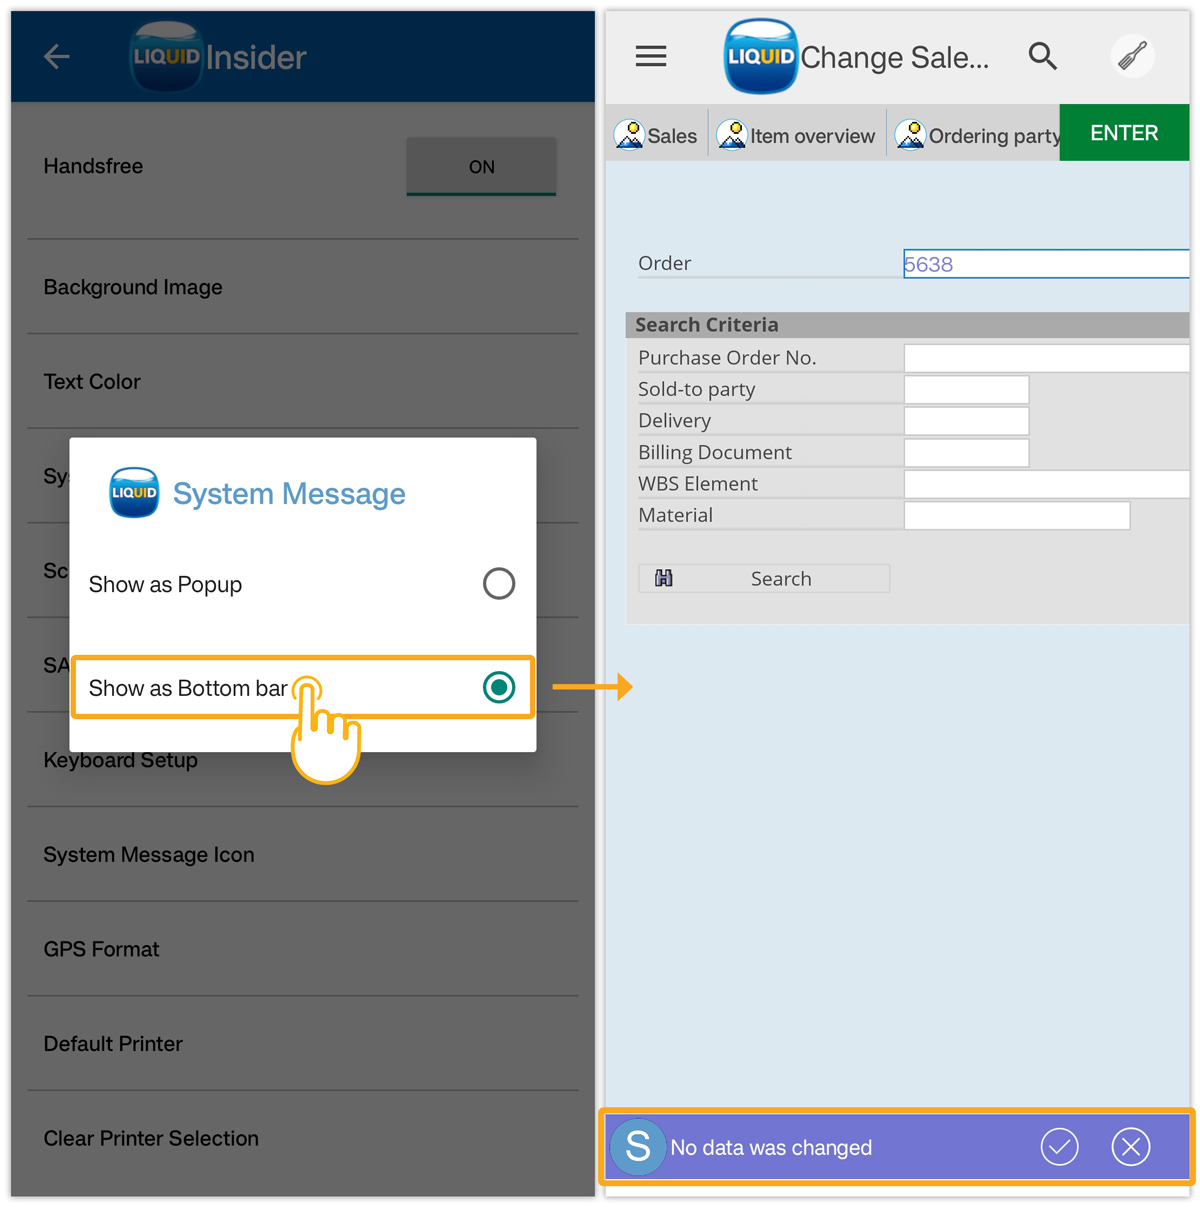
- System Message Style
This setting allows you to choose the style to display SAP system messages such as success, warning, and errors. The option allows you to change the style either to display a message in a popup dialog or the bottom Status bar.
- Click on System Message Style, which displays a popup with two different options, as shown in the image below.
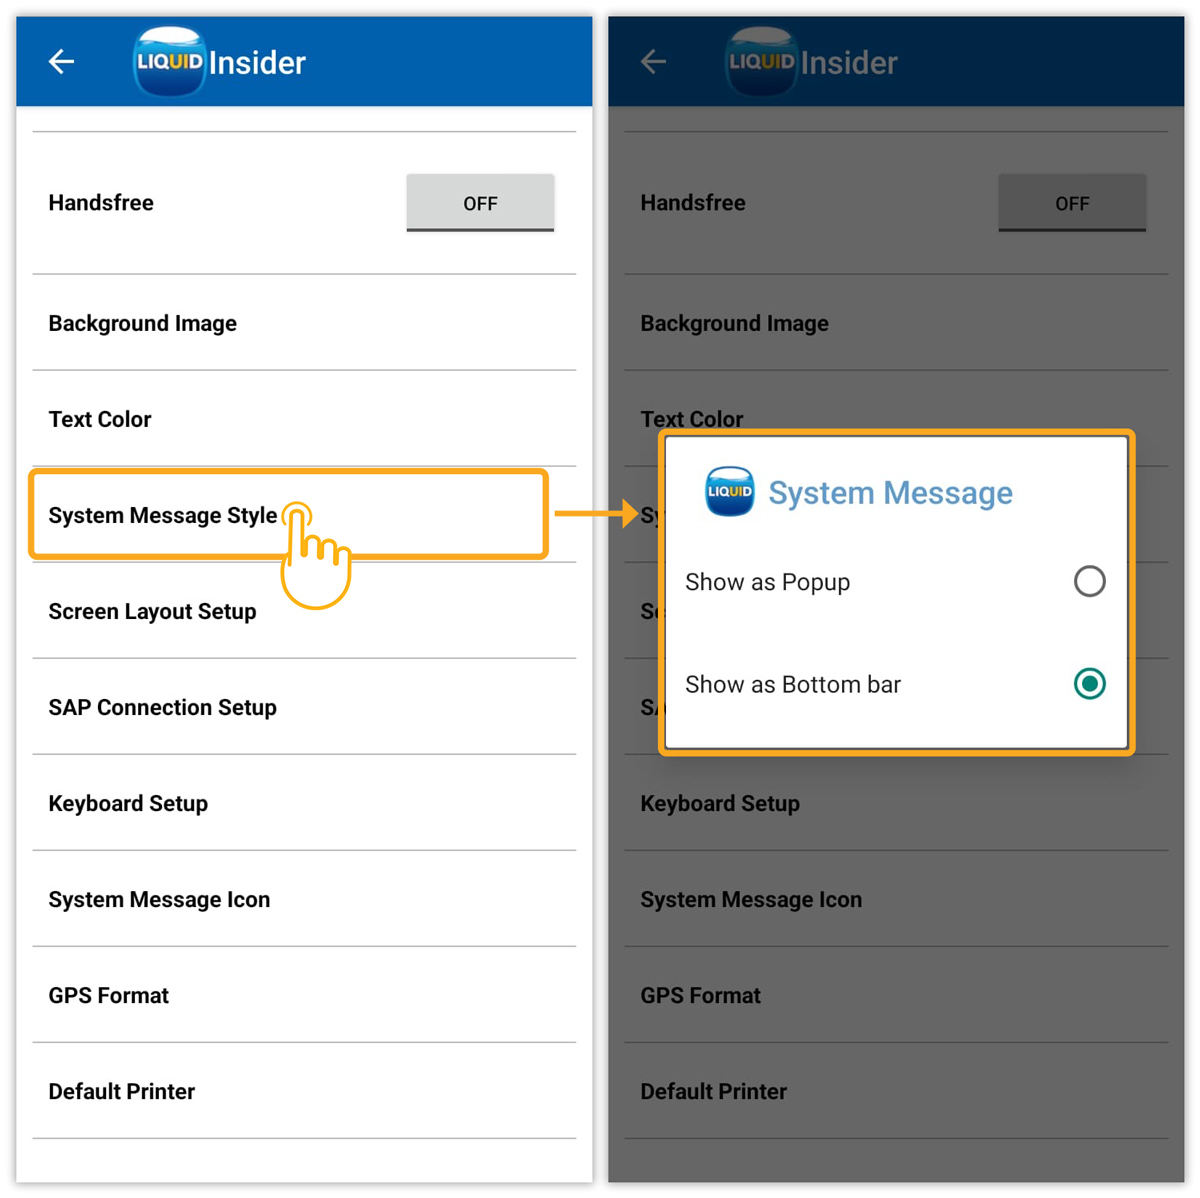
- Select Show as Popup radio button to display the system message on the popup window.
- Select Show as Bottom bar radio button to display the system message in the Status bar.
- Click on System Message Style, which displays a popup with two different options, as shown in the image below.
- Screen Layout Setup
This setting allows you to set up a screen layout in four different ways. After selecting the required layout setup, you will be able to see the change in the SAP screen layout.
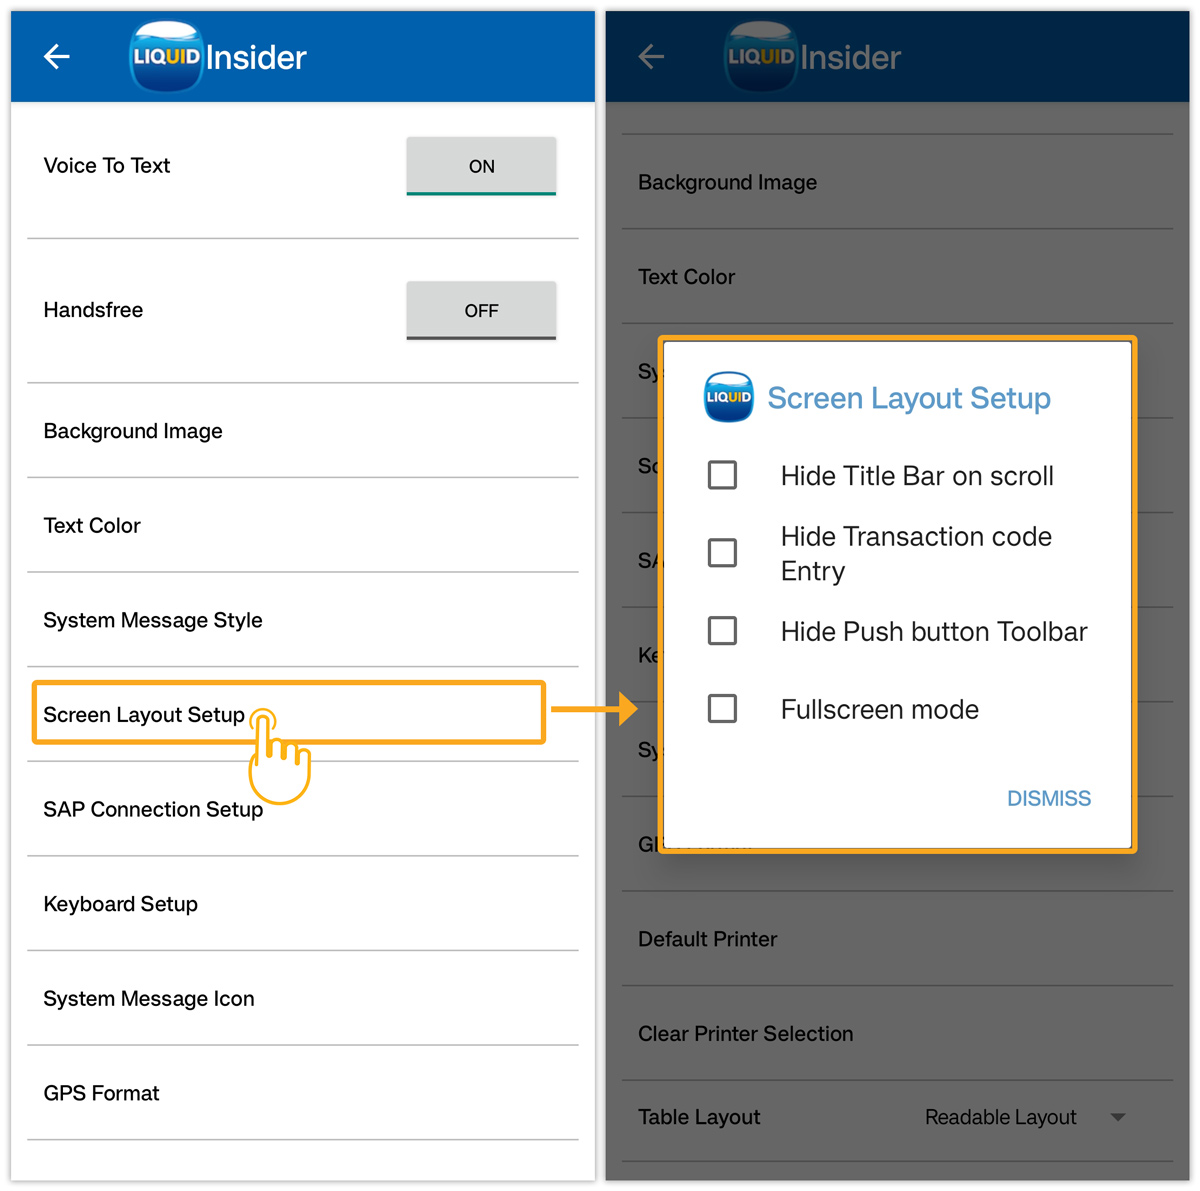 Click here to know more about the Screen Layout Setup.
 - SAP Connection Setup
The Screen Layout Setup allows you to configure the idle session timeout for the TCP connection between the application and the enterprise server. Using this, you can configure the Keep Alive and Keep Alive TimeOut intervals for newly created SAP connections without affecting existing connections.
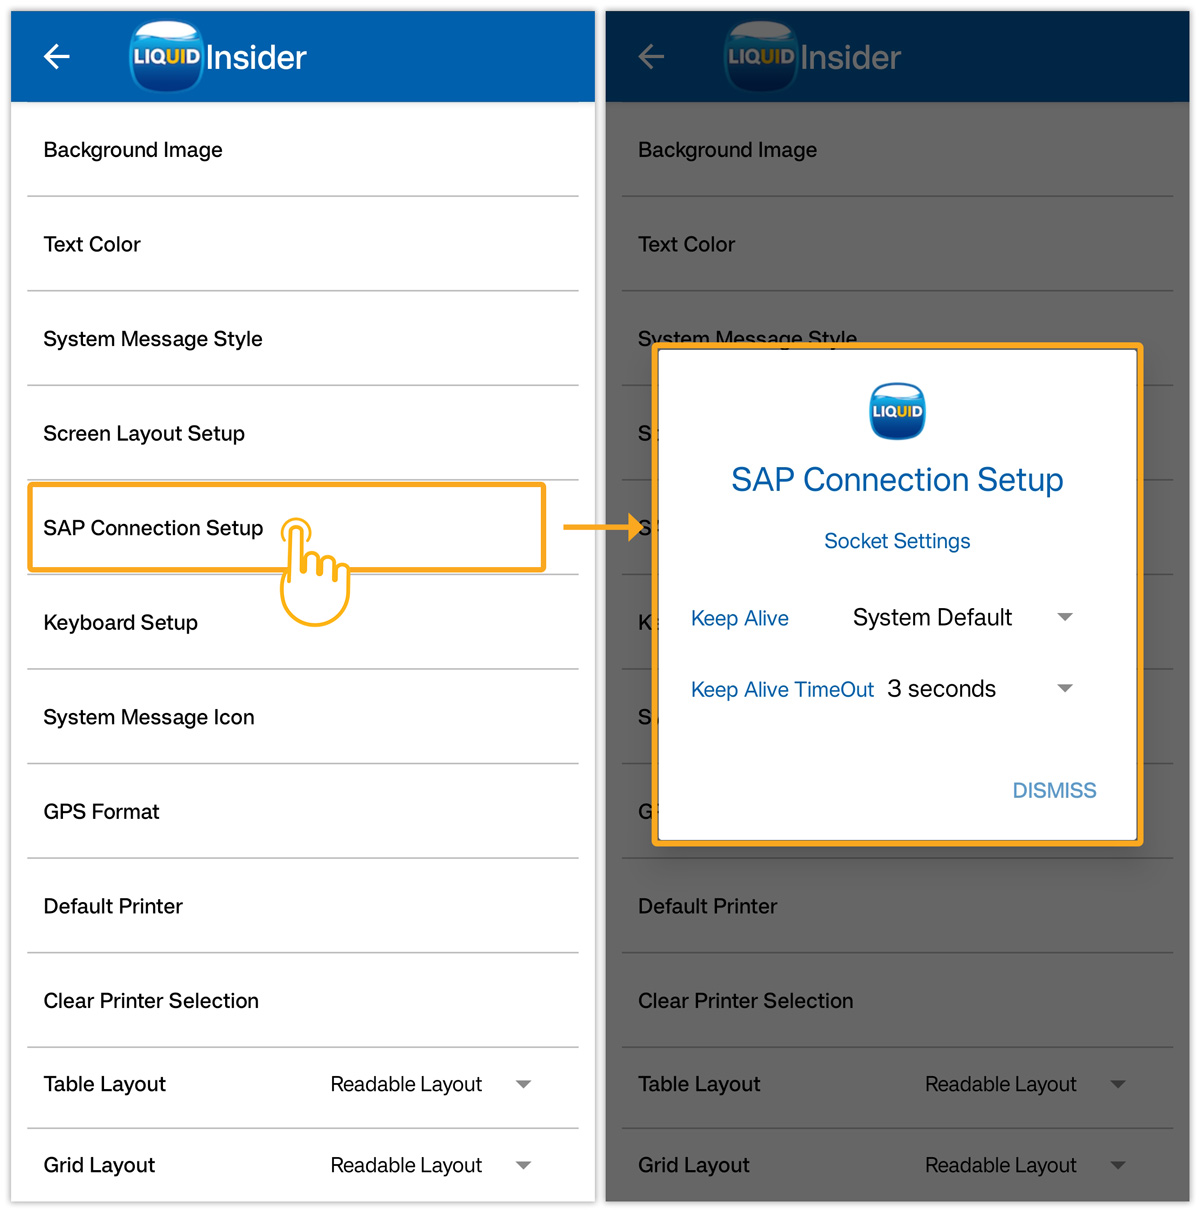 Click here to know more about the SAP Connection Setup.
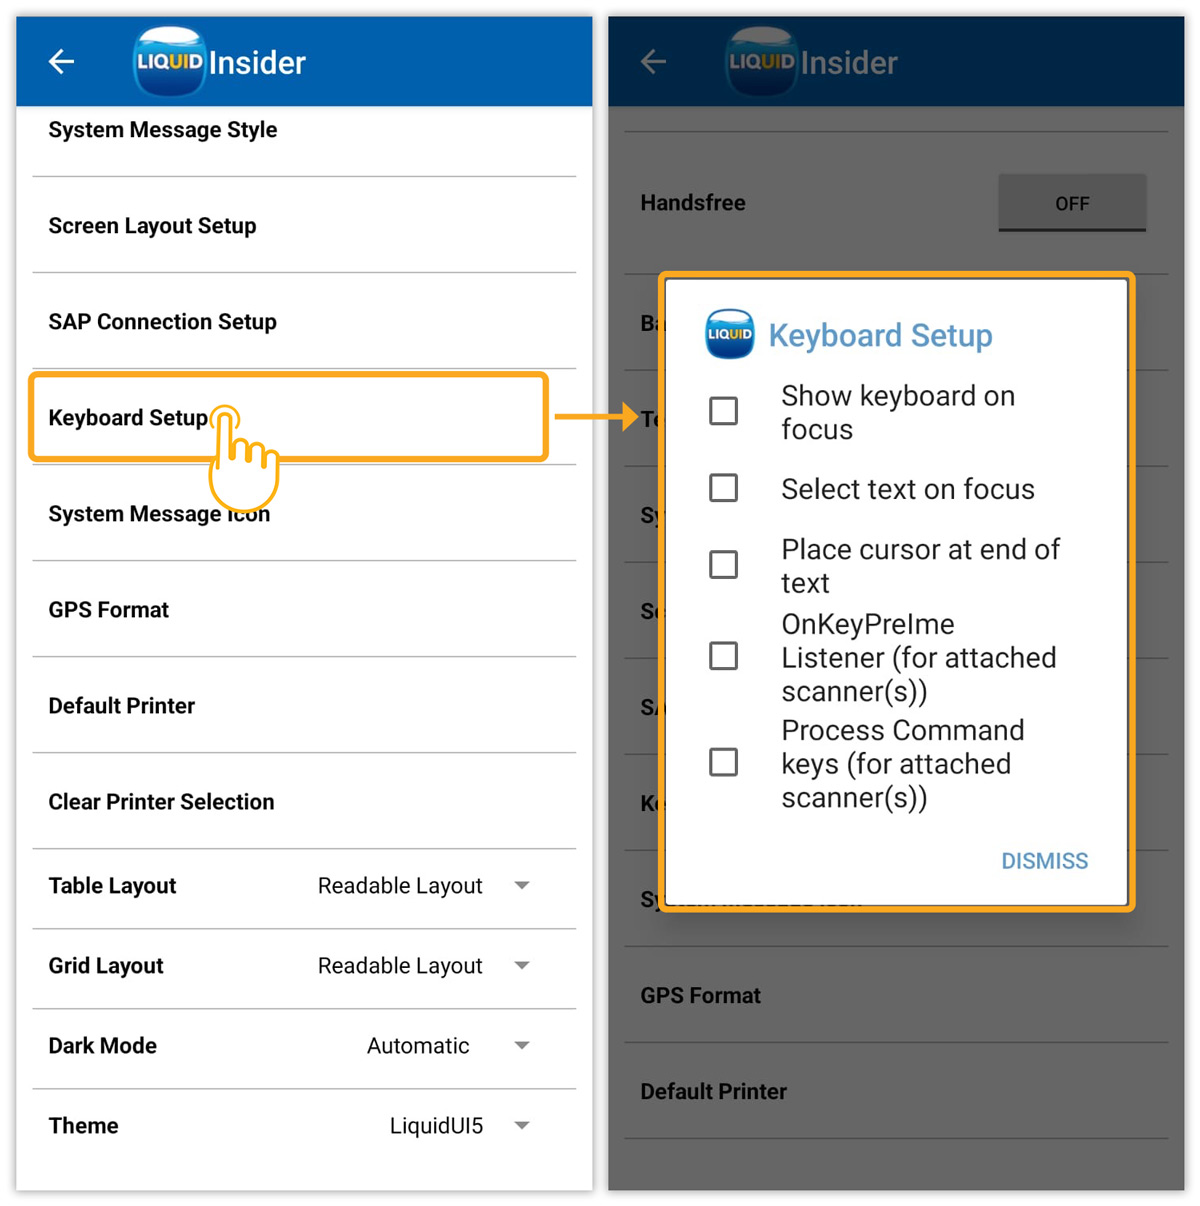
 - Keyboard Setup
Using the Keyboard Setup, you can access menus, and Input Fields on the screen, navigate within control elements, and perform various other tasks. The available options are defined as follows:
- Show keyboard on focus: This option enables the keyboard to focus.
- Select text on focus: Enable this option to show the text on focus.
- Place cursor at end of text: Enabling this option will place the cursor at the end of the text.
- OnkeyPrelme Listener (for attached scanner(s)): Enable this option to scan the devices with inbuilt scanners.
- Process Command keys (for attached scanner(s)): Enabling this option will scan the devices using the keyboard commands.
 Click here to know more about the Keyboard Setup.
 - System Message Icon
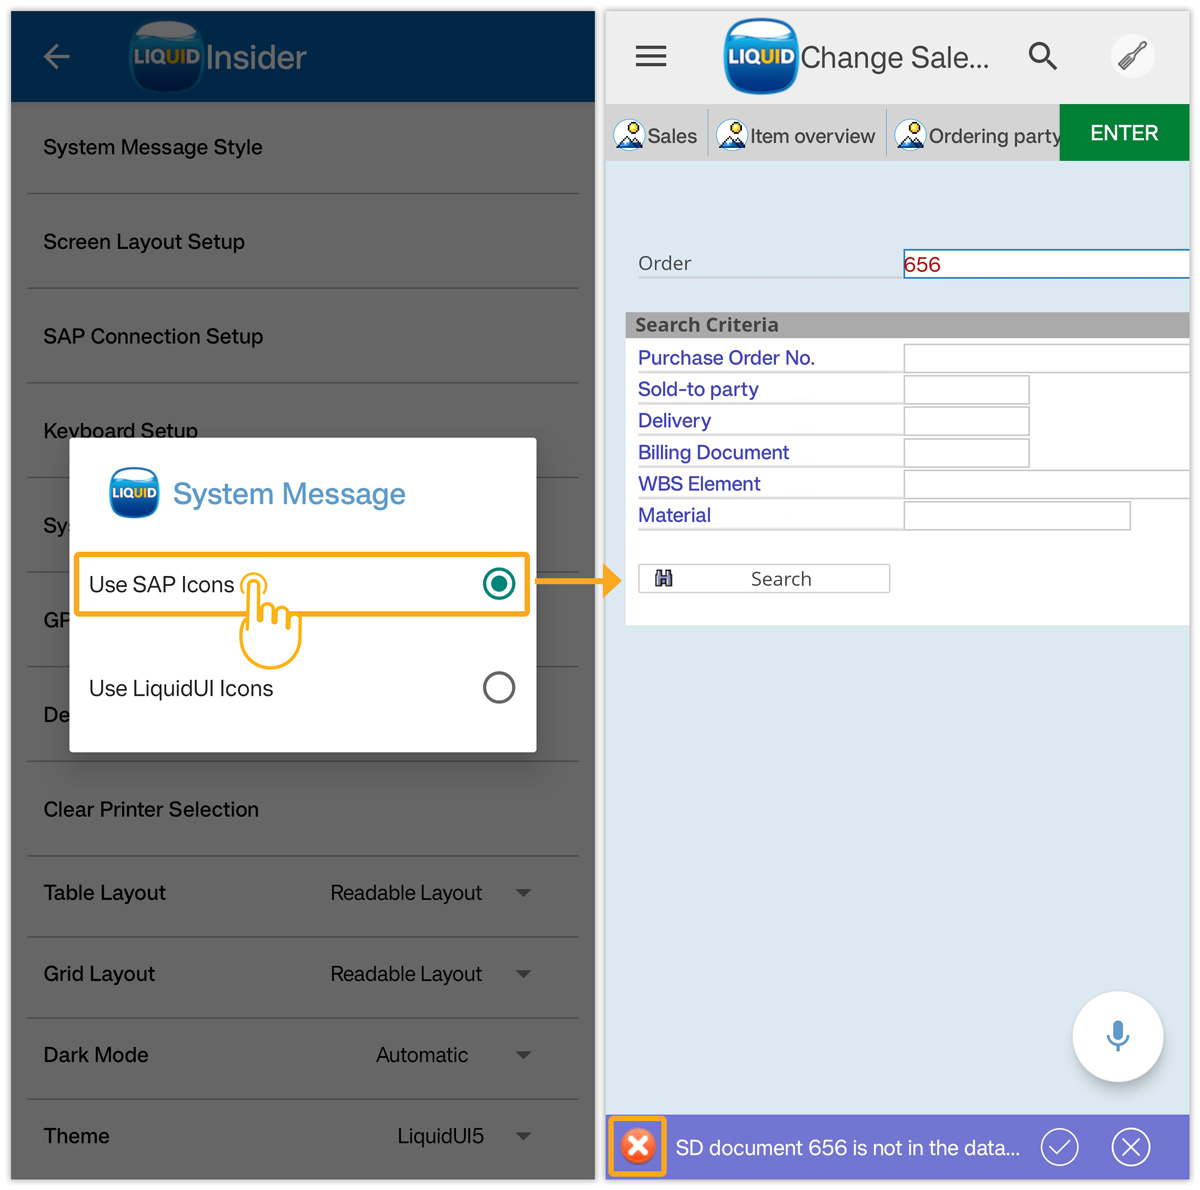
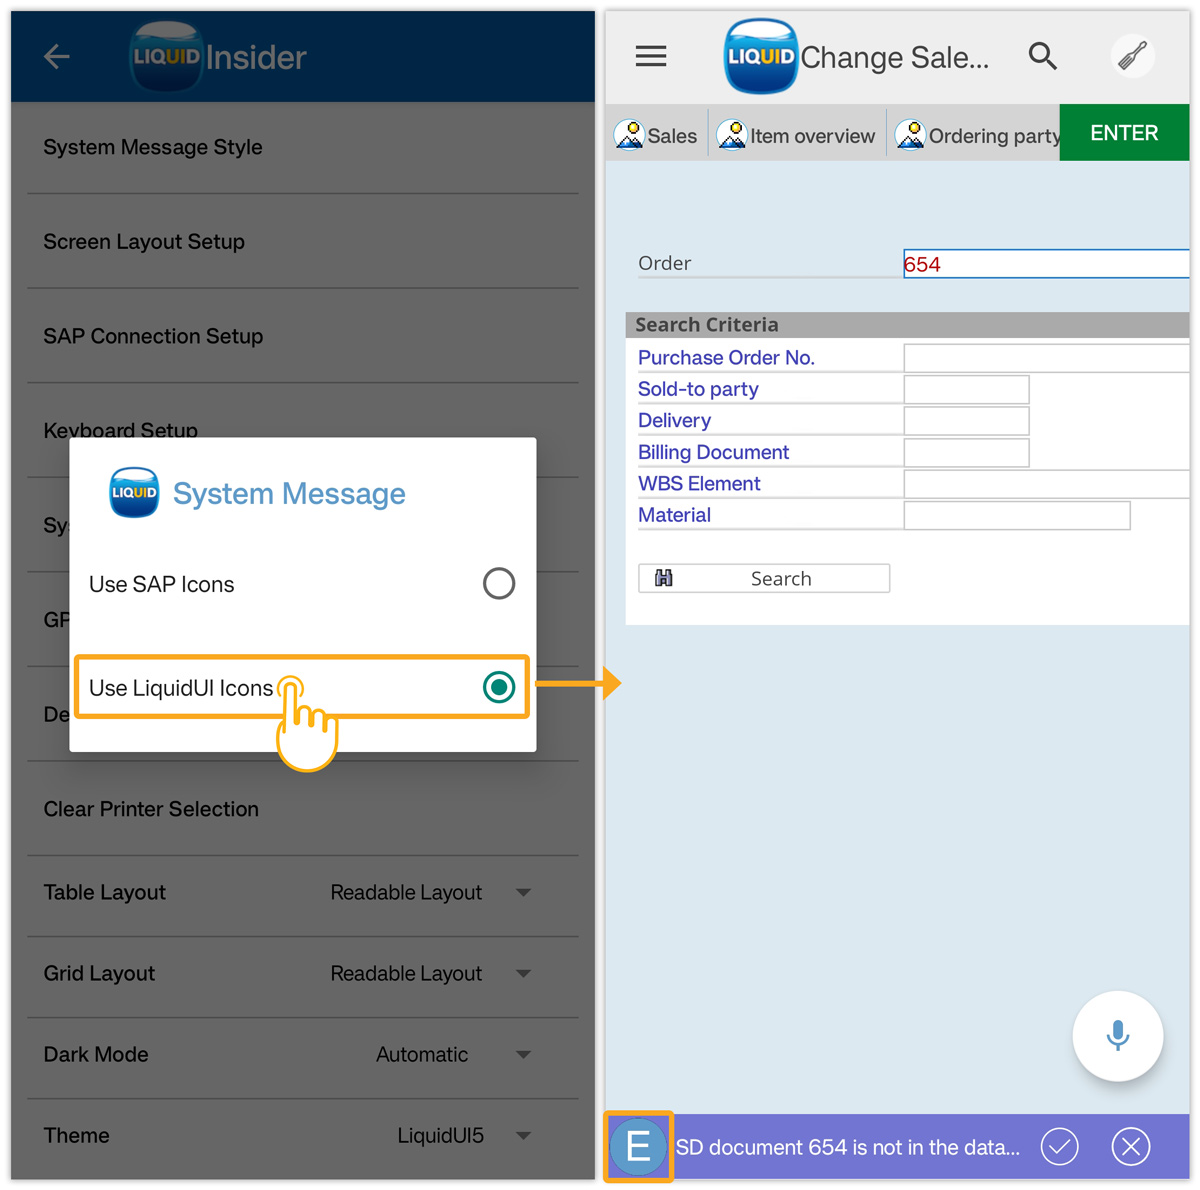
This option lets you select either SAP icons or Liquid UI icons to be displayed with the system message. You can see different icons displayed for various types of messages indicating either success, warning, or error.
- Select the Use SAP Icons radio button to display SAP icons before the system message.
- Select the Use LiquidUI Icons radio button to display Liquid UI icons before the system message.
- Select the Use SAP Icons radio button to display SAP icons before the system message.
- GPS Format
This setting eliminates manual data entries by populating the latitude and longitude values of the location. It enables the users to populate geographical coordinates on any SAP Input Field with a long press.
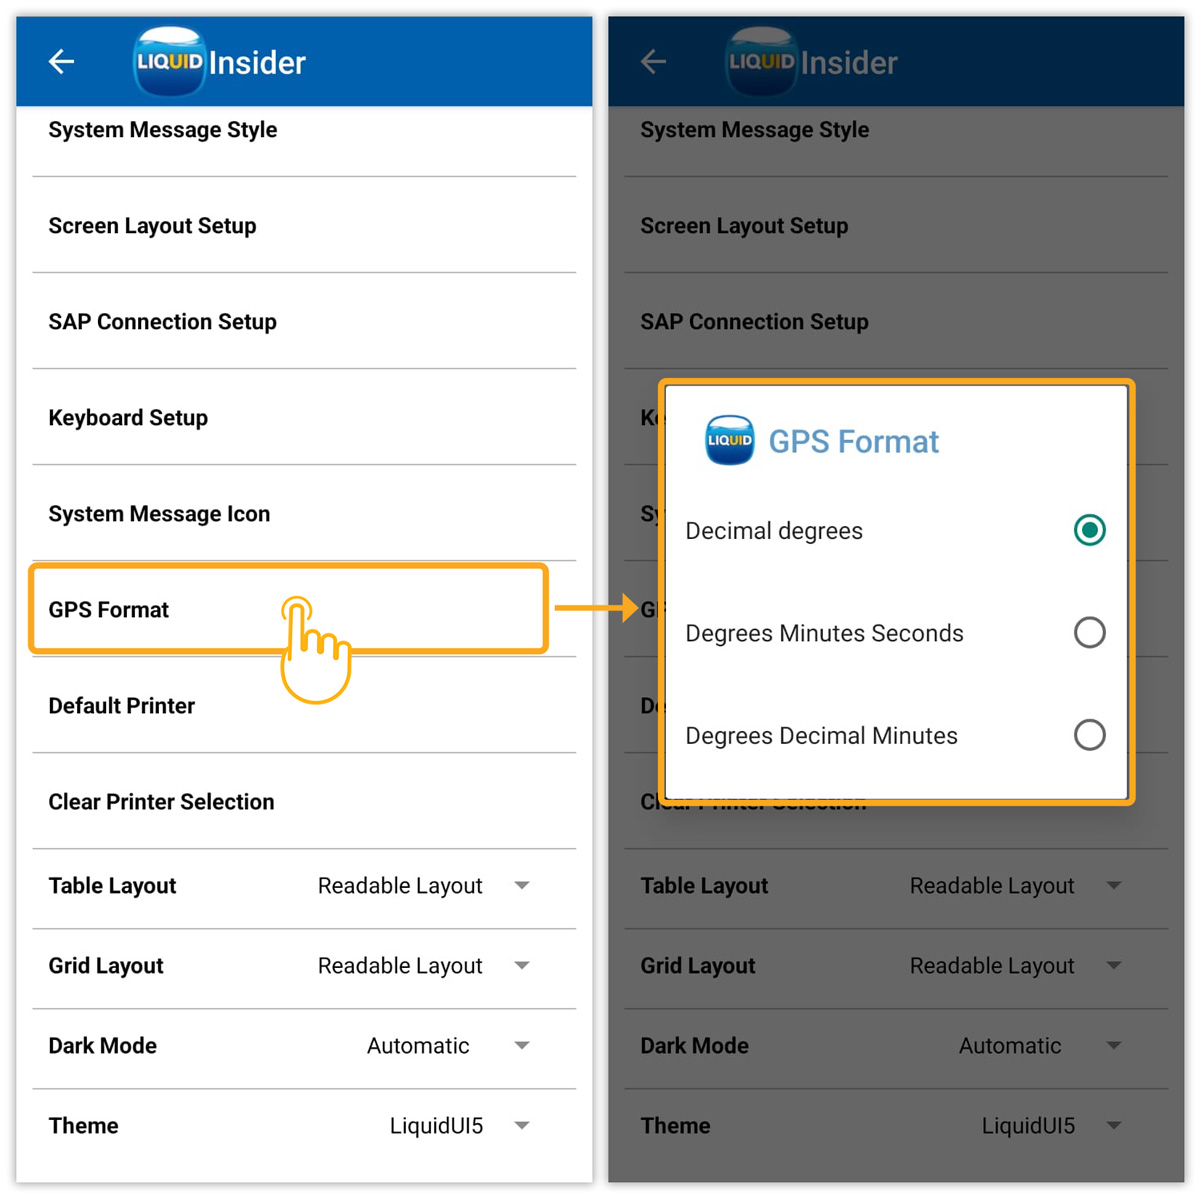 Click here to learn more about the GPS Format.
 - Default Printer
This option allows you to choose a Bluetooth printer. You can set any desired printer as the default printer to print SAP transaction pages using the Liquid UI app on your Android device.
Note: Bluetooth needs to be enabled for this to work.
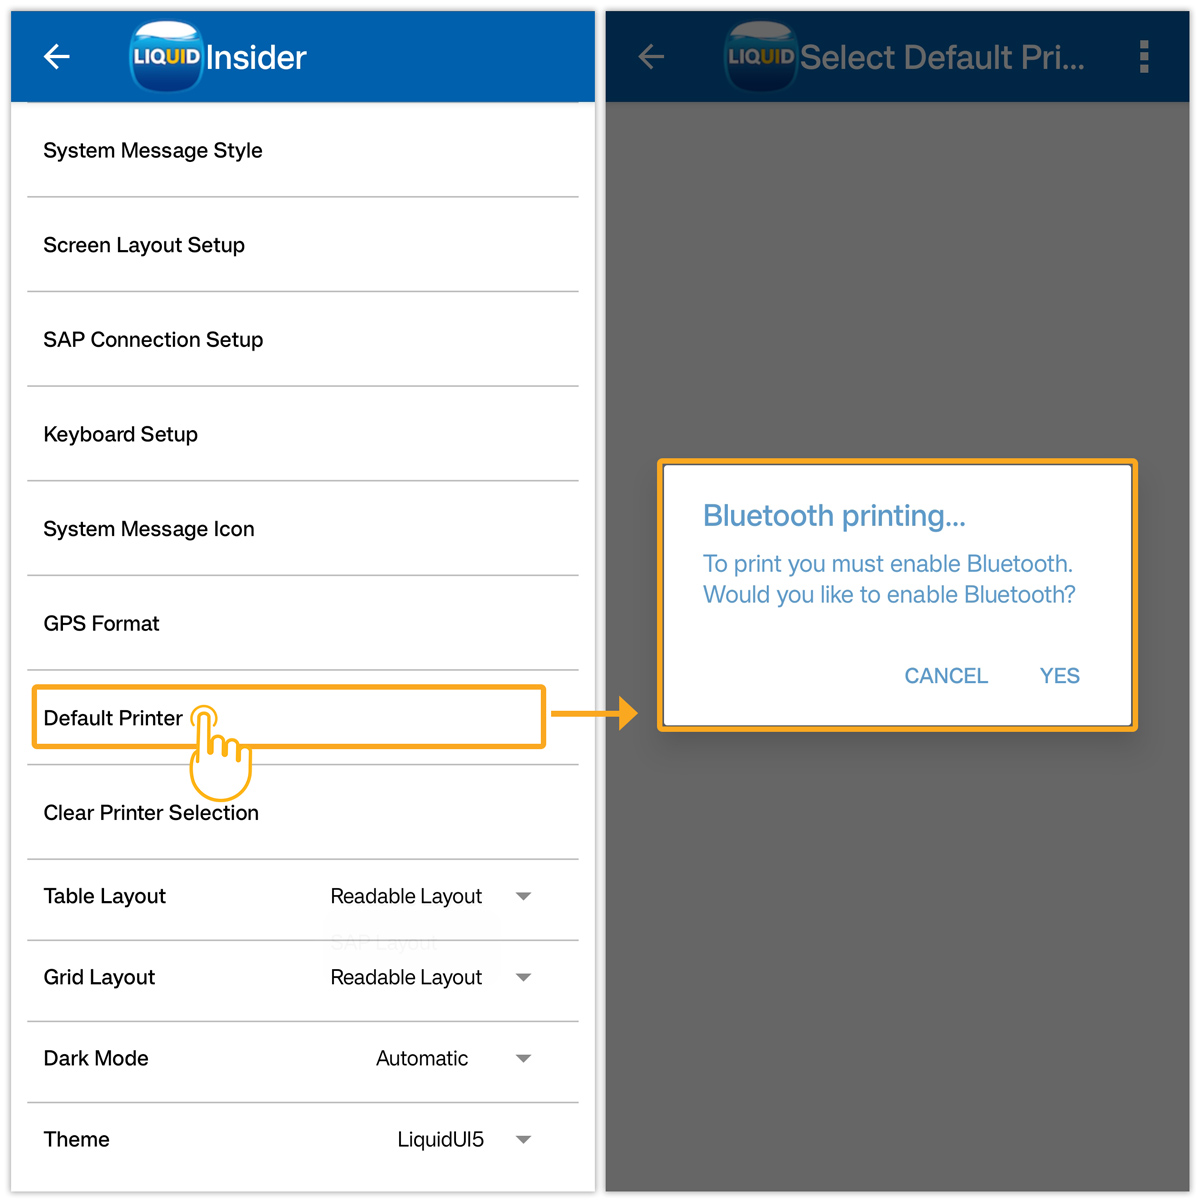 Click here to see how to use the printer from Liquid UI for Android.
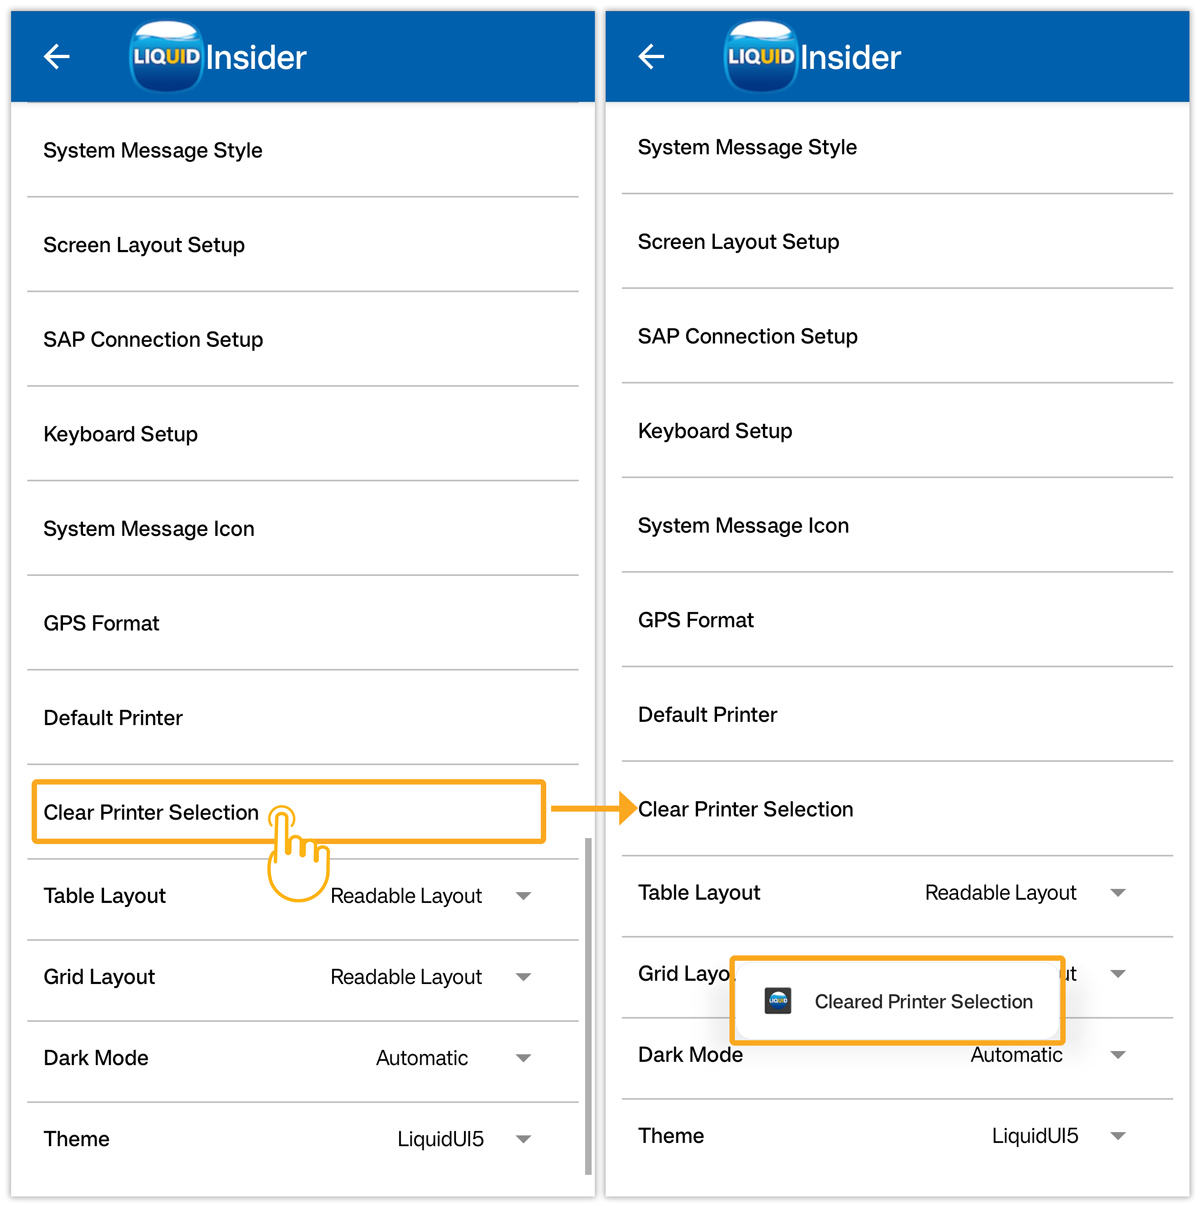
 - Clear printer selection
Enabling this option will remove the default printing prompt. Thereafter, while printing, displays a dialog with the available printing prompts each time.
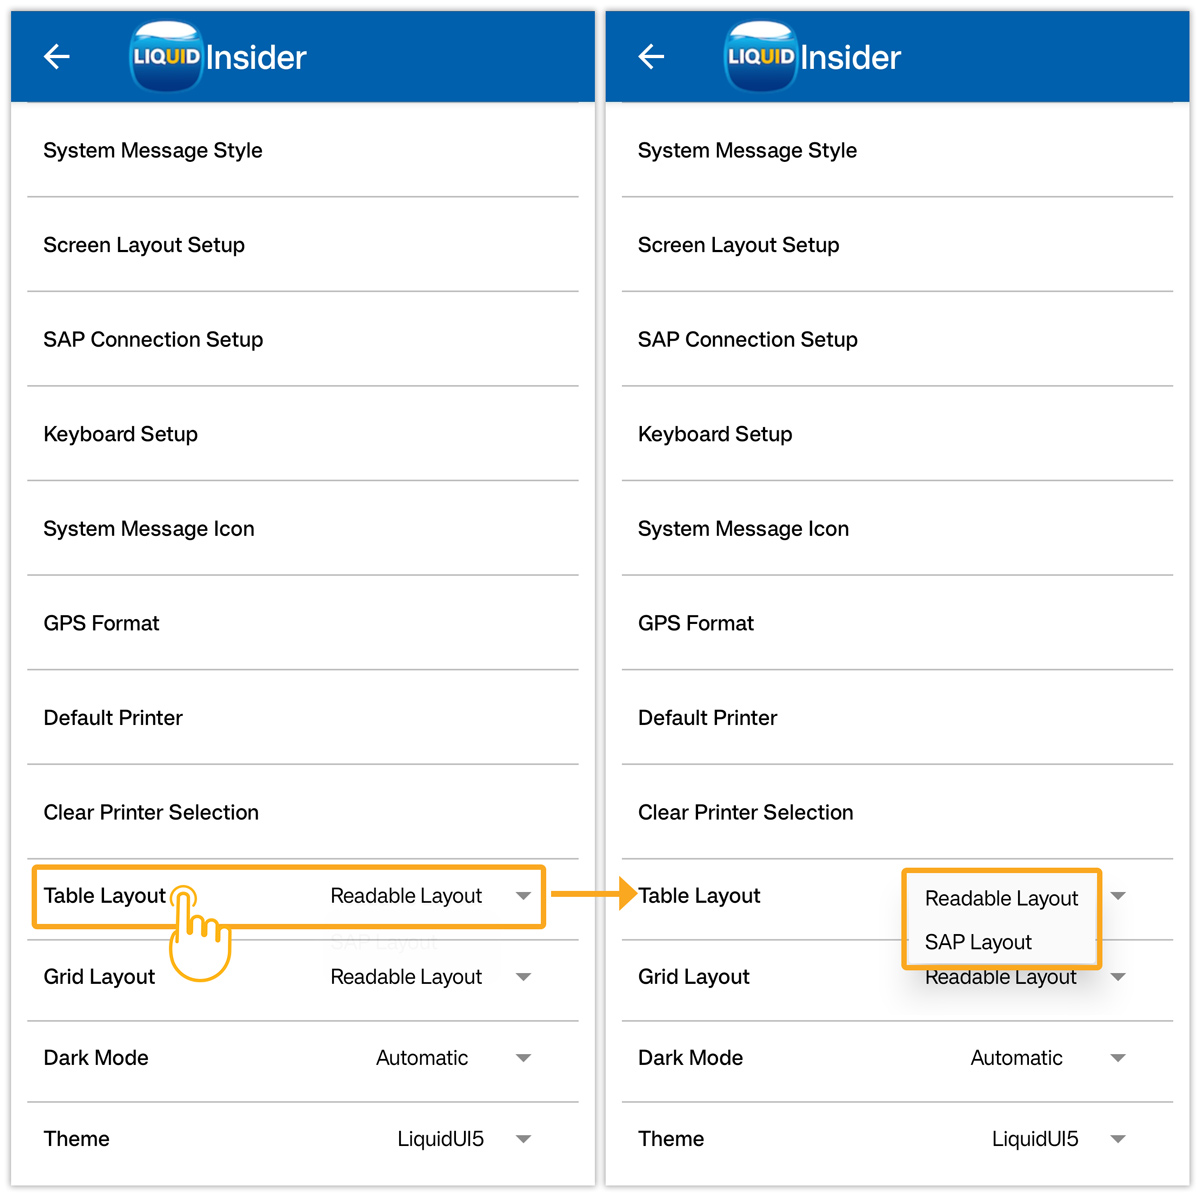
- Table Layout
The user can customize the view of tables in SAP through a table layout. It has 2 options named SAP Layout and Readable Layout. The readable layout allows you to view full column names with a wider table cell width whereas in the SAP layout you would see the column names in the abbreviated form.
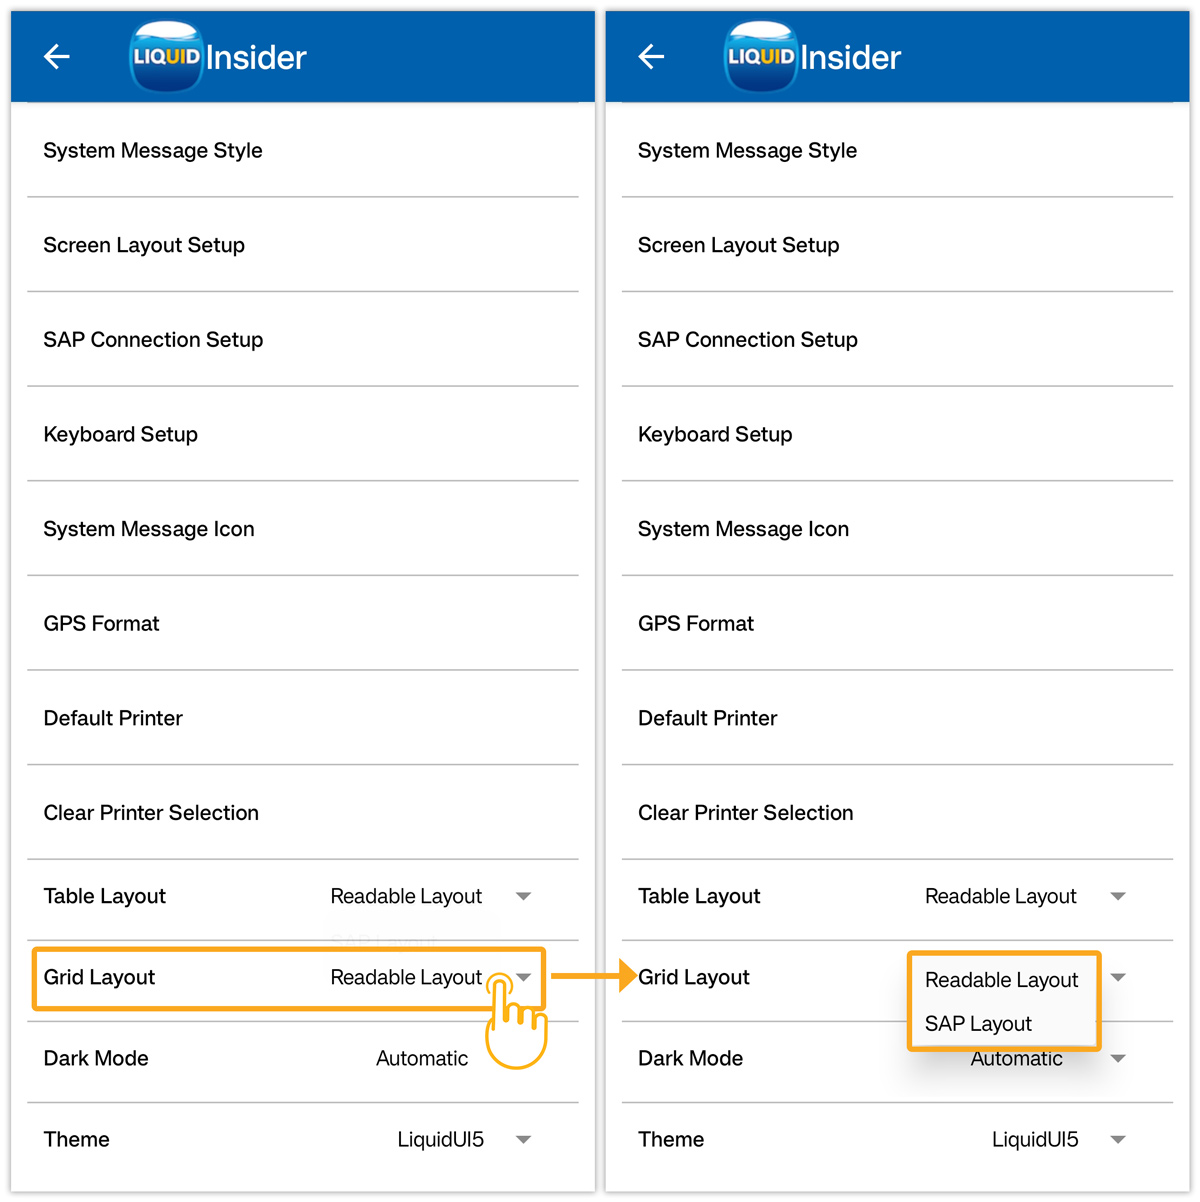
- Grid Layout
The user can customize the grid controls using this option. It has 2 options named SAP Layout and Readable Layout. The readable layout allows you to view full column names with a wider table cell width whereas in the SAP layout you would see the column names in the abbreviated form.
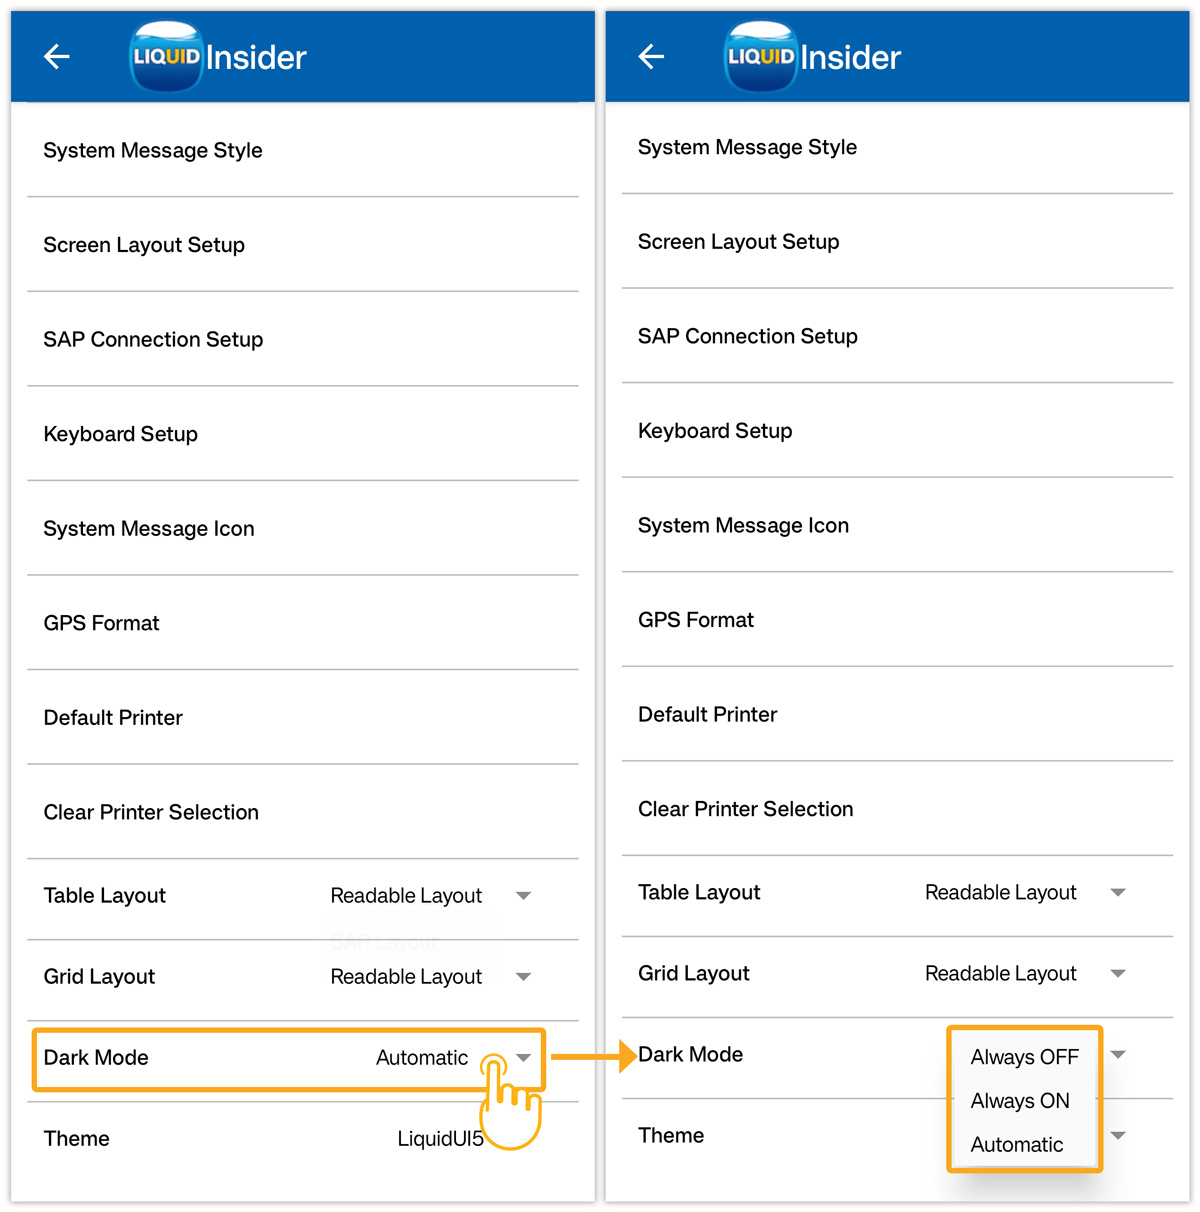
- Dark Mode
Enable this mode in the application improves content visibility, especially in low-light working environments or nighttime. It has three options, namely Always OFF, Always ON, and Automatic.
 Click here to learn more about the Dark mode Setup.
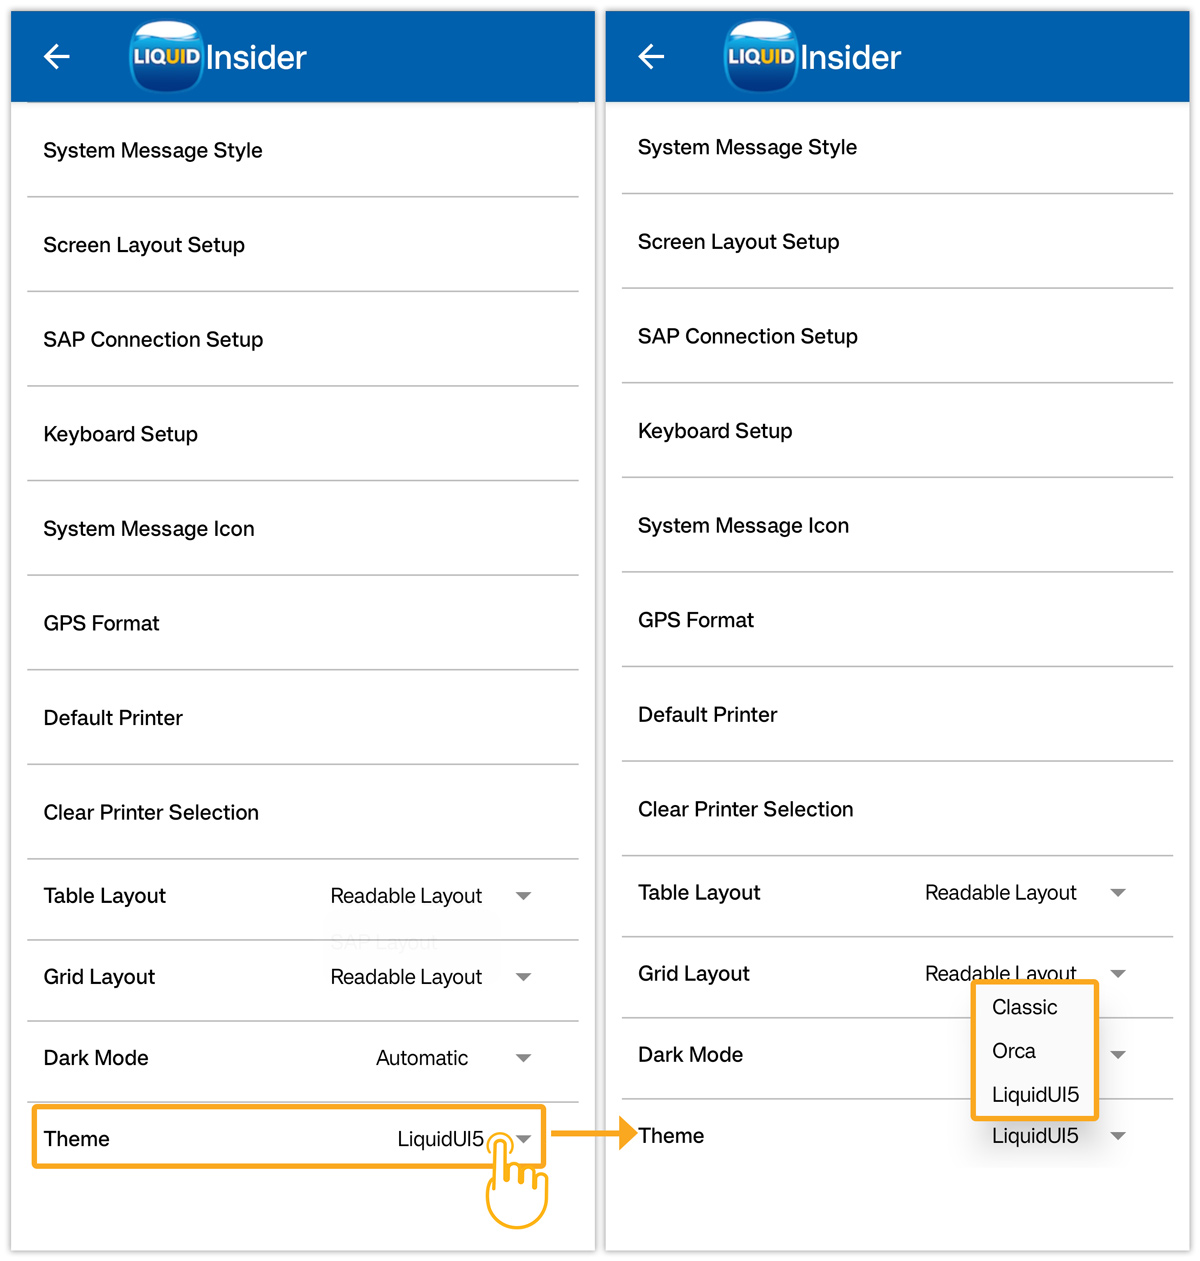
 - Theme
Themes enable you to change the look and feel of the user interface. Currently, Liquid UI for Android supports Classic, Orca, and LiquidUI5 themes.
 Click here to learn more about Themes.