Sample Concept
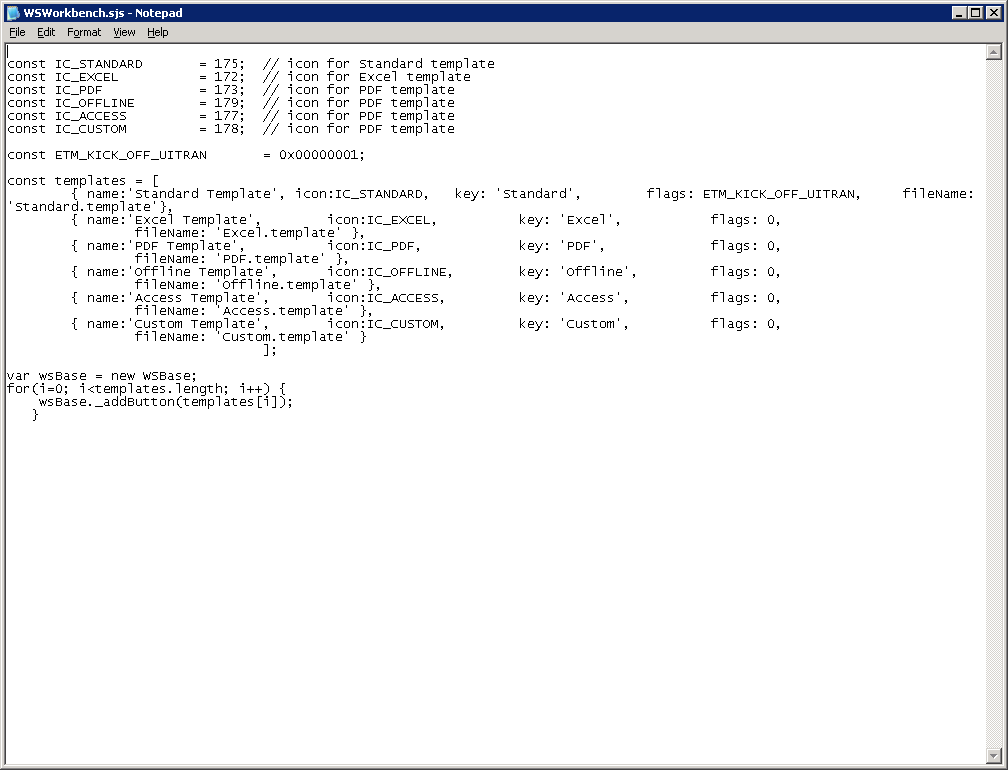
The Workbench.sjs file is where you can add custom template files. A typical Workbench.sjs file appears as follows.
The Workbench.sjs configuration file contains the following parameters.
- Template Icons
-
The icons used for each template are defined at the top of the configuration file. The available icons are as follows.
- IC_EXCEL=172: Pre-defined icon for the Excel template.
- IC_PDF=173: Pre-defined icon for the PDF template.
- IC_STANDARD=175: Pre-defined icon for the Standard (SAPGUI) template.
- IC_ACCESS=177: Pre-defined icon for the Access template.
- IC_OFFLINE_SYNC=178: Pre-defined icon for the Offline Synchronization template.
- IC_CUSTOM=179: Pre-defined icon for the Custom template.
- IC_OFFLINE_UI=245: Pre-defined icon for the Offline UI template.
- Flag Value
-
The Workbench.sjs file contains a flag value for the Standard template. The flag value is as follows:
- var ETM_KICK_OFF_UITRAN = 0x00000001; When scripts are used with SAP GUI, there is a need to store data. This flag value specifies how content is stored internally in Workbench.
- list item
- Templates
-
The list of templates that can be used to generate scripts is contained in an array. You can store up to sixteen templates in this array using the format provided. An example array is shown below:
            const templates = [
      { name:'Standard Template', icon:IC_STANDARD, key:'Standard', flags:ETM_KICK_OFF_UITRAN, fileName:'Standard.template' },
      { name:'Excel Template', icon:IC_EXCEL, key:'Excel', flags:0, fileName:'Excel.template' },
      { name:'PDF Template', icon:IC_PDF, key:'PDF', flags:0, fileName:'Pdf.template' },
      { name:'Offline Synchronization Template', icon:IC_OFFLINE_SYNC, key:'offline_synchronization', flags:0, fileName:'offline_synchronization.template' },
      { name:'Offline UI Template', icon:IC_OFFLINE_UI, key:'offline_UI', flags:0, fileName:'offline_UI.template' },
      { name:'Access Template', icon:IC_ACCESS, key:'Access', flags:0, fileName:'Access.template' },
      { name:'Custom Template', icon:IC_CUSTOM, key:'Custom', flags:0, filename:'Custom.template' }
Each entry in the array will contain the following parameters.
- name: The template name. This is displayed on both the settings tab and on the Navigation bar.
- icon: The icon used for the template, and is displayed only on the navigation bar.
- key: The identification number used to store any associated variables. It should match the name of the template file. For example, if the template file is named 'CT1.template', then the key-value should also be 'CT1'.
- flags: Values used for other processing tasks.
- filename: The name of the template file displayed in the Settings tab.
At present, the only templates included with Workbench are those previously listed. However, an entry for a custom template is included in the Workbench.sjs file although no corresponding file is located in the Workbench directory. You can use the custom template icon for your own templates.
- Template Loading Function
-
A function is included in the Workbench.sjs file to load new templates into the Workbench application. The function first creates a new object and then checks for all included templates. If there are more templates than buttons, the function will add a new button to correspond with the additional template. The function is as follows:
var wsBase = new WSBase;
for(i=0; i<templates.length; i++) {
    wsBase._addButton(templates[i]);
}
Once a new template is added to the array, the loading function will automatically add a new icon for the additional template to the list in the Workbench sidebar, as explained below.
Adding Templates
In addition to the pre-defined templates that are included with Workbench, it is possible to add up to sixteen user-created templates to Workbench. This functionality is designed to be used by Synactive's Professional Services team. However, you may wish to add your own templates as well. To use this function, please do the following:
-
Create a new template file based on the examples given in the Workbench Templates section of this document. The Workbench.sjs file should now appear, as shown below:
-
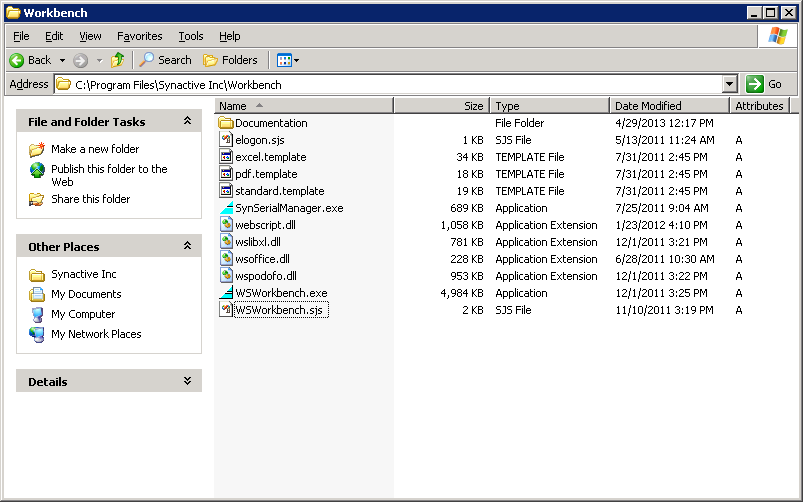
Place the new template file into the Workbench directory, as shown below. In our example, the directory path is as follows: C:\Program Files\Synactive Inc\Workbench.
-
In the Workbench.sjs file, replace the Custom Template entry in the template array with a new entry. It is important to add a comma at the end of the preceding line or none of the template buttons will display. The new entry must also contain the following information:
- name: Enter the new template name. The name can be anything, but we recommend using a name that clearly describes the type of script you will be generating.
- icon: Enter the relevant icon. For user-created templates, the icon must be the Custom icon defined in the Workbench.sjs file.
- key: The key must be set to the same value as the name of the new template.
- flags: Set this value to zero unless the template will be used for generating scripts that will be used with SAP GUI. In that case, set the value to 'ETM_KICK_OFF_UITRAN'.
- filename: This should be the filename of the new template file.
-
Replace the default 'Custom Template' entry and save the changes to the template file. The new entry should appear similar to the example below:
{ name:'Test Template', icon:IC_CUSTOM, key:'Custom', flags:0, filename:'Test.template' } -
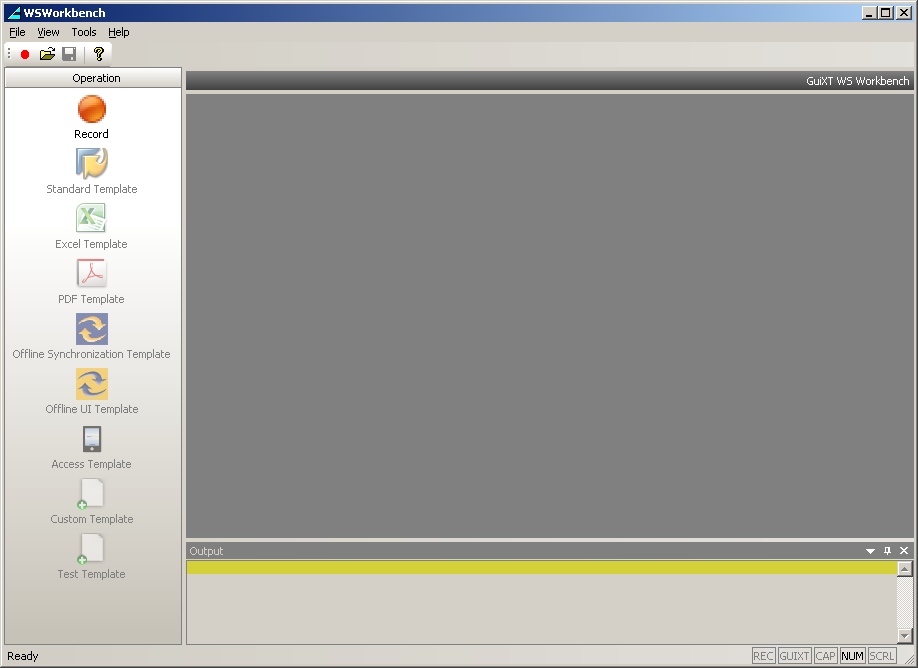
Launch Workbench. The new template button will be displayed, as shown below: