The NetWeaver Business Client for SAP (NWBC) is a lightweight alternative to SAP GUI. It presents no difficulties for Liquid UI WS users, as you can use the same scripts that you already use with SAP GUI. In the following section, we will explain how to install and configure NWBC so that it will work with the Liquid UI WS engine. Please note that these instructions are specific to the NWBC Desktop - we do not currently support using Liquid UI WS with the NWBC for HTML client.
In the following document, we will briefly explain how to configure NWBC for use with the Liquid UI WS platform. Topics covered include installing and configuring WS for use with NWBC.
Installing WS
You must first install the GuiXT WS engine. This process is the same whether you are using GuiXT WS with SAP GUI or with NWBC. Refer Installing WS topic for details.
Configuring WS for NWBC
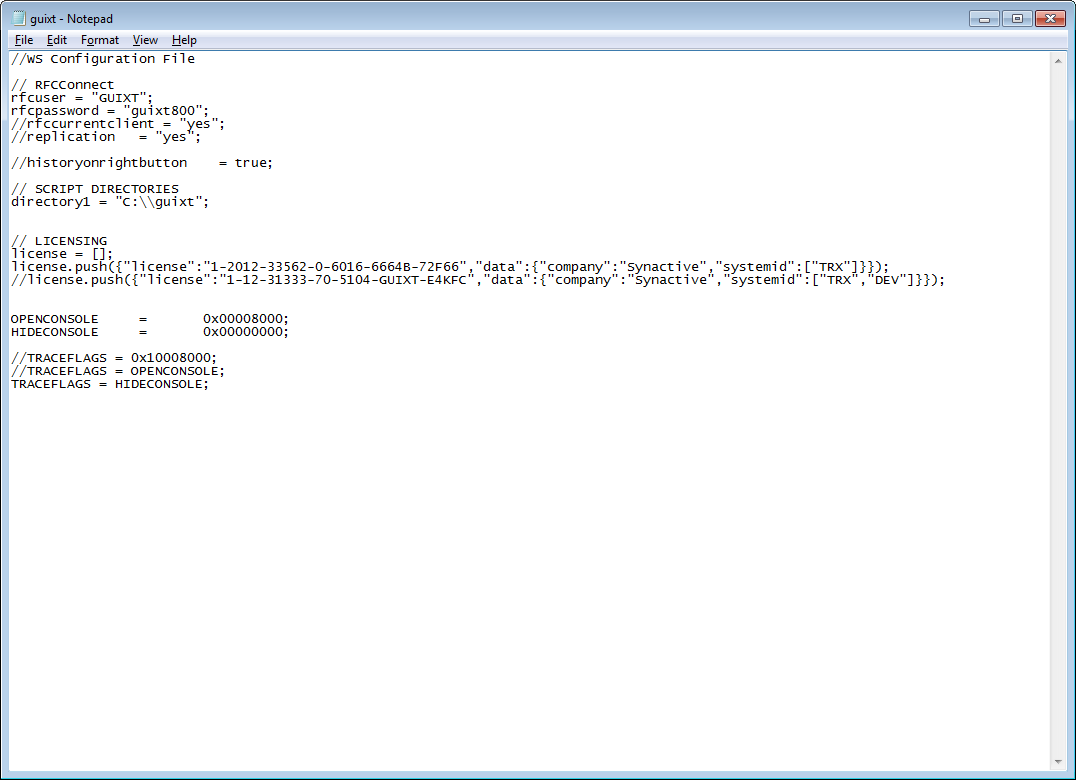
After installing the GuiXT WS engine, you will need to configure it to use with SAP GUI or NWBC. The configuration is mainly done in the guixt.sjs file. The file is present in the following directory.
C:\Program Files\SAP\FrontEnd\SAPgui
A typical basic guixt.sjs configuration file appears as shown in Figure 1.
The following steps describe the procedure to configure NWBC:
- Open the guixt.sjs configuration file in a text editor.
- Locate the 'directory1' entry in the script file. Enter the path of the folder where you save your WS files:
directory1 = "C:\\guixt\\scripts";
- You should have received a license file from Synactive when you purchased the WS engine. Find the license entry (license = [];) in the guixt.sjs file or create one if it does not already exist. Open the license file you received from Synactive in a text editor such as Notepad and copy the following information in the file into guixt.sjs file. A sample license entry is shown below:
license = []; license.push({"license":"1-2012-33562-0-6016-6664B-72F66","data":{"company":"Synactive","systemid":["TRX"]}}); - Save your changes and close the guixt.sjs file.
- Launch NWBC and activate GuiXT WS using the Alt + F12 key on your computer keyboard.
- Now, create a connection in NWBC.
Creating Connections in NWBC
Just as is the case in SAP GUI, you must create connections to your SAP Application Server in order to communicate with SAP.
The following steps describe the procedure to create a connection in NWBC:
- Launch NWBC and from the Personalize menu select Options.
- The configuration win:
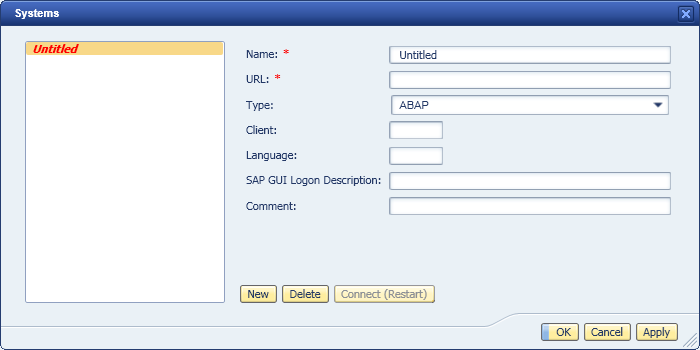
- Click the New button to create a new connection entry.
- In the new connection, fill in the required fields. These fields are defined as follows:
- Name
-
This is a required field. The Name field contains the symbolic name of the connection. This name must be the same across all connections.
- URL
-
This is a required field. The URL field contains the link to the SAP Application Server from NWBC. The syntax for this URL is shown in the following example.
http(s)://<serverName>:<portNumber>/sap/bc/nwbc/nwbc_launch
Note:The server name should be a fully-qualified host name. You can obtain this data by going to the SMICM transaction in SAP. In this transaction, click the services icon to view the HTTP port number. Then click the Parameters > Display > Check ICM/host_name option to view the server's fully-qualified host name.
- Type
-
NWBC can connect either to a standalone SAP server or to a portal server. In this optional field, you can define which type of connection you are creating. The two choices are as follows.
- ABAP: Specifies that you will be connecting to an actual ABAP SAP application server.
Note: You must select 'ABAP' as the type in order for GuiXT custom screens to work in NWBC.
- Portal: Specifies that you will be connecting to a portal server.
- ABAP: Specifies that you will be connecting to an actual ABAP SAP application server.
- Client
-
This optional field contains the three-digit client number, if you are connecting to an ABAP system. An example of a client number would be '000'. This field is not used in a portal connection.
- Language
-
This optional field contains the two-digit language ID of the target SAP server. An example language code would be 'EN' for English.
- SAPGUI Logon Description
-
This optional field contains the exact same description of the connection that exists for this connection in the SAP Logon Pad. It is used only for ABAP connections - you can leave this field blank if you are connecting to a portal server.
Important: The description in NWBC and the description in SAP Logon Pad must be identical in every respect, or the connection will not succeed. - Comment
-
This optional field contains any text that you wish to input. It often contains a short description of the system to which you are connecting.
-
Save your changes by clicking Apply at the bottom of the connection screen. Then click OK.
-
The new connection is now ready to use with the GuiXT WS platform.


