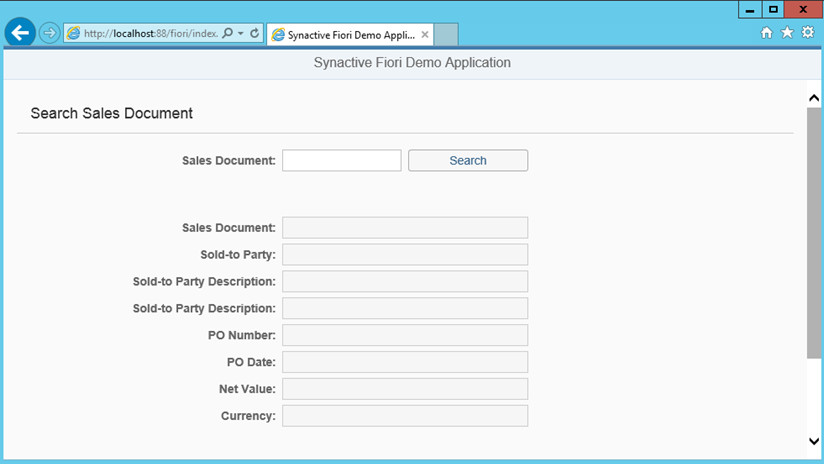
Liquid UI for Fiori enables you to personalize and simplify the user experience for your SAP Fiori applications. For demonstration, let us create a form for Search Sales document. To run the program successfully, place the files related to UI display in “view” folder and the corresponding validations in the “controller” folder.
Depending upon the type of UI, you can add the form elements. To figure out some basic techniques, follow the below links for a detailed explanation of all the UI5 controls with source code and demo:
- For Edit Field, use Input @ https://openui5.hana.ondemand.com/explored.html#/entity/sap.m.Input/samples
- For Button, use Button @ https://openui5.hana.ondemand.com/explored.html#/entity/sap.m.Button/samples
- For URL, use Url Helper @ https://openui5.hana.ondemand.com/explored.html#/entity/sap.m.URLHelper/samples
Procedure:
The UI of Search Sales Document is about the plant listview of SAP and has following elements:
The sample code for the PlantList.view.xml :
 <mvc:View controllerName="sap.ui.demo.wt.controller.PlantList">
<form:SimpleForm id="InputSalesOrderForm" width="auto" class="sapUiResponsiveMargin" layout="ResponsiveGridLayout" editable="true" labelSpanL="4" labelSpanM="4" emptySpanL="2" emptySpanM="2" columnsL="1" columnsM="1" title="{i18n>plantSalesTitle}">
<form:content>
<Label text="{i18n>salesDocument}" design="Bold"/>
<Input id="orderNo" value="{path:'/SalesDocument'}" maxLength="4" type="Number" submit="onEnterOrderNo"/>
<Button text="Track a package" press="onTrackPackage"/>
</form:content>
</form:SimpleForm>
<form:SimpleForm id="SalesOrderForm" width="auto" class="sapUiResponsiveMargin" layout="ResponsiveGridLayout" editable="true" labelSpanL="4" labelSpanM="4" emptySpanL="4" emptySpanM="4" columnsL="1" columnsM="1" title="{/Title}">
<form:content>
<Label text="{i18n>salesDocument}" design="Bold"/>
<Input id="SalesOrderDoc" value="{path:'/SalesDocument'}" editable="false"/>
<Label text="{i18n>salesSoldToParty}" design="Bold"/>
<Input value="{path:'/Sold-toParty'}" editable="false"/>
<Label text="{i18n>salesSoldtoPartyDesc}" design="Bold"/>
<Input value="{path:'/Sold-toPartyDescription'}" editable="false"/>
<Label text="{i18n>salesSoldtoPartyDesc}" design="Bold"/>
<Input value="{path:'/Ship-toPartyDescription'}" editable="false"/>
<Label text="{i18n>salesPONumber}" design="Bold"/>
<Input value="{path:'/PONumber'}" editable="false"/>
<Label text="{i18n>salesPODate}" design="Bold"/>
<Input value="{path:'/PODate'}" editable="false"/>
<Label text="{i18n>salesNetValue}" design="Bold"/>
<Input value="{path:'/NetValue'}" editable="false"/>
<Label text="{i18n>salesCurrency}" design="Bold"/>
<Input value="{path:'/Currency'}" editable="false"/>
</form:content>
</form:SimpleForm>
<Table id="plantList" class="sapUiResponsiveMargin" width="auto" items="{    path : 'plant>/Plants'   }">
<headerToolbar><Toolbar><Title text="{i18n>plantListTitle}"/><ToolbarSpacer/>
<SearchField id="SalesOrderQuery" width="50%" search="onFilterPlants" placeholder="Search Description"/>
</Toolbar></headerToolbar>
<columns><Column><Text text="{i18n>columnTitle}"/></Column>
<Column minScreenWidth="Small" demandPopin="true"><Text text="{i18n>columnMaterial}"/></Column>
<Column minScreenWidth="Tablet" demandPopin="false"><Text text="{i18n>columnQuantity}"/></Column>
<Column minScreenWidth="Tablet" demandPopin="false"><Text text="{i18n>columnSU}"/></Column>
<Column minScreenWidth="Tablet" demandPopin="false"><Text text="{i18n>columnDescription}"/></Column>
<Column hAlign="End"><Text text="{i18n>columnAmount}"/></Column></columns>
<items><ColumnListItem type="Navigation"><cells><ObjectIdentifier title="{plant>Item}"/><Text text="{plant>Material}"/>
<ObjectNumber number="{plant>Quantity}" emphasized="false"/><ObjectNumber number="{plant>SU}" emphasized="false"/>
<!-- <Text text="{ -->
<!-- path: 'plant>Status', -->
<!-- formatter: '.formatter.statusText' -->
<!-- }"/> -->
<Text text="{plant>Description}"/><Text text="{plant>Amount}"/><!-- <ObjectNumber -->
<!-- number="{ -->
<!-- parts: [{path: 'plant>ExtendedPrice'}, {path: 'view>/currency'}],
--><!-- type: 'sap.ui.model.type.Currency', -->
<!-- formatOptions: { -->
<!-- showMeasure: false -->
<!-- } -->
<!-- }" -->
<!-- unit="{view>/currency}" -->
<!-- state="{= ${plant>ExtendedPrice} > 50 ? 'Error' : 'Success' }"/>
--></cells></ColumnListItem></items>
</Table>
</mvc:View>
In PlantList.view.xml there are two forms (InputSalesOrderForm and SalesOrderForm) and a Table (plantList) which define the main UI components for the demo. You can customize the form with the desired actions.
Add the button to the <form:content> as shown below:

Step 1: Modify PlantList.view.xml
<form:SimpleForm id="InputSalesOrderForm" width="auto" class="sapUiResponsiveMargin" layout="ResponsiveGridLayout" editable="true" labelSpanL="4" labelSpanM="4" emptySpanL="2" emptySpanM="2" columnsL="1" columnsM="1" title="{i18n>plantSalesTitle}" > <form:content> <Label text="{i18n>salesDocument}" design="Bold"/>
<Input id="orderNo" value="{path:'/SalesDocument'}" maxLength="4" type="Number" submit="onEnterOrderNo"/>
<Button text="Search" press="onEnterOrderNo"/>
<Button text="Track a package" press="onTrackPackage"/>
</form:content>
</form:SimpleForm>
Step 2: Add the following function to PlantList.controller.js
onTrackPackage : function (oEvent) { sap.m.URLHelper.redirect("http://www.google.com",
true); },
Note: Basically this is UI5 JS programming using its framework. There are no "formal" ways of adding, modifying or deleting stuff. One has to get familiar with the framework (SAP UI5 website is the best knowledge learning place) and know how to program JS in order to master the skill.
Step 3: Trigger an action
After executing the script, when you click on the button, it triggers the user action. Here we are invoking the URL Helper with a hyperlink to open in the browser. Then, a browser window with the corresponding URL will popup.
This URL Helper can be used with any UI control.
Note: If you find difficulty with the application changes and cannot view the updated UI, then you have to either clear the browser's cache before testing the new code or disable the cache by using the incognito mode.


