Prerequisites
- Products: Liquid UI WS, Liquid UI Server or Local DLL, Client Software
- Commands: set(), text(), inputfield(), onUIEvents(), openfile(), readfile(), closefile()
Purpose
In this article, you will learn how to retrieve values from a file and display them in the input fields created dynamically on the screen. We will walk you through the following steps:
- Add a file with Material, Item, and Description values
- Delete unnecessary screen elements
- Add a function to check the variable value
- Add three texts fields
- Create a loop using labels
- Add a function to fetch values from the text file
- Perform enter to display file content into the input fields
User Interface
//Create this file also inside your script folder for customizing the SAP Easy Access screen: file.txt
//Now, let's start adding the content to the above file
- Add the following data to file.txt
1030,10,valve 1
1030,20,15 inch TV
1030,30,monitor
2120,10,door handle
2120,20,paper clips
2120,30,mouse
3650,10,TV set
3650,20,remote control
4400,10,round cable
4400,20,starter
5003,10,test
5003,20,test
//Create this file inside your script folder for customizing the SAP Easy Access screen: SAPLSMTR_NAVIGATION.E0100.sjs
//Now, let's start adding the Liquid UI script to the above file and save it.
- Delete the unnecessary screen elements on the SAP Easy Access screen, using del().
 //Delete an image container on SAP Easy Access screen
del('X[IMAGE_CONTAINER]');
- Add an isBlank function to check whether the variable value is blank.
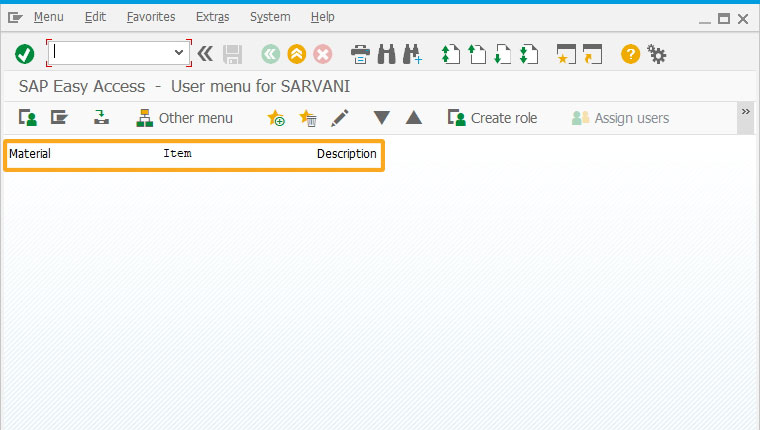
//Function to check if the variable value is blank or not function isBlank(jvar) { if (jvar== void 0 || jvar==null || jvar=="") { return true; } else { return false; } } - Add three text fields, namely Material, Item, and Description.
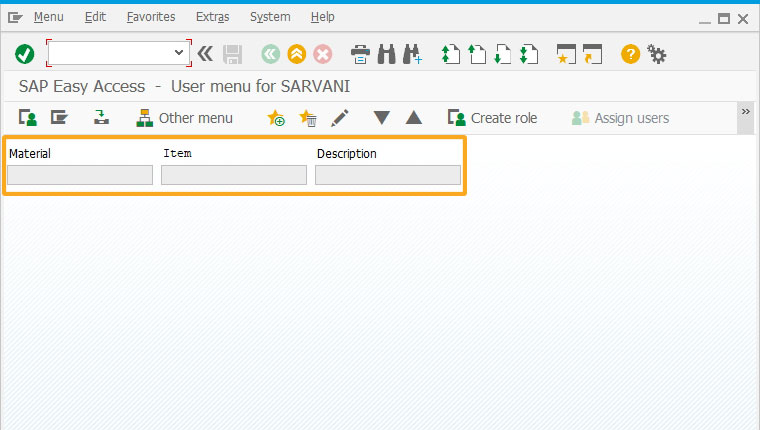
//Initializes the required variables and creates texts
pidx = 0;
idx=0;
// Creates a text with label as Material and its size is 20
text([0,0],"Material",{"size":20});
// Creates a text with label as Item and its size is 20
text([0,22],"Item",{"size":20});
// Creates a text with label as Description and its size is 20
text([0,44],"Description",{"size":20});
- Add a goto statement with a label to jump or continue the labeled loop statements.
// Executes labeled loop statements based on the z_checkfld
create:{
 inputfield([pidx + 1,0],{"size":20,"readonly":true,"name":"z_first_&V[pidx]" ,"nolabel":true});
 inputfield([pidx + 1,22],{"size":20,"readonly":true,"name":"z_second_&V[pidx]" ,"nolabel":true});
 inputfield([pidx + 1,44],{"size":20,"readonly":true,"name":"z_third_&V[pidx]","nolabel":true});
}
pidx = pidx + 1;
set("V[z_checkfld]","&V[z_first_&V[pidx]]");
if(isBlank(z_checkfld)) {
  println("<<<<<<<<<CHECK FIELD>>>>>>>>>>" + z_checkfld);
  goto end_create;
}
goto create;
end_create:
- Add an OnUIEvent command to execute the IW21_readfile function and navigates through the Create Notification screen.
//Creates onUIEvents to excute iw21_readfile function
  onUIEvents['Enter'] = {"process":iw21_readfile, "fcode":"/niw21"};
- Add a function iw21_readfile to read all the values in the file and then close the file.
//Creates a function to open, read and print values from the file
function iw21_readfile(){
println("<<<<<<<<<<<<INITIAL VALUE>>>>>>>> :" + idx);
openfile('file.txt',{"delimiter":","});
read:{
println("<<<<<<<<<<<<READING VALUES>>>>>>>> :" );
readfile('file.txt',{"z_first_&V[idx]":true, "z_second_&V[idx]":true, "z_third_&V[idx]":true});
}
set("V[z_currField]","&V[z_first_&V[idx]]");
println("<<<<<<<<<<<<<<<<<Current Field>>>>>>>>>>>>>>" + z_currField);
if(isBlank(z_currField)) {
  println("<<<<<<<<<<<<<<GOING END>>>>>>>>>>>>>>");
  goto end;
}
idx++;
println("<<<<<<<<<<<<THE IDX VALUE>>>>>>>> :" + idx);
goto read;
end:
   closefile('file.txt');
}
SAP Process
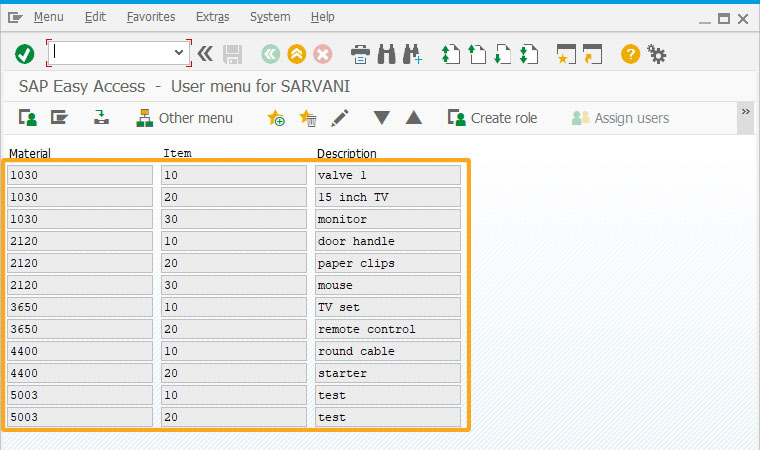
- Refresh the SAP screen and click enter on your keyboard. You will see the input fields created with values based on the file content is displayed automatically, as shown below.
Next Steps

Conversion of array data to grid data with to and fro navigation.
Learn how to display data in a grid using array data.
Learn how to display data in a grid using array data.
10 min.
This article is part of the Interpreting function codes tutorial.


