Prerequisites
- Products: Liquid UI WS, Liquid UI Server or Local DLL, Client Software
- Commands: pushbutton(), set(), del(), onscreen(), enter(), table(), column(), gettableattribute()
Purpose
In this article, you will learn about different types of scrolling and their usage. Scrolling helps you to view the additional information which will not fit in your window. Liquid UI allows you to scroll the tables, list screens, and fetch the required data from the SAP screens. Scrolling can be performed in two ways.
- Vertical scrolling
- Horizontal scrolling
Vertical and horizontal scroll bars appear to the right and bottom of the document pane whenever the view does not show the entire table or list screen of an SAP screen. Using the enter command, you can dynamically retrieve data from list screens or tables.
User Interface
Example1:
In this scenario, you will learn how to scroll vertically and horizontally on a list screen using the enter command with hscrollto and scrolltoline parameters.
//Create the file RVKRED01.E0120.sjs inside your script folder for customizing the Blocked SD Documents screen.
//Now, let's start adding the Liquid UI script to the above file and save it.
- Add a toolbar pushbutton Scroll Horizontal, which on click executes the process z_HorScroll that scrolls the screen horizontally.
//Creates a toolbar pushbutton titled Scroll Horizontal to call z_HorScroll function
pushbutton( [TOOLBAR], "Scroll Horizontal",{"process": z_HorScroll });
function z_HorScroll(){

//Adds function to horizontal scrolling on list screen
     onscreen 'RVKRED01.0120'
     enter("/hscrollto=20");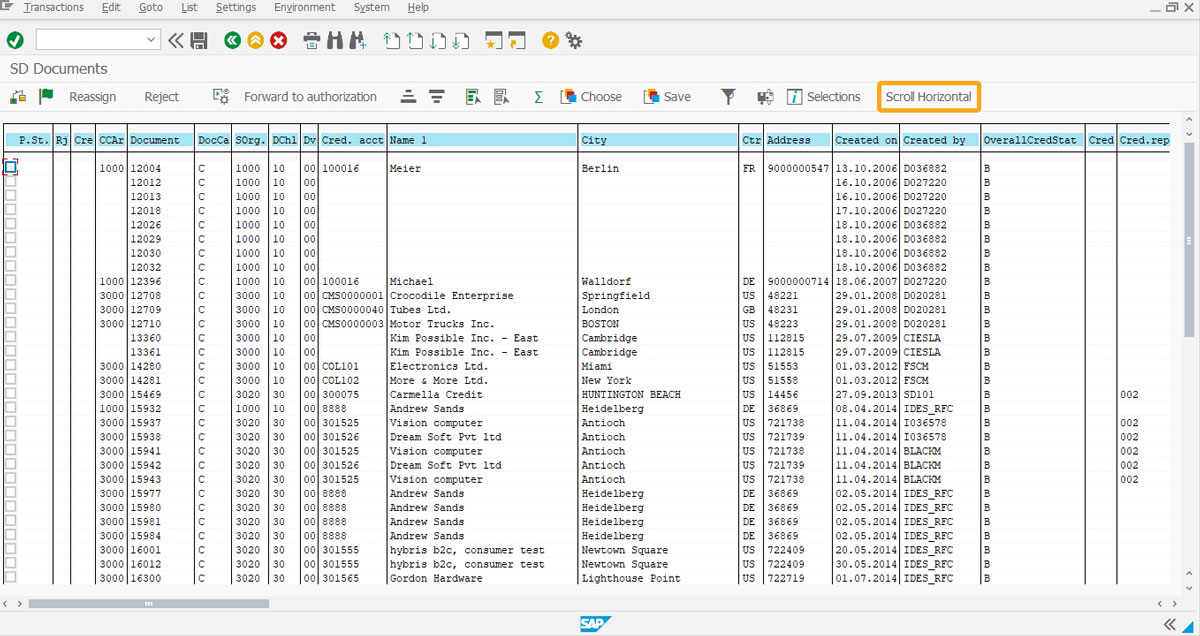
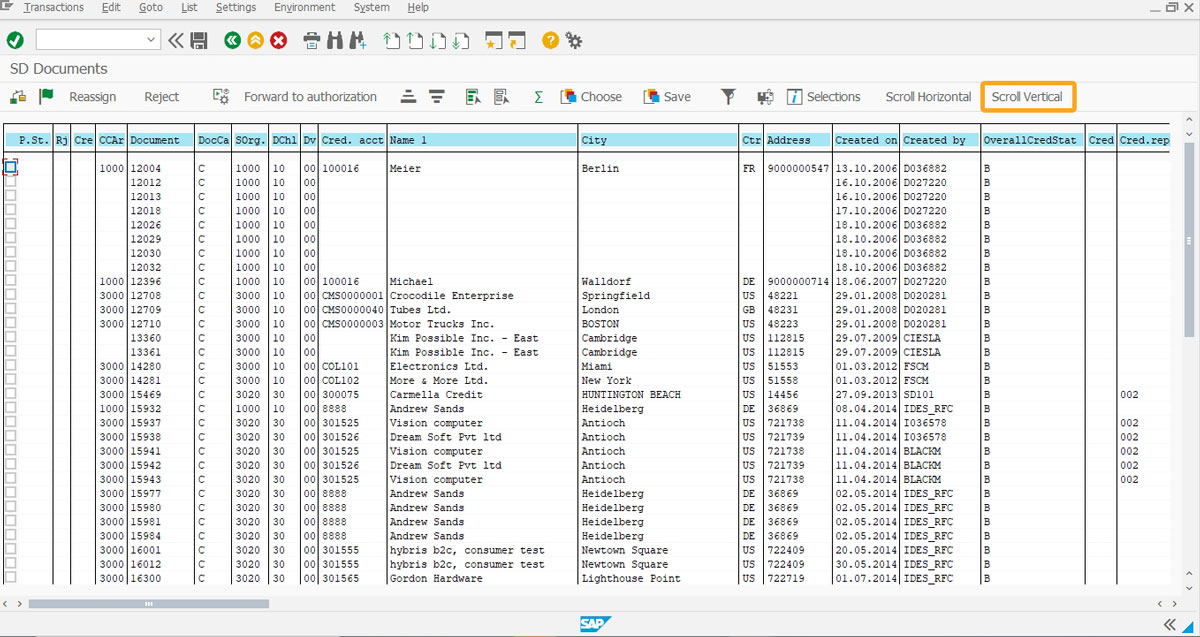
- Add a toolbar pushbutton Scroll Vertical, which on click executes the process z_VerScroll that scrolls the screen vertically.
// Creates a toolbar pushbutton titled Scroll vertical to call z_VerScroll function
pushbutton( [TOOLBAR], "Scroll Vertical",{"process": z_VerScroll});function z_VerScroll (){

// Adds function to vertical scrolling on list screen
     onscreen 'RVKRED01.0120'
     enter("/scrolltoline=10");
}
SAP Process
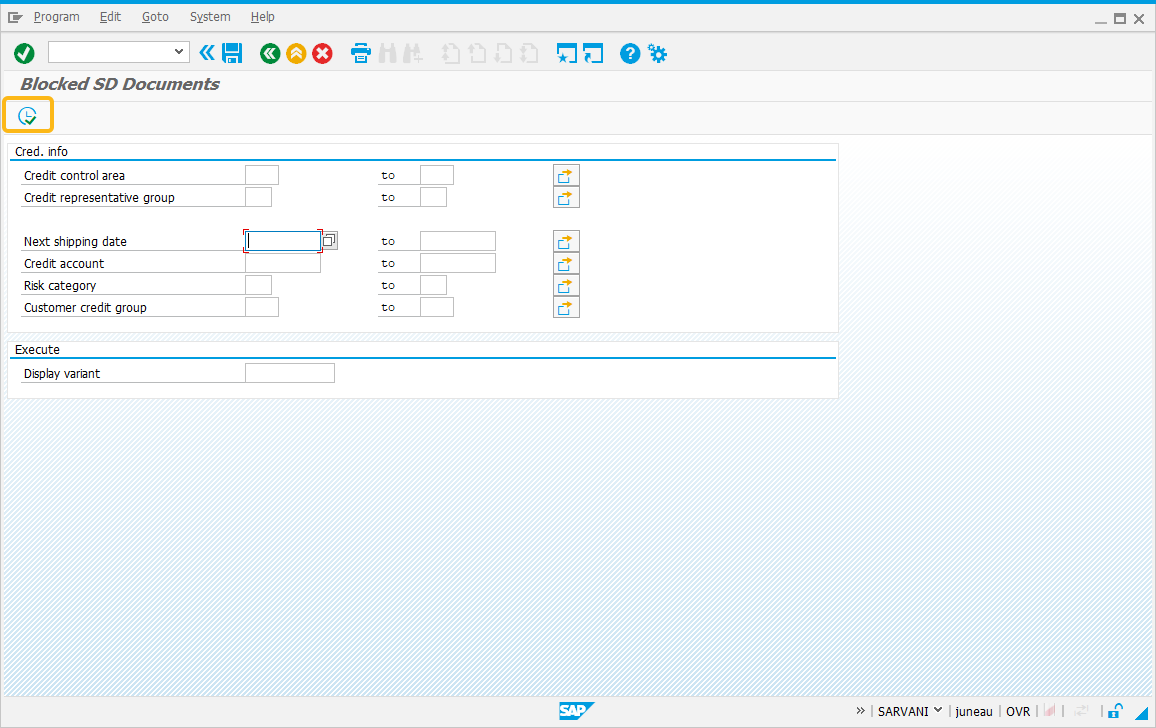
- Logon to SAP and navigate to the VKM1 transaction, and click on Execute button, as shown in the image below:
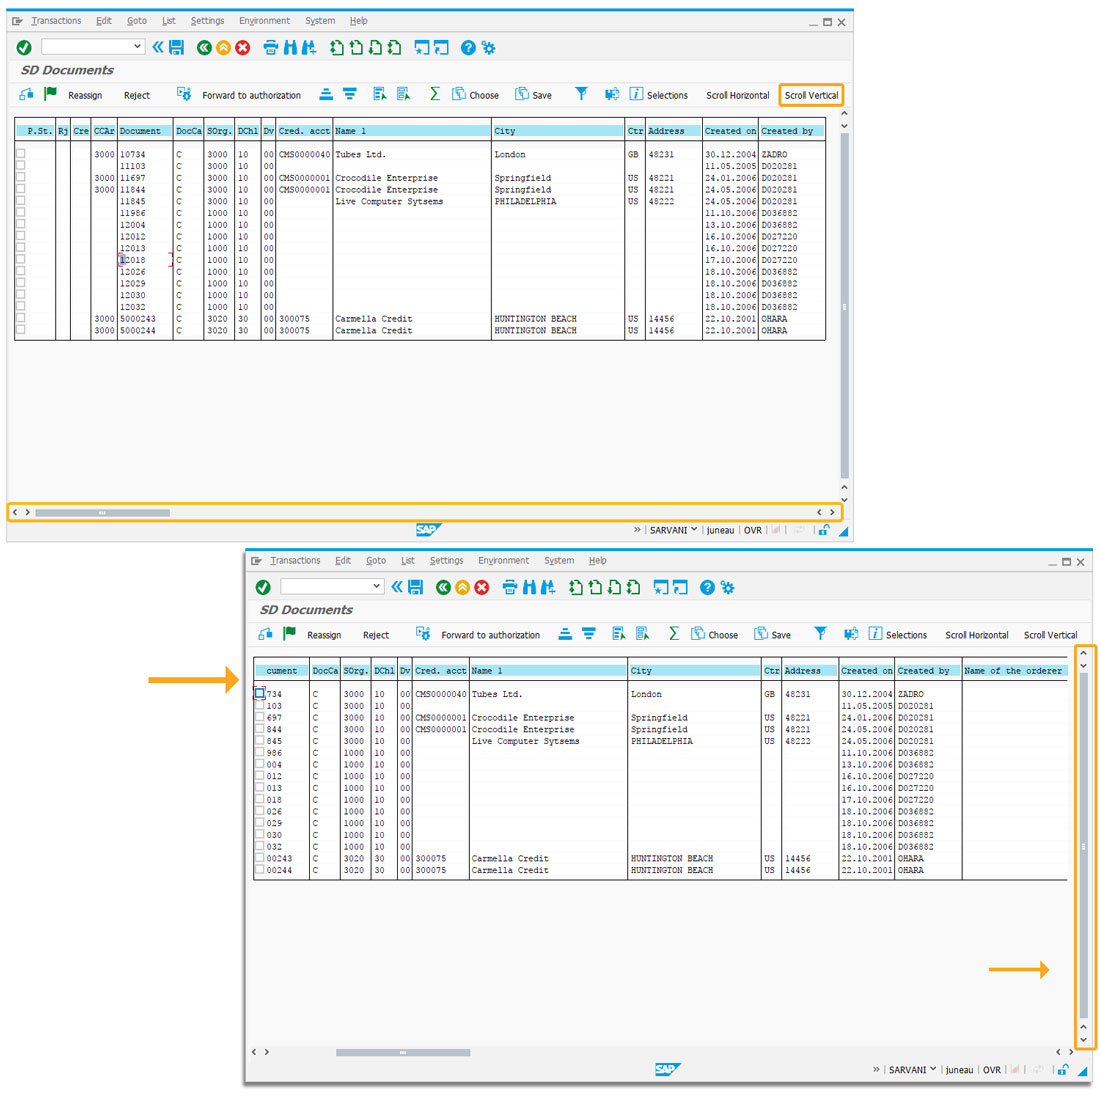
- You can view the list screen with two toolbar push buttons created. Now, click on Scroll Vertical toolbar pushbutton to scroll the screen vertically, as shown in the image below.
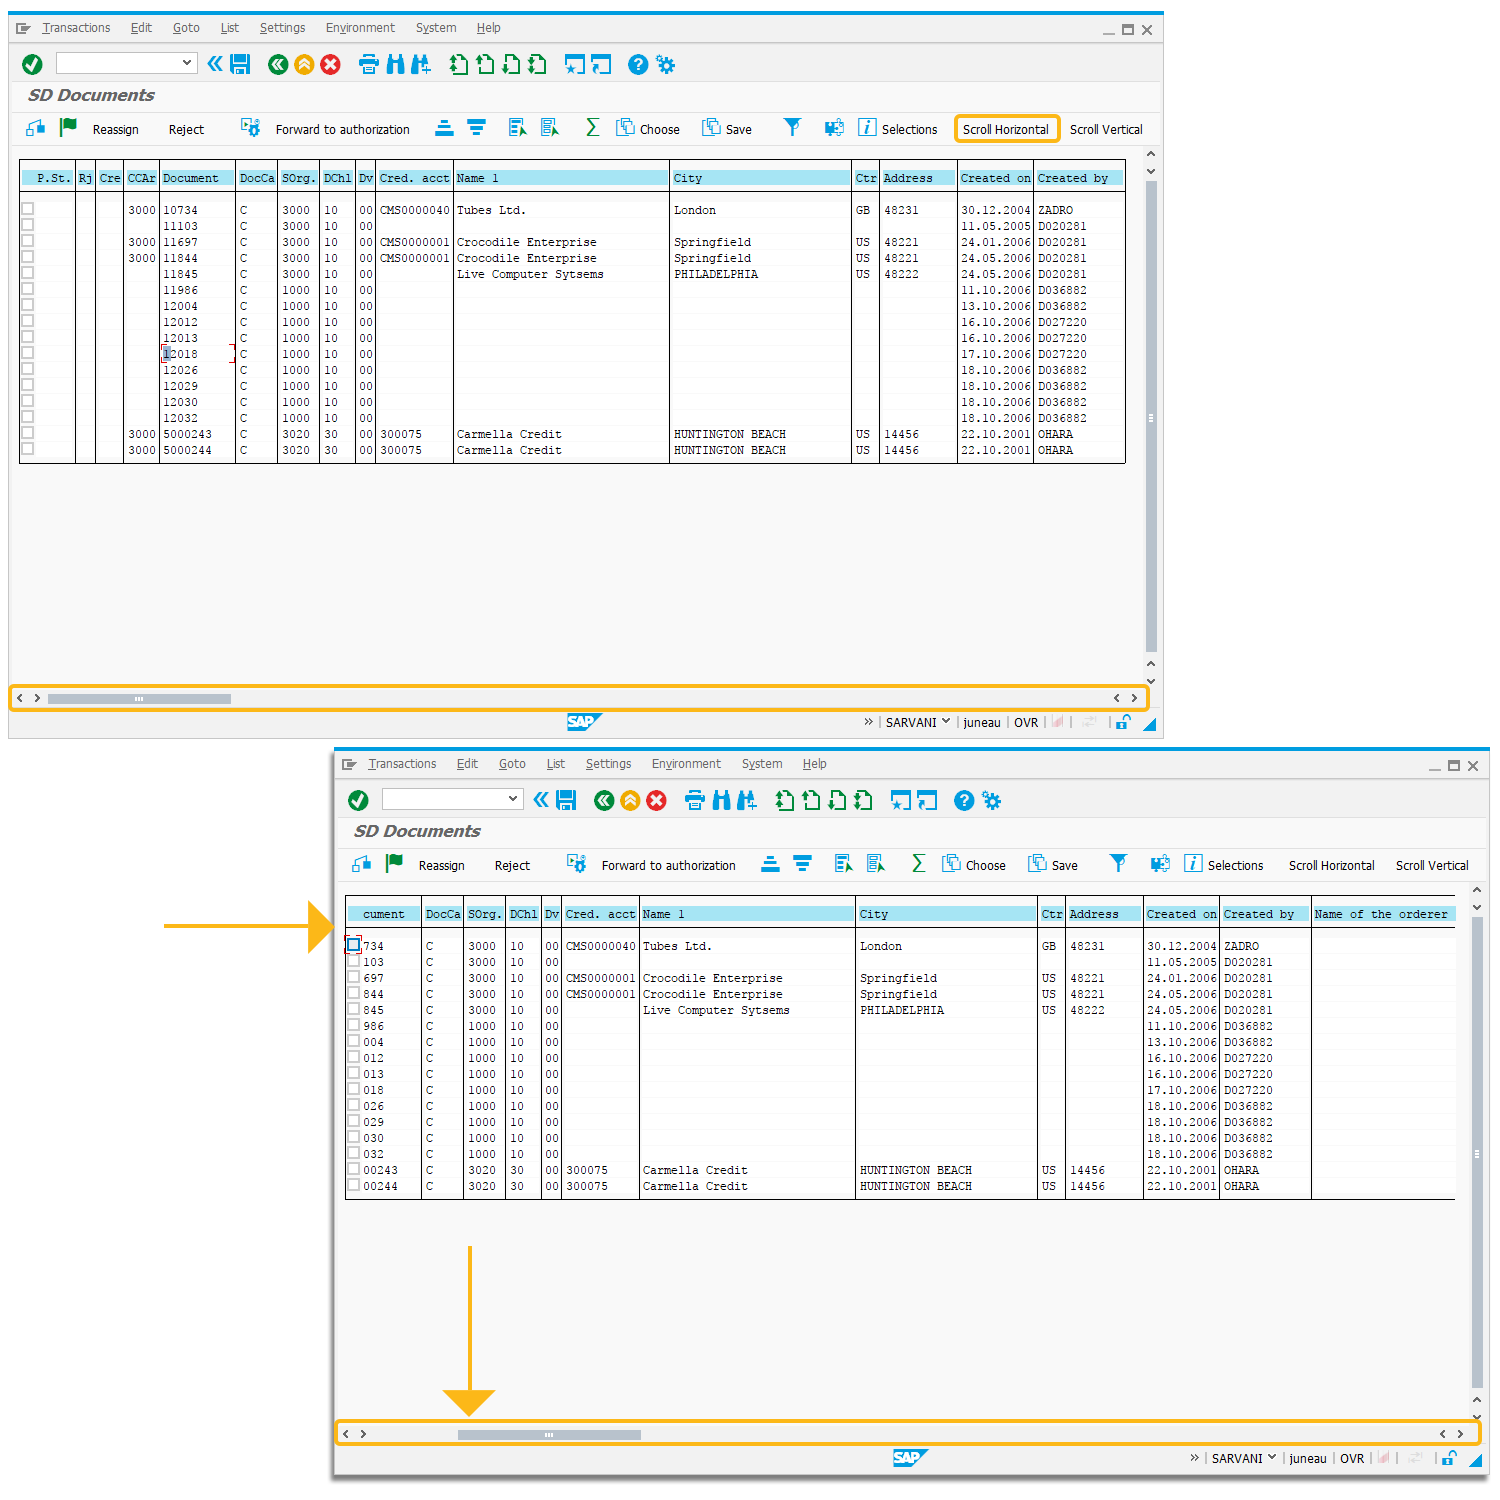
- Click on the Scroll Horizontal toolbar pushbutton to scroll the screen horizontally, as shown in the image below.
Example2:
In this scenario, you will learn how to use the scrolling mechanism to fetch the necessary values from the SAP table and assign them to the Liquid UI fields.
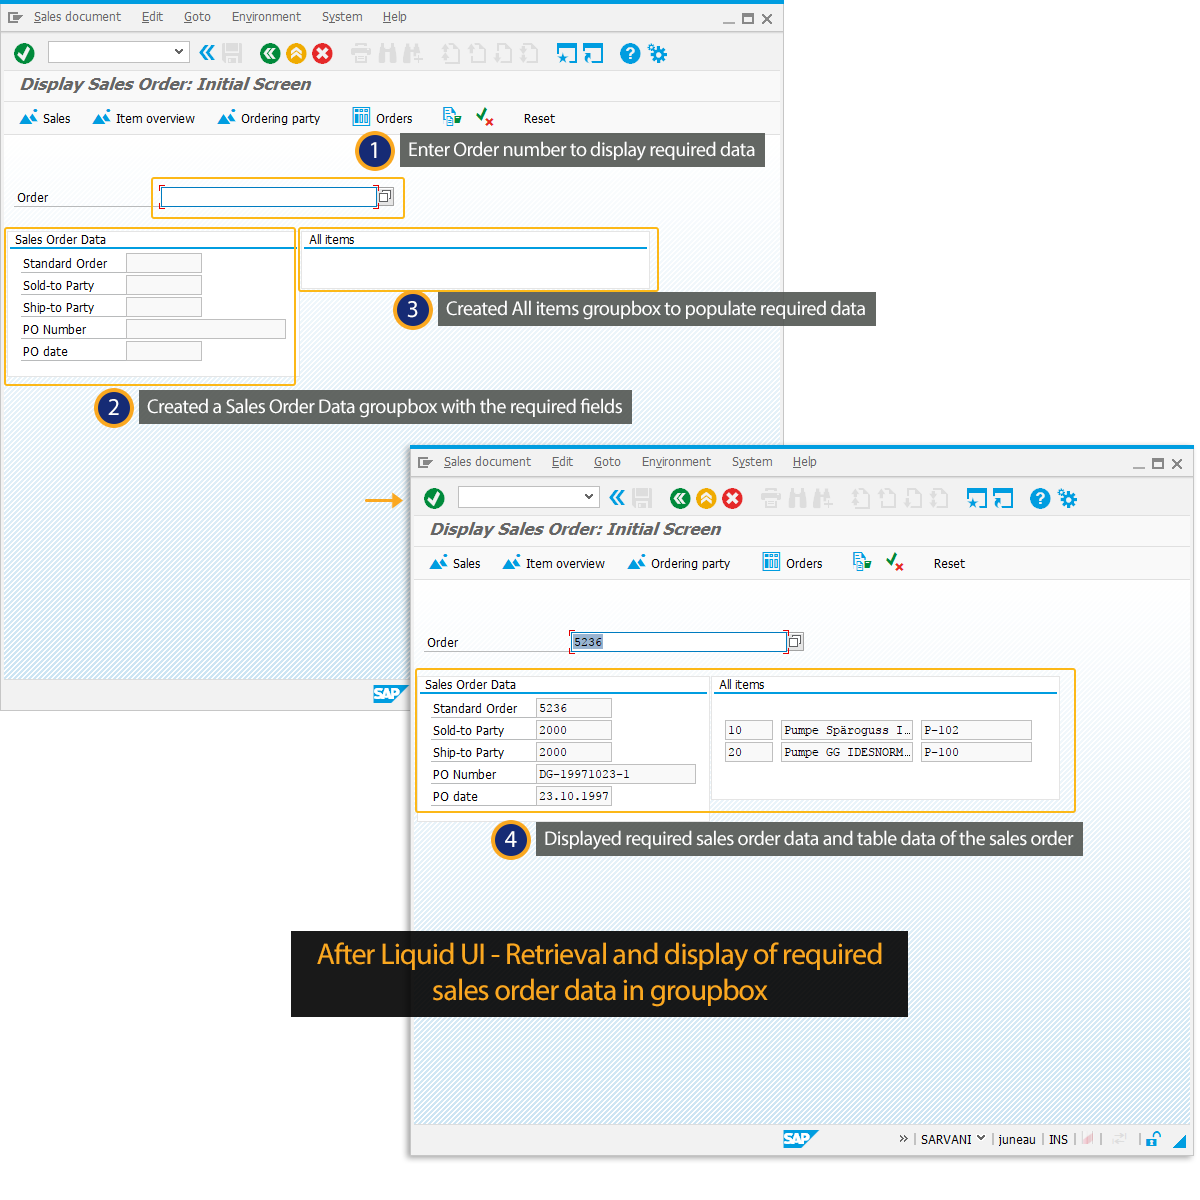
- Logon to SAP and navigate to the VA02 transaction. And enter an Order Number to fetch the required Order details from the SAP table on the VA02 second screen, as shown in the image below.
Learn more about Table Scroll.
Example3:
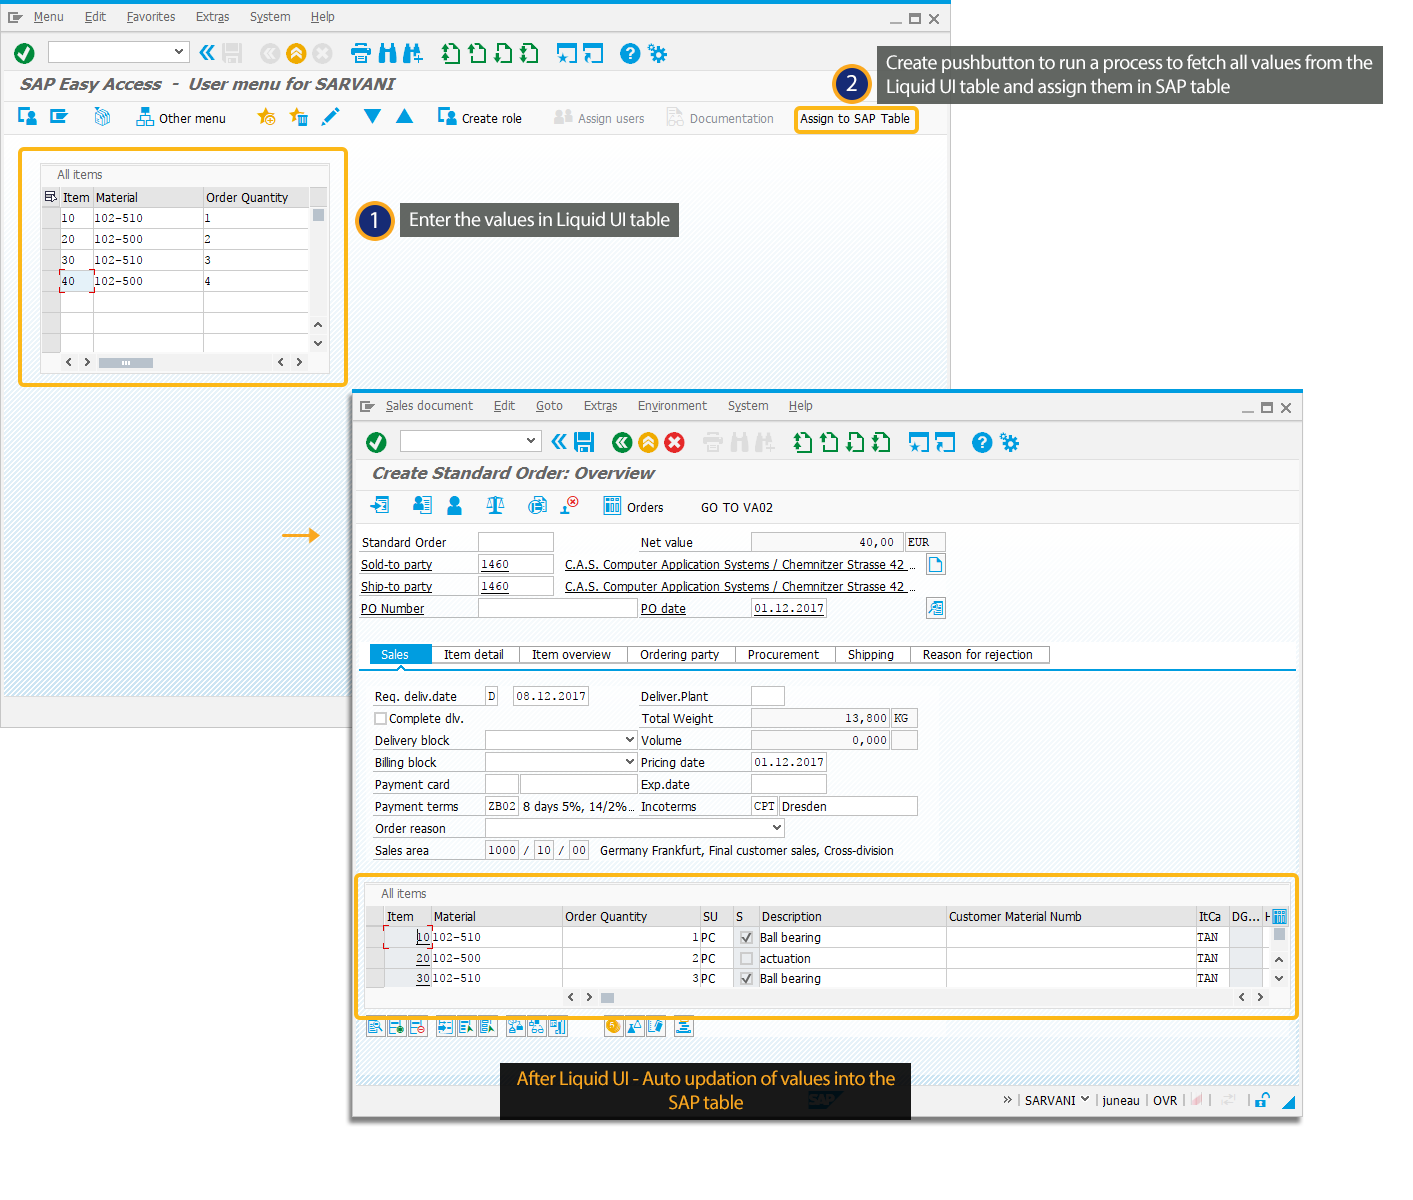
In this scenario, you will learn how to assign values to the SAP table from the Liquid UI table using the scrolling mechanism.
//Create the file SAPLSMTR_NAVIGATION.E0100.sjs inside your script folder for customizing the SAP table.
//Now, let's start adding the Liquid UI script to the above file and save it.
Customization
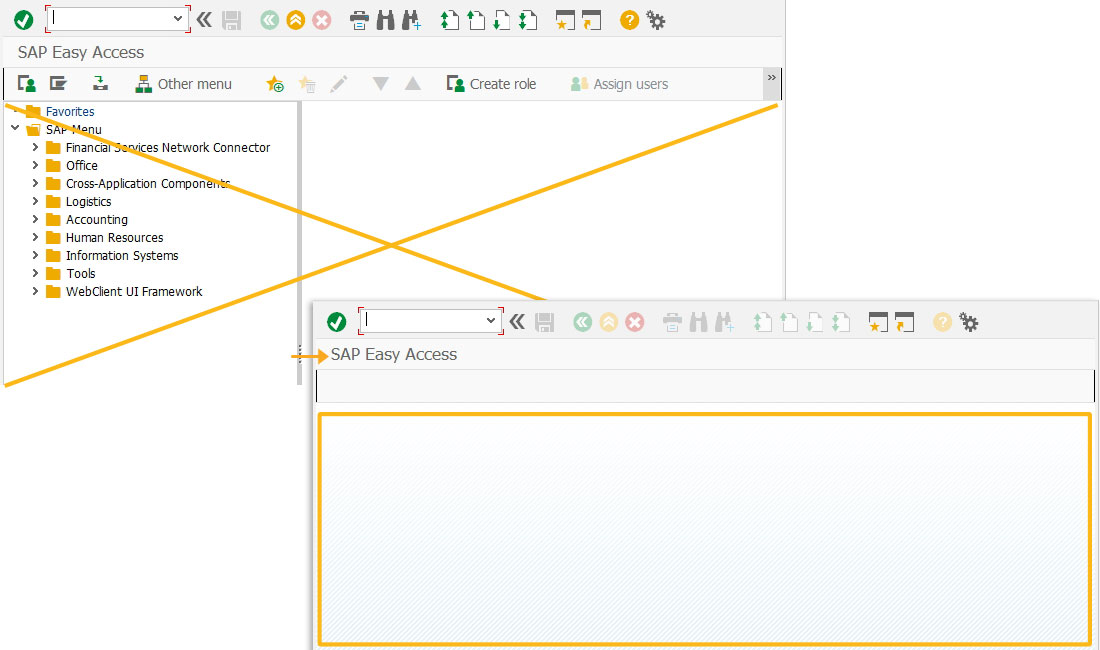
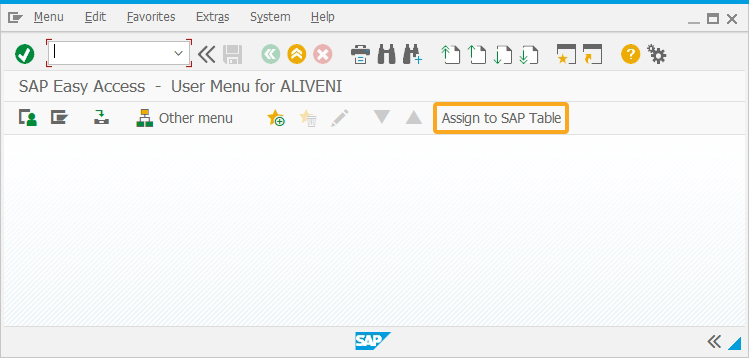
- Delete the unnecessary elements on the SAP Easy Access screen using the del command.
//Deletes the image conatiner on the SAP Easy Access screen.
del('X[IMAGE_CONTAINER]');
- Add a toolbar pushbutton Assign to SAP Table to execute the process z_AssigntoSAPTbale on click.
// Creates a toolbar pushbutton titled "Assign to SAP Table" to call the function on click.
pushbutton([TOOLBAR], "Assign to SAP Table","?",{"process":z_AssigntoSAPTbale,"size":[2,23]});
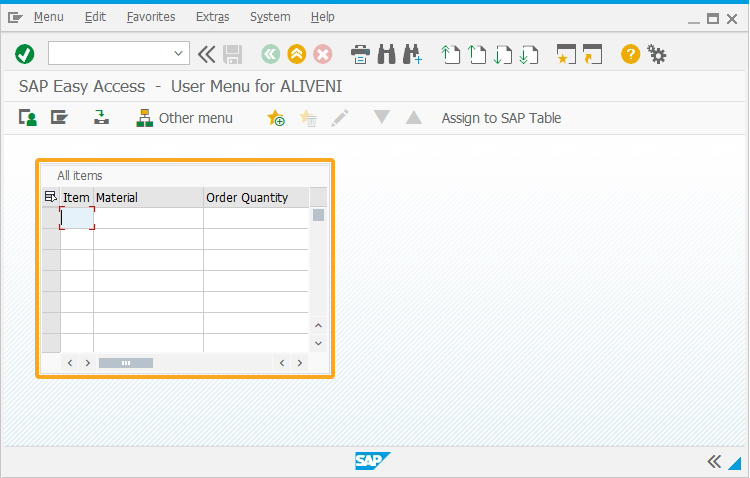
- Now, create a table All items with columns Item, Material, and Order.
//creates table titled "All Items"
table([1,5],[10,45],{"name":"va01_AllItems","title":"All items", "rows":10, "rowselection":true,"columnselection":true});
column('Item',{"table":"va01_AllItems","size":4,"name":"z_va01_item","position":1});
column('Material',{"table":"va01_AllItems","size":15,"name":"z_va01_material","position":2});
column('Order Quantity',{"table":"va01_AllItems","size":15,"name":"z_va01_Orderquantity","position":3});
- Add a function to assign values to the All items table.
//Adds function to assign values to All Items table
function z_AssigntoSAPTbale(){
 i = 0; //declaring variables and arrays
 temp_items=[];
 temp_material=[];
 temp_quantity=[];

  // code to fetch data from Liquid table to arrays
 STARTLABEL:
 z_temp1 = va01_AllItems.z_va01_item[i];
 z_temp2 = va01_AllItems.z_va01_material[i];
 z_temp3 = va01_AllItems.z_va01_Orderquantity[i];

 if(isBlank(z_temp1) && isBlank(z_temp2) && isBlank(z_temp3)){
  goto ENDLOOP;
 }

 temp_items.push(z_temp1);
 temp_material.push(z_temp2);
 temp_quantity.push(z_temp3);
 i=i+1;
 goto STARTLABEL;

 ENDLOOP:
 enter('/nva01');

// Creates Standard Order: Overview
onscreen 'SAPMV45A.0101'
 set('F[Order Type]', 'OR');
 enter();
// Creates Standard Order: Overview
onscreen 'SAPMV45A.4001'
 set('F[Sold-to party]','1460');
 enter();
// Logic to assign array values to All item table
onscreen 'SAPMV45A.4001'
 gettableattribute("T[All items]", {"lastvisiblerow":"LVisRow"}) // gets lastvisible row
 var z=1;
 for(j=0;j<LVisRow;j++){  // assign values to visible rows in table
  z_item_temp = temp_items[j];
  z_item_material = temp_material[j];
  z_item_quantity = temp_quantity[j];
  set("cell[All items,Item,&V[z]]" , "&V[z_item_temp]");
  set("cell[All items,Material,&V[z]]" , "&V[z_item_material]");
  set("cell[All items,Order Quantity,&V[z]]" , "&V[z_item_quantity]");
  z=z+1;
 }

 // on enter cursor moves to next row in table
 START:
 enter();
// logic assign values to rows after scrolling table using enter()
onscreen 'SAPMV45A.4001'
 z_item_temp = temp_items[j];
 z_item_material = temp_material[j];
 z_item_quantity = temp_quantity[j];
 set("cell[All items,Item,&V[LVisRow]]" , "&V[z_item_temp]");
 set("cell[All items,Material,&V[LVisRow]]" , "&V[z_item_material]");
 set("cell[All items,Order Quantity,&V[LVisRow]]" ,  "&V[z_item_quantity]");
 j=j+1;

 if(j<=i){ // loops until all liquid ui table values are assigned to sap table
  goto START;
 }
 enter();
}
SAP Process
- Logon to SAP. On the SAP Easy Access screen, you can see the Liquid UI table and a toolbar pushbutton Assign to SAP Table, now enter the values into the table, as shown below.
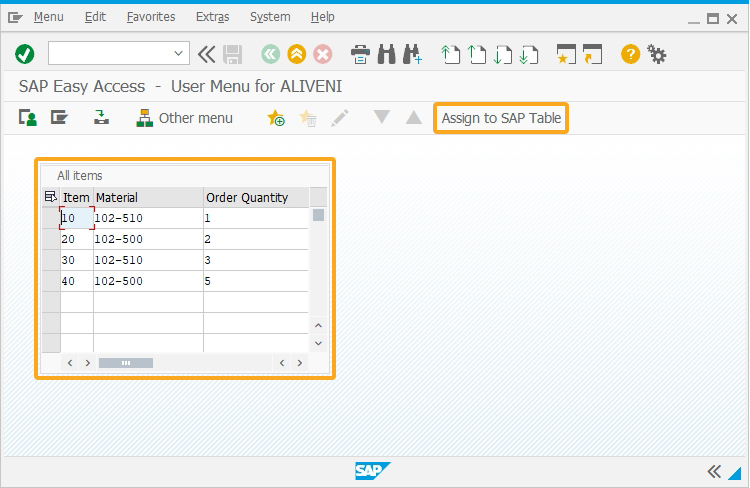
- Now, click on the Assign to SAP Table toolbar pushbutton to assign these values to the SAP table of the VA01 second screen. Select the sales organization value from the pop-up window to continue the process, as shown in the image below.