Prerequisites
- Products: Liquid UI WS, Liquid UI Server or Local DLL, Client Software
- Commands: pushbutton(), del(), box(), set(), enter(), onscreen()
Purpose
In this article, you will learn about the usage of pushbutton() options in different scenarios.
The following example demonstrates the usage of pushbutton options:
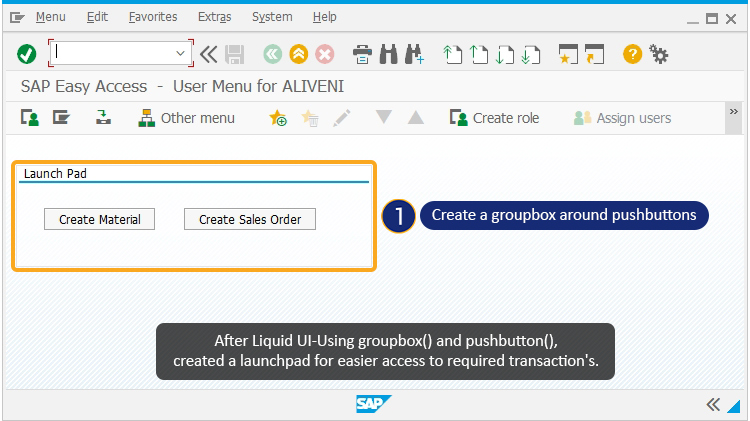
- Creating launchpads
- Assigning tooltips and icons to pushbuttons
- Passing parameters to a function
- Adding pushbuttons to the SAP toolbar
User Interface
//Create this file inside your script folder for customizing the SAP Easy Access screen: SAPLSMTR_NAVIGATION.E0100.sjs
//Now, let's start adding the Liquid UI script to the above file and save it.
Launching Transactions
Using the pushbutton() you can launch different transactions on the SAP screen. Here, we added two pushbuttons with labels as Create Sales Order and Create New Material to navigate to the Create Sales Order and Create New Material screens, as shown below.
//Creates two pushbuttons to navigate to Create Sales Order screen and Create New Material screen and a box labeled Launchpad.
pushbutton([4,6],"Create Sales Order","/nva01");
pushbutton([4,28],"Create New Material","/nmm01");
box([1,1],[5,50],'Launch Pad');
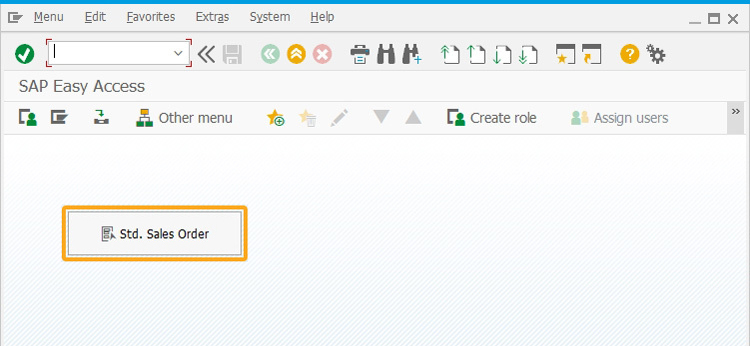
Adding Icons & Tooltips
Using the pushbutton() you can add icons and tooltips on the SAP screen. Here, we added an icon on pushbutton “Std. Sales Order”, as shown below.
//creates a pushbuttons with an icon to execute the va01_process.
pushbutton([10,20],"@4D\\QCreate a Std. Sales Order@Std. Sales Order",{"process":va01_process,"size":[2,24],"using":{"z_va01_ordertype":"OR"}});
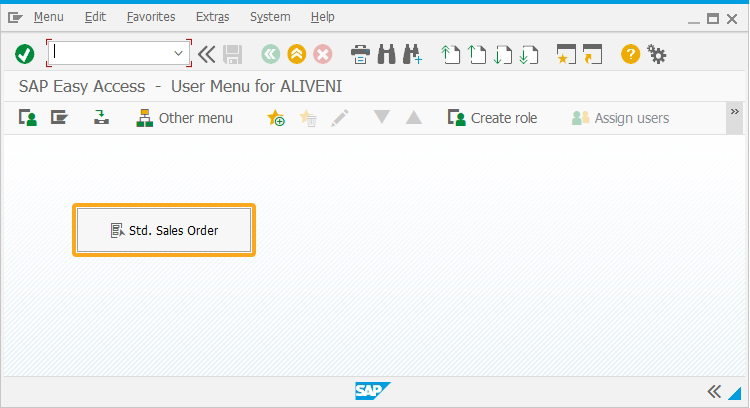
Passing parameters to functions
Using the pushbutton() you can pass the value to the fields on a different screen. Clicking on pushbutton “Std. Sales Order” assigns “OR” to the Order Type input field in the Create Sales Order screen and directly navigates to Create Standard order: Overview screen, as shown below.
//creates a pushbutton with an icon to exceute the process va01_process.
pushbutton([10,20],"@4D\\QCreate a Std. Sales Order@Std. Sales Order",{"process":va01_process,"size":[2,24],"using":{"z_va01_ordertype":"OR"}});
Now, add a function to pass the parameter to Create Sales Order screen, as shown below.
//add function to pass the parameters.
function va01_process()
{
// SAP Easy Access
onscreen 'SAPLSMTR_NAVIGATION.0101'
enter('/nva01');
// Create Sales Order: Initial Screen
onscreen 'SAPMV45A.0101'
set('F[Order Type]','or');
enter();
}
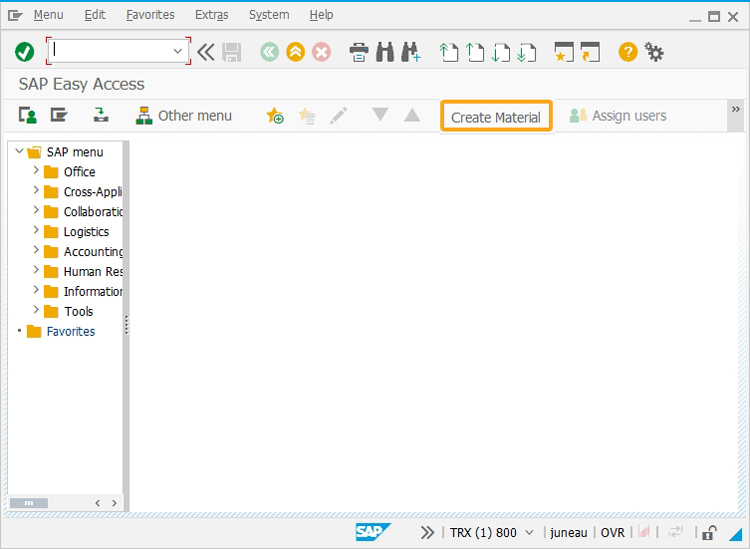
Adding Pushbutton to the toolbar
We can add pushbuttons on the toolbar using pushbutton(). Here, we added a toolbar pushbutton labeled Create Material on the SAP Easy Access screen.
//creates a toolbar pushbutton to execute the CreatMat process.
pushbutton([TOOLBAR],"Create Material",{"process":createMat,"using":{"v1":"BEARINGS","v2":"C","v3":"FERT"}});
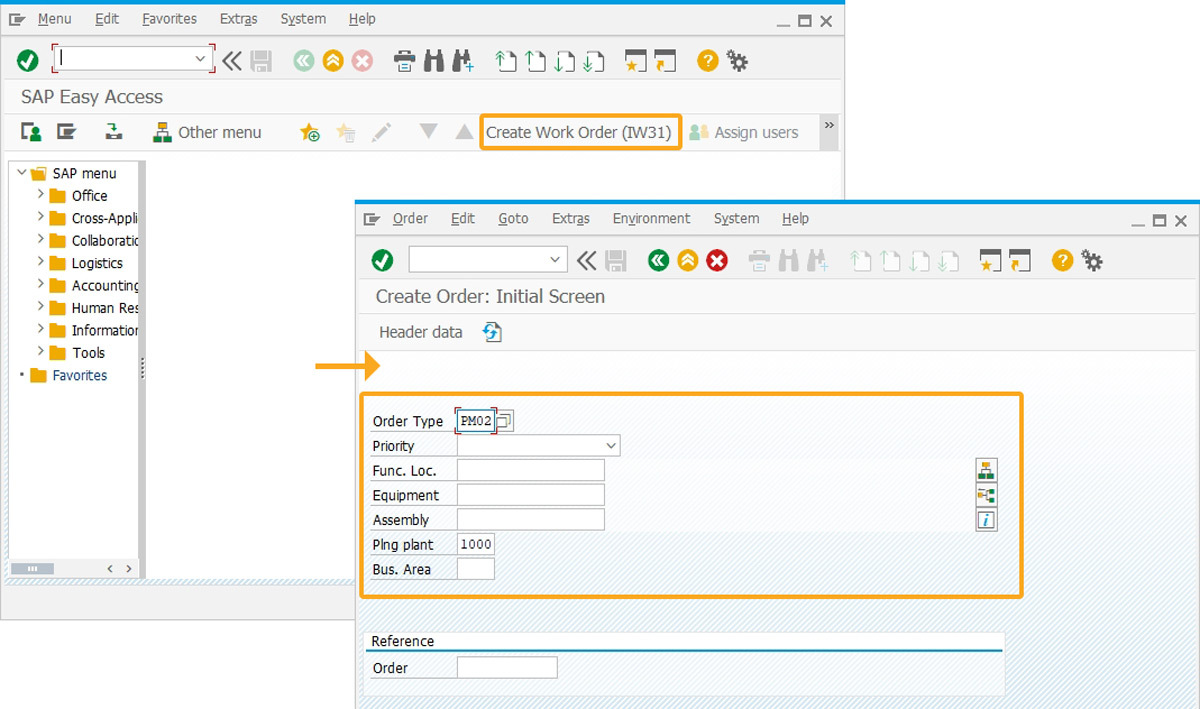
Executing transaction with OK code
Add a toolbar pushbutton "Create Work Order(IW31)" and click to navigate to the IW31 transaction, and assign values to the specified fields, as shown below.
//Creates a toolbar pushbutton with label "Create Work Order".
pushbutton([4,6],"Create Sales Order","/nva01");
pushbutton([4,28],"([TOOLBAR],'Create Work Order (IW31)','/OIW31 AUFPAR-PM_AUFART=PM02; CAUFVD-IWERK=1000');","/nmm01");