Prerequisites
- Products: Liquid UI WS, Liquid UI Server or Local DLL, Client Software
- Commands: inputfield(), message(), pushbutton()
Purpose
Learn how to add all the required fields on the same SAP screen instead of navigating to different screens to include different field values to create a material. We will walk you through the following steps.
- Delete unnecessary elements on the SAP screen using del()
- Change the position of the elements
- Add group boxes to arrange the screen elements
- Add inputfields to enter required values
- Add radio button to select the required plant values
- Add checkbox to select the required plant values
- Add pushbutton to execute a function on click
- Add functionality to add values into the elements to create a material
//Create this file inside your script folder for customizing the Create Material (Initial Screen) SAPLMGMM.E0060.sjs
//Now, let's add the Liquid UI script to the above file and save it.
- Delete the unnecessary elements on the Create Material screen using the del command.
//Deletes Change Number inputfield
del("F[Change Number]");
//Deletes Copy from inputfield
del("G[Copy from...]");
//Deletes Material inputfield
del("F[Material]");
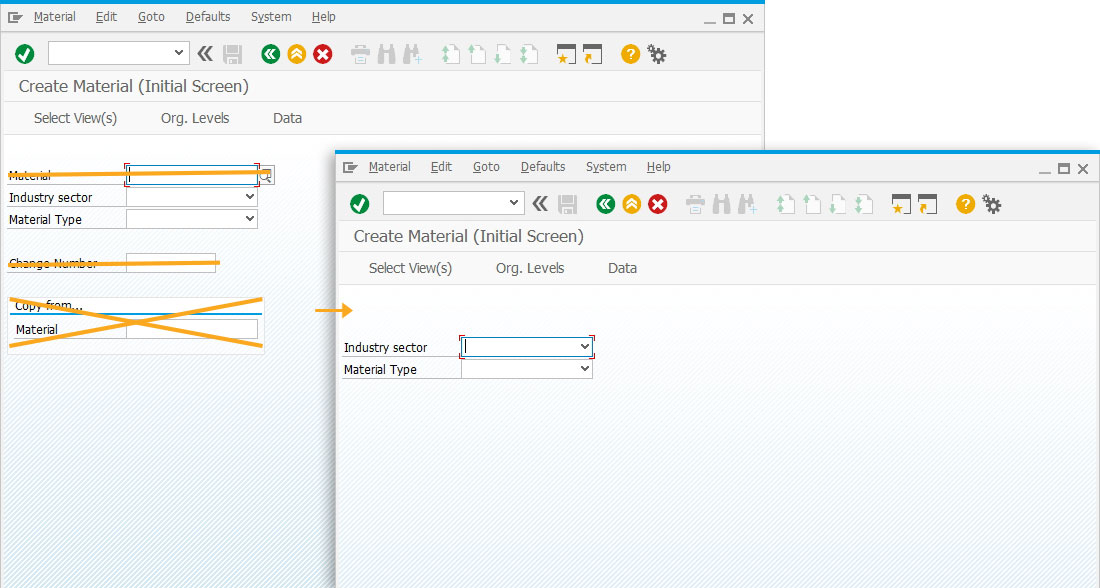
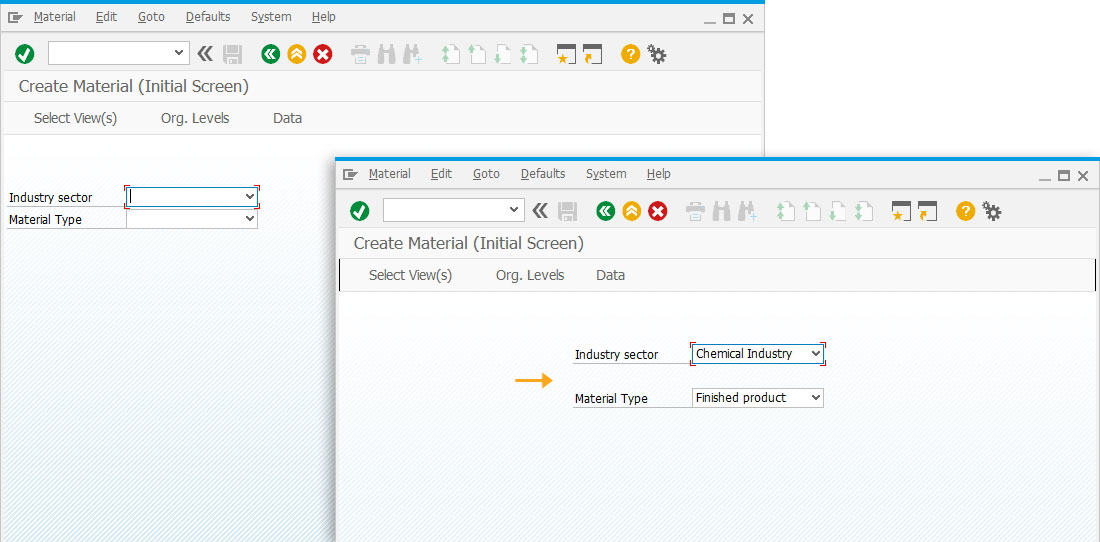
- Change the position of the Industry sector and Material Type input field, as shown below.
//Moves the input fields on the screen
pos("F[Industry sector]",[3,51]);
pos("F[Material Type]",[4,51]);
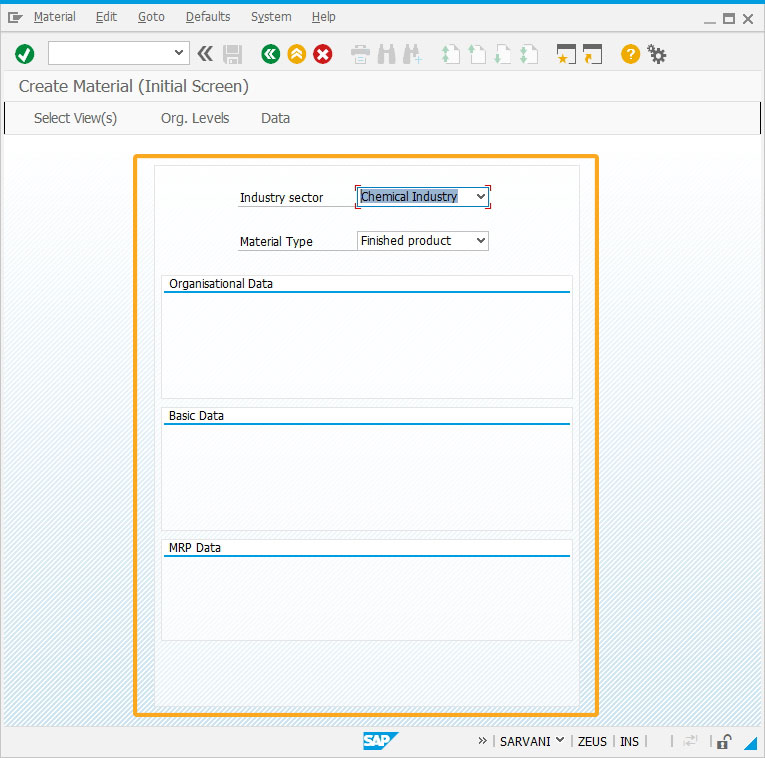
- Add three group boxes with labels as Basic Data, Organisational Data, and MRP Data to arrange screen elements.
//Creates group boxes with required titles
box([11,46],[15,90],"Basic Data");
box([6,46],[10,90],"Organizational Data");
box([16,46],[20,90],"MRP Data");
box([2,44],[23,92],"");
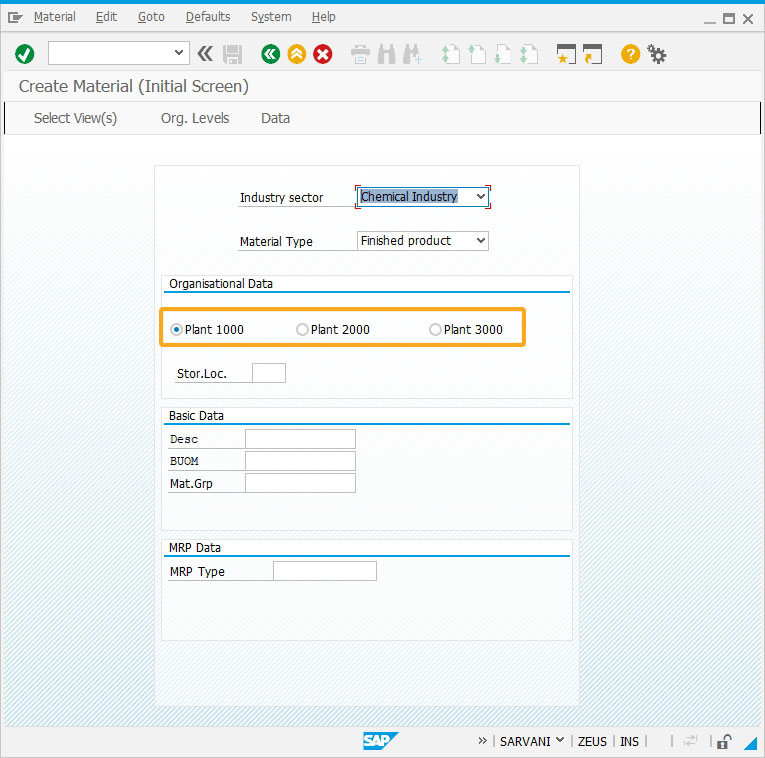
- Add input fields namely Stor.Loc, Mat Grp, BUOM, Mrp Type, and Description to enter the values to create a material.
//Creates 5 input fields required label names, technical names and sizes
inputfield([8,48],"Stor.Loc",[8,58],{"name":"z_mm01_storloc","size":4, "required":true});
inputfield([14,48],"Mat Grp",[14,60],{"name":"z_mm01_matgrp","size":3});
inputfield([13,48],"BUOM",[13,60],{"name":"z_mm01_buom","size":2});
inputfield([17,48],"Mrp Type",[17,60],{"name":"z_mm01_mrptype","size":3});
inputfield([12,48],"Description", [12,60],{"name":"z_mm01_desc","size":25});
- Add three radio buttons with Plant values to select the required value.
//Creates 3 radio buttons to select the required plant value
radiobutton([7,78],"Plant 3000",{"name":"z_mm01_plant","value":3000});
radiobutton([7,47],"Plant 1000",{"name":"z_mm01_plant","value":1000});
radiobutton([7,63],"Plant 2000",{"name":"z_mm01_plant","value":2000});
- Add a checkbox with Bulk Material as the label and z_mm01_blkmat as its technical name.
//Creates a push button with a label name and to execute the process on click
checkbox([19,49],"Bulk Material",{"name":"z_mm01_blkmat"});
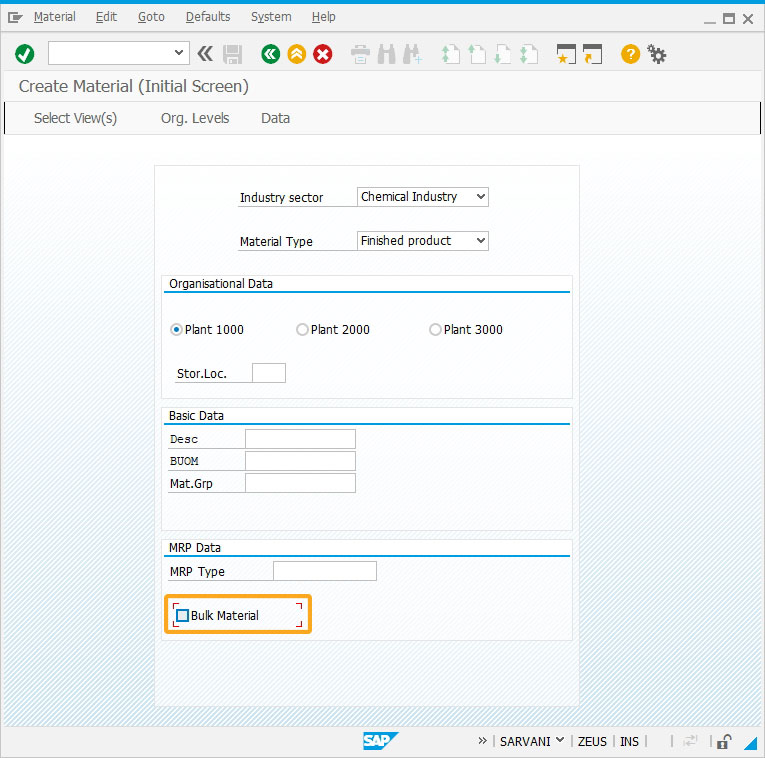
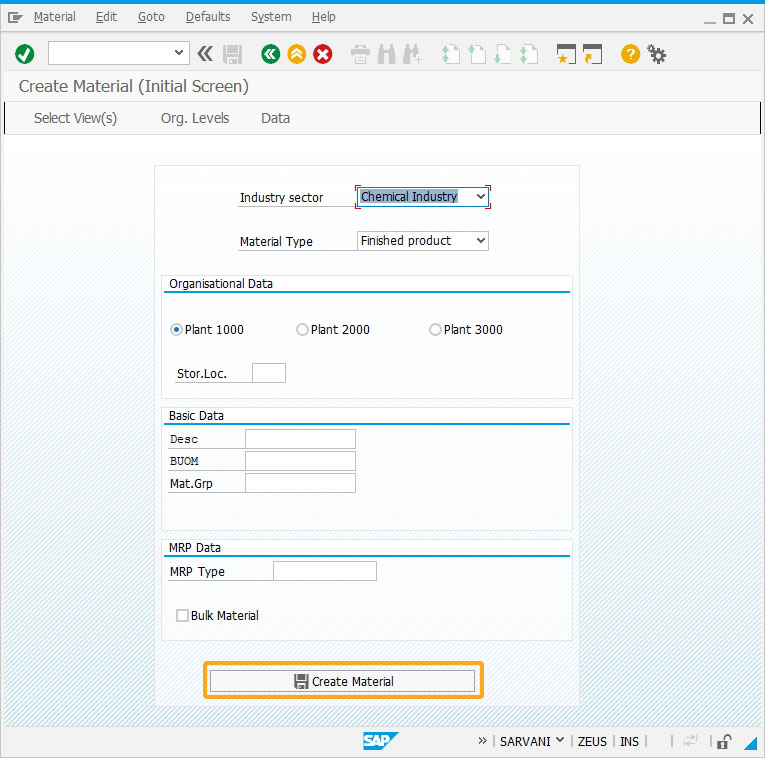
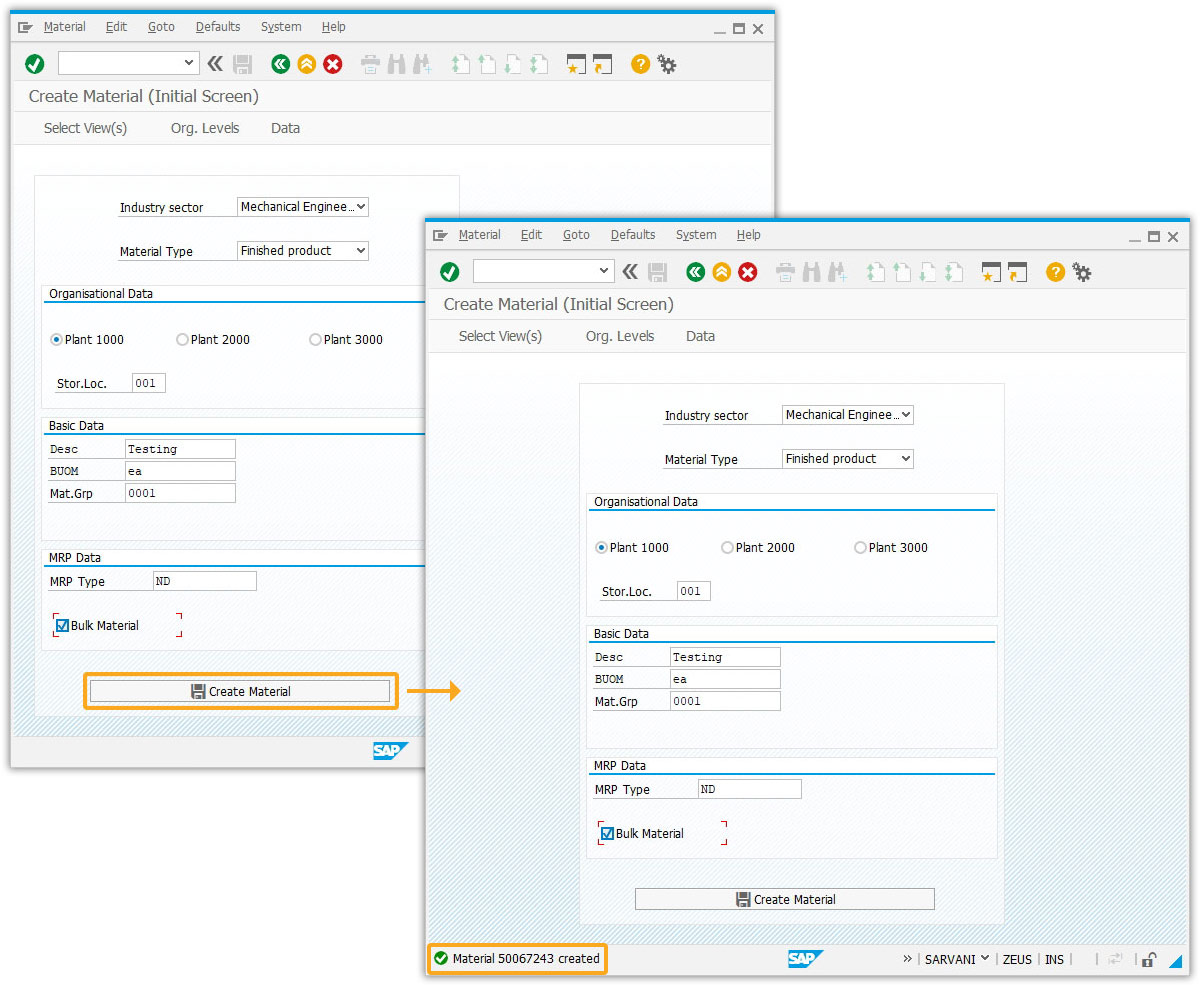
- Add a pushbutton labeled Create Material that executes the process.
//Creates a check box with a label name and technical name
pushbutton([24,29], "@2L@Create Material                  ",{"process":mm01_create_material});
- Add functionality to create a material that assigns values to the required fields.
// Creates a function to assign values to the required fields to create a material
function mm01_create_material(){
// Create Material (Initial Screen)
onscreen 'SAPLMGMM.0060'
enter('/5');
// Create Material (Initial Screen)
onscreen 'SAPLMGMM.0070'
set('Cell[Table,0,1]','X');
set('Cell[Table,0,4]','X');
set('Cell[Table,0,6]','X');
set('Cell[Table,0,12]','X');
set('Cell[Table,0,13]','X');
set('Cell[Table,0,14]','X');
enter('/6');
// Create Material (Initial Screen)
onscreen 'SAPLMGMM.0080'
set('F[Plant]','&V[z_mm01_plant]');
set('F[Stor. Location]','&V[z_mm01_storloc]');
set('F[Sales Org.]','1000');
set('F[Distr. Channel]','10');
enter();
// Create Material 68999 (Finished product)
onscreen 'SAPLMGMM.4004'
set('F[MAKT-MAKTX]', '&V[z_mm01_desc]');
set('F[Base Unit of Measure]','&V[z_mm01_buom]');
set('F[Material Group]','&V[z_mm01_matgrp]');
enter('=SP04');
// Create Material 68999 (Finished product)
onscreen 'SAPLMGMM.4000'
set('cell[TABLE,Tax classification,1]','1');
enter('=SP06');
// Create Material 50066763 (Finished product)
onscreen 'SAPLMGMM.4200'
set('cell[TABLE,Tax Classification,2]', '1');
set('cell[TABLE,Tax Classification,3]', '1');
set('cell[TABLE,Tax Classification,4]', '1');
set('cell[TABLE,Tax Classification,5]', '1');
set('cell[TABLE,Tax Classification,6]', '1');
set('cell[TABLE,Tax Classification,7]', '1');
set('cell[TABLE,Tax Classification,8]', '1');
enter("/27");
// Create Material 50066763 (Finished product)
onscreen 'SAPLMGMM.4000'
enter("=SP06");

// Create Material 68999 (Finished product)
onscreen 'SAPLMGMM.4000'
set('F[Trans. Grp]','0001');
set('F[LoadingGrp]','0001');
set('F[Availability Check]','01');
enter("=SP12");
// Create Material 68999 (Finished product)
onscreen 'SAPLMGMM.4000'
set('F[MRP Type]','&V[z_mm01_mrptype]');
enter("=SP13");
// Create Material 68999 (Finished product)
onscreen 'SAPLMGMM.4000'
set('F[SchedMargin key]','000');
if (z_mm01_blkmat=='X')
set('C[Bulk Material]','X');
else
{
set('C[Bulk Material]', ' ');
}
enter("=SP14");
// Create Material 68999 (Finished product)
onscreen 'SAPLMGMM.4000'
enter('/11',3000);
} - Enter the required value into the fields and click Create Material. You will see the success message indicating the Material created, as shown below:
Next Steps

Scenario 4 - Creating a Notification
Learn how to save the notifications on the Create Notification Maintenance Request screen.
Learn how to save the notifications on the Create Notification Maintenance Request screen.
10 min.
This article is part of the Screens combination/aggregation


