Purpose
All specifications relating to the Liquid UI Server are specified in the sapproxy.ini configuration file.
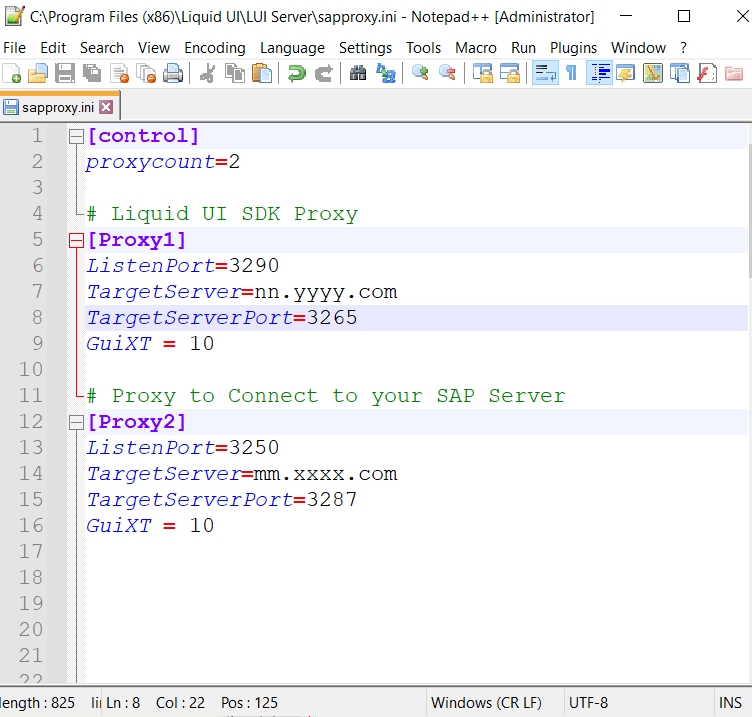
In the sapproxy.ini file, you will define the server configuration parameters. It is housed in the same directory as the Liquid UI Server aka GuiXT Server files. A typical sapproxy.ini file will look as follows:
Parameters
The sapproxy.ini file contains two sections and various parameters, which are defined below. The two sections are:
- Control
- Proxy
Control
The [control] section in the sapproxy.ini file allows you to specify how many SAP servers you can connect. You can set the number to the proxycount variable. A sample [control] section of the sapproxy.ini file appears as follows:
The parameter contained in the [control] section of the sapproxy.ini file is explained as follows:
- proxycount
-
This parameter defines how many SAP ERP systems the Liquid UI Server will connect to. In our example, there is only a single SAP system involved. Client sites may have up to four proxies.

Proxy
The [ProxyX] section of the sapproxy.ini file is where you will input the actual connection parameters of the server. The [X] is a number that denotes the proxy count for each connection. There must be a [ProxyX] section for each server specified in the [control] section. In other words, if you set proxycount=4 in the [control] section, you must have four [Proxy] sections. These will be numbered as follows:
- [Proxy1]
- [Proxy2]
- [Proxy3]
- [Proxy4]
A sample [ProxyX] section of the sapproxy.ini file is displayed in the example below.
[control]
proxycount=1

[Proxy1]
ListenPort=3200
TargetServer=test
TargetServerPort=3200
ReservedPhysMem=25
GuiXT = 10
Options= -logtraffic:on -tracetraffic:on
servercert=r:\synactive\sapproxy\servercert.pem
privatekey=r:\synactive\sapproxy\privatekey.pem
The required parameters contained in the [Proxy] section of the sapproxy.ini file are as follows:
|
Parameter Name |
Description |
|
ListenPort |
|
|
TargetServer |
|
|
TargetServerPort |
|
|
GuiXT |
|
|
ReservedPhysMem |
|
Other Options
In addition to the parameters introduced above, the sapproxy.ini file can contain other parameters as per the functionality and requirement as well. These are as follows:
- Trace options
-
You can add trace options to the sapproxy.ini file. Trace options assist in debugging the Liquid UI Server. The syntax is as follows:
options=-logtraffic
This option is a Boolean value that can be turned on or off. Every network packet will be examined by Logtraffic, and the results will be recorded in a log file. The naming pattern for logs is 'TL_*'. The 'logtraffic' option is added to the sapproxy.ini under the keyword 'Options=logtraffic:on/off'. The default setting for logtraffic is 'off'.
To add trace options, please do the following:
- Open the Sapproxy.ini in a supported text editor. We usually use Notepad.
- Add the following keyword to the Sapproxy.ini file: options=-logtraffic:on. This keyword will trace each and every network packet, writing the results as log files. The logs will use the naming convention: TL_*
- Once the log files are generated, send them to Synactive for review by a Support specialist.
- Easy Access On/Off
-
This flag turns off the automatic addition of the NO_EASYACCESS flag. The NO_AEASYACCESS flag is used to eliminate the easy access bit in the DIAG. The default setting is 'on'. The option is written as shown below
-add_no_easyaccess:off
- ITS On/Off
-
This is used to disable the removal of the ITS flag. ITS was the predecessor to NetWeaver. GuiXT was able to run in ITS and this flag was used to prevent the flag from being removed. Since ITS is no longer common, this flag is unlikely to be used in most scenarios. The default setting is 'on' and it is written as follows:
-remove_its:off
- SAPConsole On/Off
-
This flag is used to turn the sapconsole detection on or off, causing the appropriate handling of sapconsole packets to occur. When the flag is set to 'on' then sapconsole mode is turned on. The default setting is 'auto'. It is written as follows:
-sapconsole:off/on
- SecureConnectPasskey=XXXX
-
This setting is used to turn on the Secure Connect feature for Liquid UI. The passphrase can be between X and XX characters long and can include alphabetic, numeric, and symbol characters. The syntax is as shown below.
SecureConnectPasskey=<passphrase>
To use this setting, please do the following.
- On the Liquid UI Server, open the sapproxy.ini file and type in the following: SecureConnectPasskey=test.
- Save your changes and close the sapproxy.ini file.
- On your iOS device, open the Connection List and select the connection you wish to use.
- In the 'Secure Connect' field, type the same passphrase you entered on the Liquid UI Server.
- Click the Save button to save your changes.
- In the Connection List, click Done.
- The connection will launch securely. You can tell that the connection is secure because the SAP system ID will be green.
- Swap Easy Access On/Off
-
This option is used to turn off the automatic swapping of Easy Access. The default setting is 'on'. This option is written as shown below:
-swap_easyaccessoff
- Send Direct Return On/Off
-
This option turns on the process of sending screens from server to client during ‘Input Script’ processing. The default state is 'off' but please note that this flag cannot be turned on if a given connection is determined to be from sapconsole. This option is written as follows:
-senddirectreturn:on
- Trace Connections
-
This option is used to trace and display information about each connection. The default setting is 'off'. This option is written as shown below:
-traceconnections:on
- Limit Trigger
-
This option is used to turn off the limit trigger. This is explained in more detail in the Server Debugging section. This option is written as follows:
-limit_trigger:off
- Log Traffic
-
This option is used to log each packet sent and received by the server. The default setting is 'off'. This option is written as follows:
-logtraffic:on
- Trace Traffic
-
This option is used to trace and log each network packet. The log can then be used to replay back the R/3 network flows. The default setting is 'off'. The option is written as follows:
-tracetraffic:on
- Progress Indicator
-
This option turns off the progress indicator during Input Script processing. The default setting is 'on', and it is written as shown below:
-progress_indicator:off
- Progress Indicator:postfs
-
This option will send both postfs (title) and progress indicator during Input Script processing. It is written as shown below:
-progress_indicator:postfs
- Progress Indicator:postfsonly
-
This option will send only postfs(title) in place of the progress indicator during Input Script processing. It is written as shown below:
-progress_indicator:postfsonly
- Async RFC
-
This option is used to suppress the addition of this flag to the SAP application server. If active, the SAP server will send all RFCs and wait for a response. It is written as follows:
-async_rfc:off
- Remove Menu Entries
-
This option will remove menu entries sent to the client when it is turned on. It is used only for sapconsole mode and the default setting is 'off'. It is written as in the example below:
-removemenuentries:off
- holdconnection
-
This flag is used to turn on the robust connections. LUI clients can hold the connection with the R/3 server in the event of network disconnection. It enables the clients to transfer the connection to different devices with the same username and password through the server. This option is written as follows:
-holdconnection:on
- remove_rfcblob_bit
-
A blob is a large screen that is sent in chunks from the R/3 server to the SAP GUI client. If this option is turned on, then the server does not process the compilation of the chunks to form the screen packet, but sends the chunks as is, behaving like pass through. This will have serious consequences for the engine code as it would miss a full screen. The default setting is off. This option is written as follows:
-remove_rfcblob_bit:off
- Verbose
-
This option generates detailed logs with every event captured during the traffic processing and traffic alterations of the server. This option is written as follows:
-verbose:on
- logrfc
-
This option is used to trace OLE control logs on the server and the option is written as follows:
-logrfc:on
- _INTR_
-
When this entry is included in the sapproxy.ini file, the Liquid UI Server will send a blank screen to the SAP GUI client. The syntax is as follows:
TargetServer=_INTR_
This setting means that you will not have a live connection to an SAP server, similar to how the Offline product works. Also as in Offline, you can run scripts to create controls and other functions on this screen. This setting is useful for creating custom controls or functions without sending data to SAP. Click the X in the upper right corner of this screen to turn it off.
The _INTR_ entry takes a single option, as follows.
- app: This option designates the Dynpro. In the example, it is the ZGUIXT custom Dynpro.
Beginning with the 3.4.xxx.0 release of Liquid UI WS Server, the _INTR_ syntax has changed. The original syntax is shown below.
TargetServer=__INTR__, app=ZGUIXT
From the 3.4.xx.0 release, the syntax will be as follows. Any new options will be included in the list of options.
TargetServer=__INTR__, options=-app:ZGUIXT -n:1001 -sid:PRD
Note: The two syntaxes cannot be mixed - you must use one or the other. If both are used, the 'options' syntax will always take precedence.The options for the _INTR_ entry are as follows.
- -app: This designates the Dynpro name.
- -n: This designates the Dynpro number.
- -sid: This designates the database name.
servercert, privatekey
Liquid UI Server will now support TLS (the encryption protocol used in SSL and HTTPS) for the most secure network connectivity. This is the same proven protocol used in all internet commerce "HTTPS" websites. It performs its encryption after a complex handshake and decides on an encryption cypher and session key to use on both ends. To turn on TLS, you need one Server Certificate and one Private Key. They are specified in sapproxy.ini as follows. You will also need the latest version of synssl.dll. Our implementation is TLS version 1.3, which is the latest version of the TLS standard. Our code is based on OpenSSL Version 1.0.2h.
servercert=r:\synactive\sapproxy\servercert.pem
privatekey=r:\synactive\sapproxy\privatekey.pem
If the Liquid UI client does not have a valid license (not purchased from the app store, and running on a temp license) and if it connects to sapproxy configured like below in sapproxy.ini, then the license specified in clientsy3 will be downloaded into the device, upon a successful login of the user.
Customers who use iOS (for now) do not have to manually install the sy3.
The sy3 file path should be configured in sapproxy.ini as ClientSY3. Simply point it to the file; no quotes or brackets are required.
[Proxy1]
ListenPort=3220
TargetServer=juneau
TargetServerPort=3200
options=-logrfc:on -tracetraffic:on -verbose:on
ClientSY3=\\raven\usr\SYNACTIVE\GALA\ANDROIDBUILD\LiquidUI.sy3
Enable SecureConnect on Liquid UI Clients without having to configure the encryption key on the client
If the Encryption key is configured only on the Liquid UI Server (sapproxy.ini) and not specified on the client, sapproxy will enable secureconnect once connected and the Server realizes that it is talking to our Liquid UI client (Again currently only available on iOS). We will have the option to enable secure connect by specifying the encryption key on both the client and server or by specifying just on the server side.
The benefit of this is users will experience a secure connection, without having to manually enter the key on the client. The key on the client will be removed in future versions of the client.
[Proxy1]
ListenPort=3220
TargetServer=juneau
TargetServerPort=3200
options=-logrfc:on -tracetraffic:on -verbose:on
ClientSY3=\\raven\usr\SYNACTIVE\GALA\ANDROIDBUILD\LiquidUI.sy3
SecureConnectPasskey="swordfish"
Secureconnect:
Secureconnect allows the Liquid UI clients to connect to the Liquid UI Server through secure messaging. It enables SecureConnect on Liquid UI Clients without having to configure the encryption key on the client. Liquid UI creates a completely secure communication channel between the Liquid UI Server and the Liquid UI client residing on your device. Liquid UI encrypts every packet between the Liquid UI Server and the client device, ensuring the security of your data.
Beginning with 3.5.520.0, secureconnect parameter is configured in Liquid UI Server→sapproxy.ini configuration file.
sapproxy.ini file for Single Sign On
The user has to follow the below configurations to enable the Single Sign On feature on Liquid UI for iOS and Android.
sapproxy.ini file for domain:
[control]
proxycount=1
[Proxy1]
ListenPort = 3200
TargetServer = juneau   // Your SAP Server
TargetServerPort = 3200    // Your SAP Server Port
GuiXT = 10
SNCName = p:trxuser@SYNDOM
defaultdomain=syndom  // Your Domain Name
Following are the additional parameters required for configuring Single Sign On using Domain
|
Parameter Name |
Description |
|
SNCName |
Secured Network Connection name created in SAP using your domain name |
|
defaultdomain |
Enter the domain name |
sapproxy.ini file for the portal:
[control]
proxycount=1
[Proxy1]
ListenPort = 3200
TargetServer = juneau   // Your SAP Server
TargetServerPort = 3200    // Your SAP Server Port
GuiXT = 10
portalurl=http://nw74:50000/irj/portal
defaultdomain=@portal
Following are the additional parameters required for configuring Single Sign On using Portal:
|
Parameter Name |
Description |
|
portalurl |
Enter the portal URL |
|
defaultdomain=@portal |
Enter the portal name |
sapproxy.ini file for key-certificate pair:
[control]
proxycount=1
[Proxy1]
ListenPort = 3200
TargetServer = juneau   // Your SAP Server
TargetServerPort = 3200    // Your SAP Server Port
GuiXT = 10
strustsso2=msad,338,LUX,r:\synactive\LUIKeyPair.p12,p12password
defaultdomain=syndom
Following are the additional parameters required for configuring Single Sign On using Key-certificate pair:
|
Parameter Name |
Description |
|
strustsso2 |
|
|
defaultdomain |
Enter your domain name |
sapproxy.ini file for key-certificate pair with cyber safe:
[proxy1] ListenPort=3220
TargetServer=SAPECCSERVER
TargetServerPort=3200
GuiXT = 10
strustsso2=msadenc,388,LUX,R:\synactive\sapproxy\LuiKeyPair.p12,p12password,800,E
snc_lib=C:\Program Files\CyberSafe\bin\sncgss64.dll
sncidentity=sapid7/liquidui1.guixt.com@GUIXT.COM
defaultdomain=GUIXT.COM
Following are the additional parameters required for configuring Single Sign On using Key-certificate pair and cyber safe
|
Parameter Name |
Description |
|
strustsso2 |
|
|
snc_lib |
Location of the Cyber Safe SNC library (sncgss64.dll) |
| note
sncidentity |
Service principal name as created by the Cyber Safe ktuil program |
|
defaultdomain |
Enter your domain name |


