Prerequisites
- Products: Liquid UI WS, Liquid UI Server or Local DLL, Client Software
- Commands: onUIEvents(), enter(), set(), inputfield(), _message, onscreen(), onmessage()
Purpose
You will learn how to change the readonly status for created elements between Create/Change/Display transactions. Those transactions will load the same script according to the same screen number and screen name. In order to create multiple commands for the different readonly status of elements, this can save the number of scripts in large screen modification efficiently.
In this scenario, we use IW32 - Change Maintenance Order/IW33 - Display Maintenance Order as an example.
The script merges some fields from the "Location" tab to "HeaderData" tab so the user doesn't need to go to the extra tab to enter data. It demonstrates how created inputfields can change its readonly status dynamically according to corresponding conditions. We will walk you through the following steps:
- Customize the Change/ Display Maintenance Order: Initial screen to fetch field values under the location tab
- Customize the Change/ Display Maintenance Order: Overview screen to make location field values read-only dynamically
//Create this file inside your script folder for customizing Change/Display Maintenance Order Initial screen: SAPLCOIH.E0101.sjs
//Now let's start adding the content to the above file
- Add an OnUIEvent command to execute a function on performing enter on the screen.
// Executes iw32iw33Execute process on performing enter
onUIEvents["Enter"] = {"fcode":"?", "process":iw32iw33Execute};
- Add a function to execute and fetch data from the Location tab.
//Execute when user hits enter on screen
//Function to execute and fetch data from "Location" tab
function iw32iw33Execute(){
    onscreen "SAPLCOIH.0101"
        enter();
        onmessage                    //Error handling
            if(_message.substring(0,2) == "E:"){
                message(_message);
                enter("?");
                goto FUNC_END;
            }
            else
                enter();

    onscreen "SAPLCOIH.0101"        //Error Handling
        if(_message.substring(0,2) == "E:"){
            message(_message);
            enter("?");
            goto FUNC_END;
        }
        else
            enter();

    onscreen "SAPLCOIH.3000"
        set("V[iw3x_status]", "&F[Sys.Status]");
        enter("=ILOA");            //Go to "Location" tab

    onscreen "SAPLCOIH.3000"
        set("V[iw3x_maint_plant]", "&F[MaintPlant]");
        set("V[iw3x_location]", "&F[Location]");
        set("V[iw3x_room]", "&F[Room]");
        set("V[iw3x_plant_section]", "&F[Plant section]");
        set("V[iw3x_work_center]", "&F[Work center]");
        enter("=IHKZ");            //Go to "HeaderData" tab

FUNC_END:;
}
//Create this file inside your script folder for customizing Change Maintenance Order Overview screen: SAPLCOIH.E3000.sjs
//Now let's start adding the content to the above file
- Add a condition to check the transaction as IW31 or IW32 and checks whether the system status CLSD value and then returns the iw3x_readonly_flag value.
//If transaction is IW31 or IW32 but system status doesn't contain "CLSD" if(_transaction == "IW31" || (_transaction == "IW32" && iw3x_status.indexOf("CLSD")<0)){ iw3x_readonly_flag = false; } - Add a condition to check the transaction is IW33 or the system status CLSD (closed - no posting possible) value, and then returns the iw3x_readonly_flag value.
//If transaction is IW33 or system status contains "CLSD"
else if(_transaction == "IW33" || iw3x_status.indexOf("CLSD")>-1){
 iw3x_readonly_flag = true;
 }
- Delete the location tab on the screen as shown below.
//Remove "Location" tab on screen
 del("P[Location]");

- Add a condition to check for the Header Data and then add a groupbox (Location) and four inputfields namely MntPlant, Location, Room, Plant section, and Work center.
- Based on the iw3x_readonly_flag value, the inputfields become non-editable.
- Fetched location tab field values are copied to the input field values under the location groupbox using their technical names.
if(_page.exists("HeaderData")){
    box("G[First operation]+[6,0]", "G[First operation]+[10,80]", "Location");
    inputfield("G[Location]+[1,1]", "MntPlant", "G[Location]+[1,12]",
        {"name":"iw3x_maint_plant", "size":4, "readonly":iw3x_readonly_flag});
    inputfield("G[Location]+[2,1]", "Location", "G[Location]+[2,12]",
        {"name":"iw3x_location", "size":10, "readonly":iw3x_readonly_flag});
    inputfield("G[Location]+[3,1]", "Room", "G[Location]+[3,12]",
        {"name":"iw3x_room", "size":8, "readonly":iw3x_readonly_flag});
    inputfield("G[Location]+[1,41]", "Plant section", "G[Location]+[1,57]",
        {"name":"iw3x_plant_section", "size":3, "readonly":iw3x_readonly_flag});
    inputfield("G[Location]+[2,41]", "Work center", "G[Location]+[2,57]",
        {"name":"iw3x_work_center", "size":8, "readonly":iw3x_readonly_flag});
}
- Add a condition to check the iw3x_readonly_flag value and execute the iw3xSave function on saving the Maintenance screen.
//Execute when user hits save on screen
if(!iw3x_readonly_flag){
    onUIEvents["/11"] = {"fcode":"?", "process":iw3xSave};        }
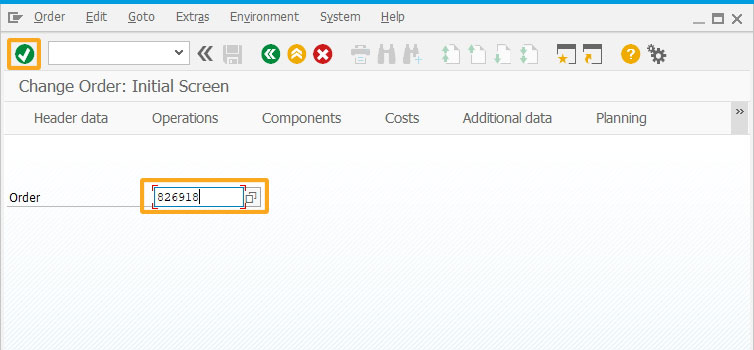
- Navigate through the Change Maintenance Order: Initial screen (IW32). Enter the Order number and click enter.
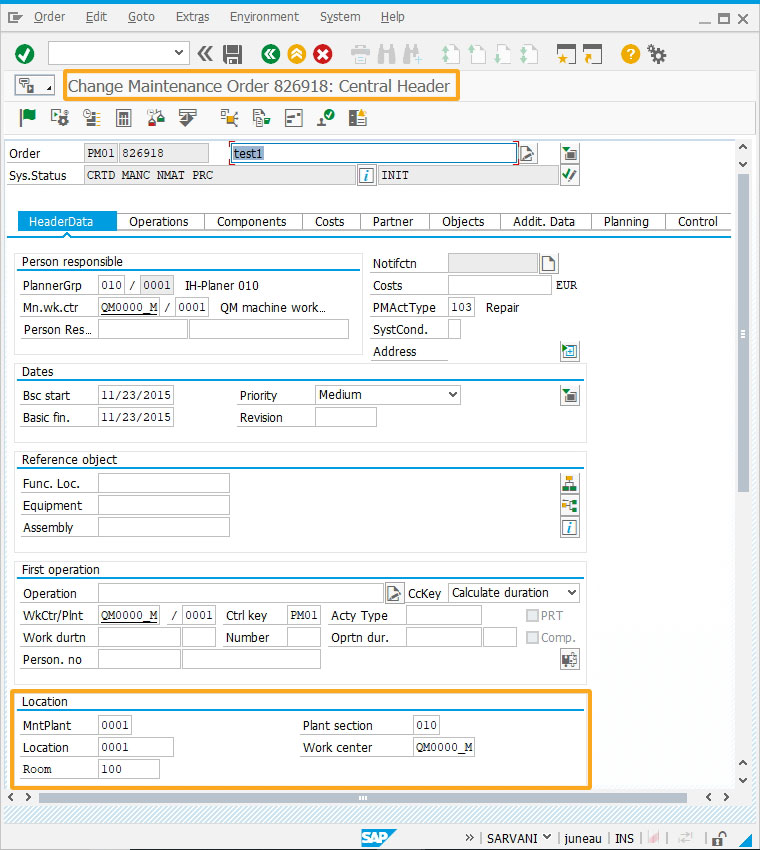
- You will see the Location tab fields and its values under the Header Data tab. If the system status of a particular order is not CLSD (Closed - no posting possible), then the newly created fields under location groupbox become editable.
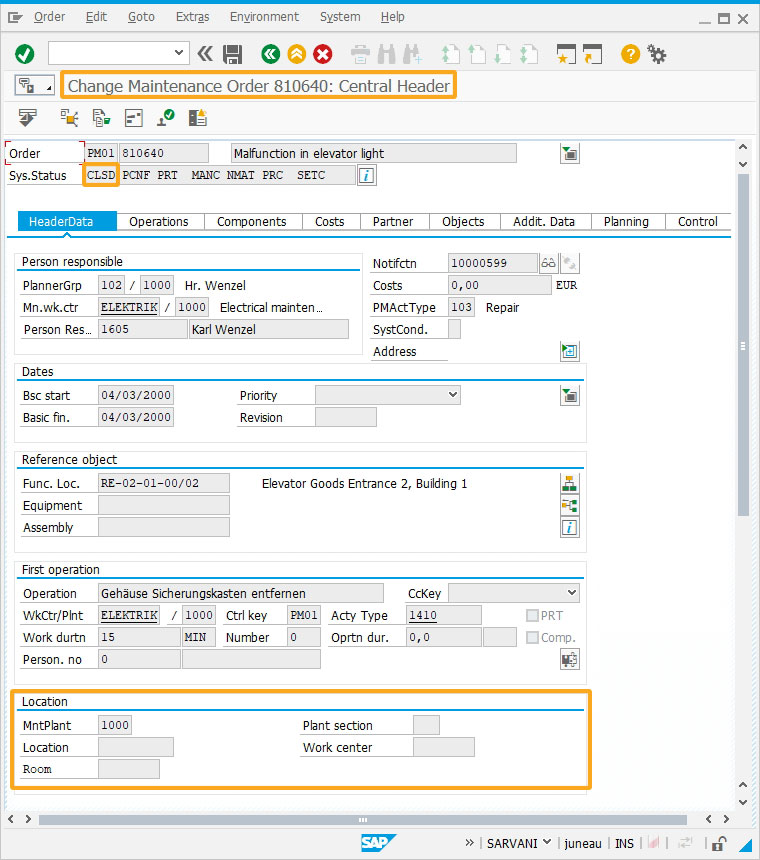
- You will see the Location tab fields and its values under the Header Data tab. If the system status of a particular order is CLSD (Closed - no posting possible), then the newly created fields under location groupbox are read-only(non-editable).
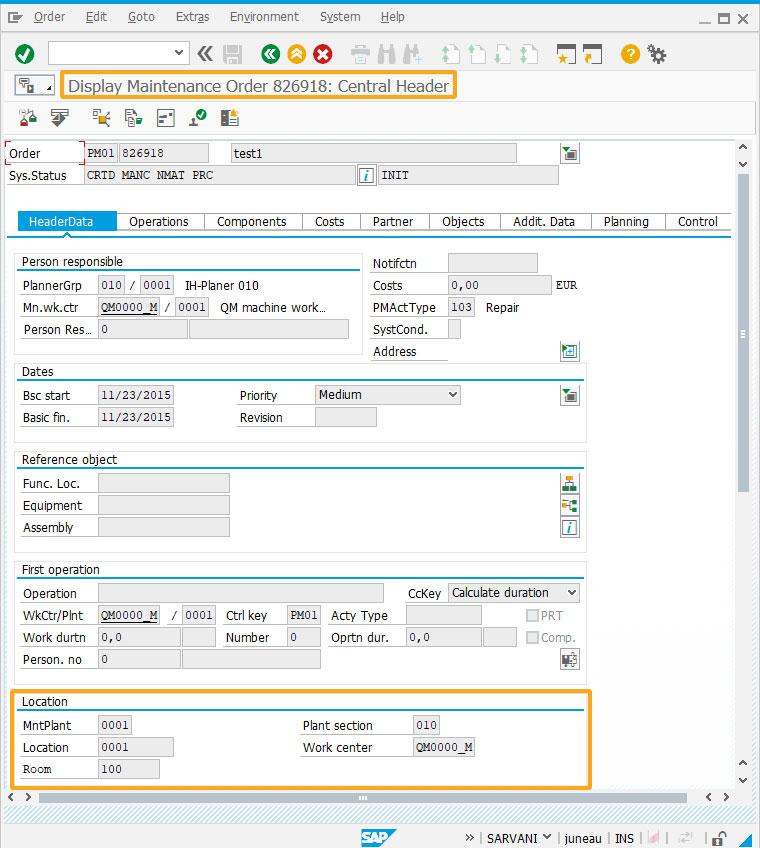
- Navigate through the Display Maintenance Order: Initial screen (IW33). Enter the Order number and click enter.
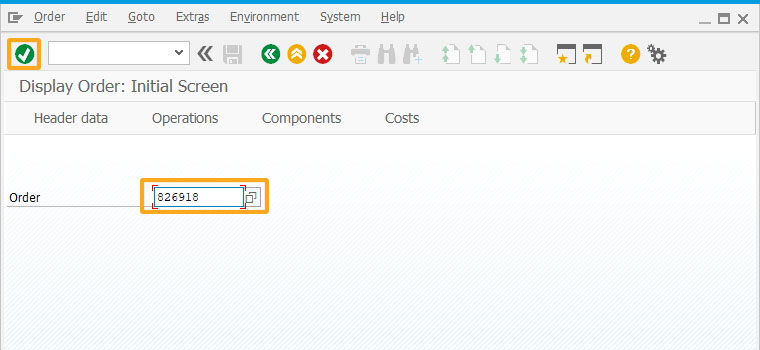
- You will see the Location tab fields and its values under the Header Data tab. The newly created fields under location groupbox are read-only(non-editable) under IW33 transaction.
Next Steps

Learn how to open a text file and retrieve file content to display them in the respective inputfields created on the SAP screen.
10 min.
This article is part of the Interpreting function codes tutorial.


