| directory1 - directory4 = "C:\\directory\\directory"; |
-
This entry defines the script directories where GuiXT WS will search for script files. Users can have up to four directories specified and these are searched in the order of sequence. The directories can be either local directories or network/HTTP/FTP/SAPWR shares.
-
Local directories:
directory1= "C:\\guixt\\scripts";
Network directories:
directory1 = "\\\\server\\directoryName";
Web directories:
directory1 = "http://server//directoryName";
FTP directories:
directory1 = "ftp://server//directoryName";
SAP Web Repositories:
directory1 = "sapwr:z.guixt.demo"
|
| usercatalog="C:\\Directory\\SubDirectory\\usercatalog.txt"; |
-
The purpose of the User Catalog is to Assign/Change the Directory 1 of the Scripts based on the Group assignment for SAP User/Role.
-
usercatalog = "C:\\Folder\\subfolder\\usercatalog.txt";
- UserCatalog File: //----- User Configurations // User groups: // make correspondence to 1-4 script directories.
- M1 "C:\LiquidUI\Scripts\Directory"
- M2 "\\network\Scripts\Directory"
- M3 "SAPWR:Z.SAP_OBJECT"
- XX None
- //User: Make correspondence to one user group. Because there is no '*' user designation, only specified users are allowed.
- 200/USER1 M1
- 300/USER2 M2
- 200/USER3 M3
|
| Key="Synactive.xxx.xxxxxx"; |
-
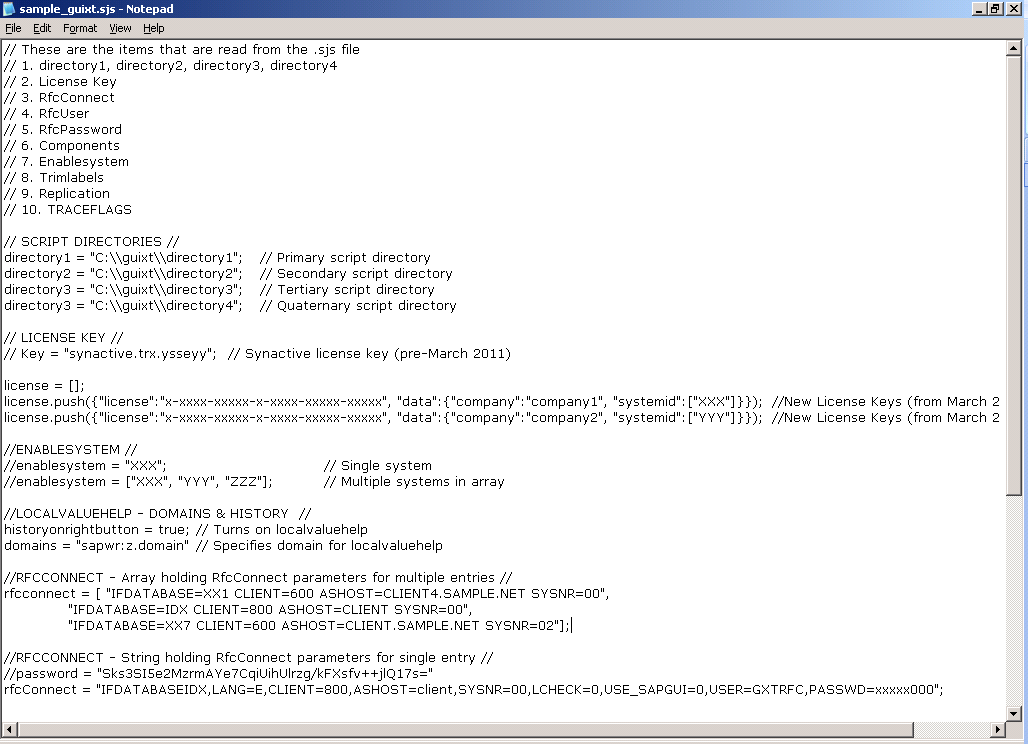
For all releases prior to March 2011, the actual license key for the various components would be entered following the 'Key' parameter in the guixt.sjs file. This parameter is not used in post-March 2011 releases. Please consult the license=[]; entry below. The pre-March 2011 format
-
Key="Synactive.xxx.xxxxxx";
|
| license=[]; |
-
For all WS releases subsequent to March 2011, the license key will be in the array format. Multiple individual license keys can be included in this format. Please consult the Licensing section of the WS Installation topic or the WS Reference Library for more information.
-
license = [ ];
license.push({"license":"x-xxxx-xxxxx-x-xxxx-xxxxx-xxxxx", "data":{"company":"company1", "systemid":["systemid1"]}});
license.push({"license":"x-xxxx-xxxxx-x-xxxx-xxxxx-xxxxx", "data":{"company":"company2", "systemid":["systemid2"]}});
|
| history = "C:\\directory\\directory"; |
-
Navigate to the path where you want the system to generate the script’s history.
-
history = "C:\\LiquidUI\\History";
|
| historyononlyguixt=true/false; |
-
This shows history information in the form of popup. true --> This option displays popup history on Liquid UI (GuiXT) created controls. Native controls will exhibit the default behavior only. false --> This option displays popup history for both SAP and Liquid UI (GuiXT) controls.
-
historyononlyguixt = true;
historyononlyguixt = false;
|
| historyonrightbutton = true/false; |
-
This works in relation to historyononlyguixt parameter. The source of information depends on the boolean value. true --> This option displays localvaluehelp content from the text file in a popup window. false --> This option displays SAP help in a popup window
-
historyonrightbutton = true;
historyonrightbutton = false;
|
| domains="sapwr:z.domain"; |
-
Any localvaluehelp domains would be specified in this parameter.
-
domains = "sapwr:z.domain";
|
| enablesystem="System ID"; |
-
This option specifies that only the listed SAP system will be active. You can view how to represent a single system and multiple systems in the following example:
-
Single System -
enablesystem="TRX";
Multiple System - use array
enablesystem ["TRX", "TRT", "TR1"];
|
| trimlabels=false; |
-
This option is for ensuring that when a screen control is moved closer to the label, the label is not overlapped by the screen control. This is particularly important for edit fields. Trimlabels are turned on by default in WS, but if a user wishes to turn it off, he or she can turn off trim labels by adding the 'trimlabels=false;' parameter to the guixt.sjs file
-
trimlabels=false;
|
| replication |
-
The replication parameter specifies if file replication is active or not. File replication will function by copying files located on a central server onto a local machine. The first time this local file copy is accessed during a new SAP session, Liquid UI will check the time stamp and compare it with the update time on the server. If the server file is newer, the file will be re-loaded from the server. But on all subsequent occasions that the file is accessed during the session, it will be read locally. To activate file replication, users need to specify 'yes'.
replication = "yes";
replication = "no";
Note: In order for replication to function correctly, you must have a valid rfcconnect statement in the guixt.sjs file. The rfcconnect statement must include the following information: rfcuser: The user name for the RFC connection. rfcpassword: The password for the RFC connection.
-
You must define the following parameters in the guixt.sjs file.
directory0 ="C:\\LiquidUI\\Cache";
directory1 ="C:\\LiquidUI\\Scripts";
-
directory0: The local directory where the files will be replicated. directory1: The server directory where the files are located. You must also use the version number command either in the ESESSION.SJS or the ELOGON.SJS file.
|
| rfcconnect |
-
There are two ways to write rfcconnect statements. The first is an array holding the RFC information for either a single user or multiple users. The second way to write the rfcconnect statement is as a string holding data for a single RFC user. Please see the rfcconnect section of the WS Reference Library for more detailed information.
-
rfcuser = "xxx"; // RFC username. Always in plain text.
rfcpassword = "xxx"; // RFC password. Used for both plain text and encrypted passwords.
|
| rfctimeout |
-
rfctimeout is an option to set the time for the RFC call receive. By default, it takes 120 seconds. The RFC timeout is necessary as sometimes SAP's LIBRFC32.DLL does not come back. As a result, the other processes will be in kernel's waiting state and make other threads to not to own the call. To efficiently use the RFC calls and not to keep any other threads in the waiting state after the thread termination, we have introduced RFCtimeout. Set the timer to RFC timeout to terminate the thread after it exceeds the timeout value.
-
rfctimeout=n;
|
| rfcdisconnect |
-
rfcdisconnect is an option to handle the RFC connections to and fro from the database. Beginning with the 1.2.286.0 the rfcdisconnect=value; must be placed in a separate statement instead of being contained in the rfcconnect statement. The rfcdisconnect parameter takes the following values, 0 will keep the RFC handle until end of the session. 1 will disconnect after every RFC call and n will disconnect after n number of RFC call
-
rfcdisconnect=0;
rfcdisconnect=1;
rfcdisconnect=n;
|
| rfcuser |
-
Defines the username for a remote function call. Beginning with 1.2.157.0, the RFC username must be placed in a separate rfcuser statement instead of being contained in the rfcconnect statement.
-
rfcuser="rfc_userName";
|
| rfcpassword |
-
Defines the password for the RFC connection. This can be either encrypted or in plain text. Beginning with 1.2.157.0, the RFC password must be placed in a separate rfcpassword statement instead of being contained in the rfcconnect statement.
-
rfcpassword="rfc_password";
|
| rfcencryptedpassword |
-
rfcencryptedpassword is used to unencrypt the encrypted password for the RFC connection. Beginning with the 1.2.286.0 the RFC encrypted password must be placed in a separate rfcencryptedpassword statement instead of being contained in the rfcconnect statement. Procedure: Generate an encrypted password of plain text password using any encryption technique. An encrypted password will be generated. Copy the encrypted password into the rfcencryptedpassword statement, which is located in the guixt.sjs file. This parameter can be edited using any text editor. Make sure the password is copied correctly, preserving uppercase, lowercase, special symbols, numerals, etc. The result would be an unencrypted password which is in turn used for making RFC calls.
-
rfcencryptedpassword=”encrypted_password”;
|
| rfcunencryptedpassword |
-
rfcunencryptedpassword is used to encrypt the password for RFC connection.
-
rfcunencryptedpassword = "rfcpassword";
|
| switchto |
-
The switchto command enables users to map a user's individual guixt.sjs file to the main guixt.sjs file hosted on a server. For more information, please see the switchto section.
-
switchto = ["C:\\Folder\\subfolder\\guixt.sjs"];
|
| dump |
-
If WS encounters a critical problem, it will create a dump file. Beginning with WS release 1.2.180.0, the guixt.sjs file has an option to set the number of dump files that are retained on your hard disk. Note: These dump files can increase to the point where your hard disk's free space will be impacted. The number following the option name specifies how many dump files will be stored on your hard disk.
-
dump=-1 --> This is the default value where new files will be constantly created and all older files will also be retained. dump=0 --> To prevent any dump file from being retained. dump=1 --> This will only retain the most recent dump file. dump=2 --> If the number is higher than one, then only the most recent n dumps will be retain depending on the number.
-
dump=-1
dump=0
dump=1
dump=2
|
| TRACEFLAGS |
-
Traceflags are used for developer debugging. 0x00000000 --> This option disables Traceflags 0x00008000 --> This option opens the console 0x10008000 --> This option opens the console and prints the debug lines in the console 0x30008000 --> This option opens the console and prints the debug lines along with subclassing in the console
-
TRACEFLAGS= 0x00000000;
TRACEFLAGS= 0x00008000;
TRACEFLAGS= 0x10008000;
TRACEFLAGS= 0x30008000;
|
| logdirectory |
-
To create a folder to specify where you want the system to generate the log files. Beginning with 1.2.286.0 the logdirectory is the parameter of guixt.sjs file. Specify the desired location in the system so that the logs will be generated directly in that particular path.
-
logdirectory = "C:\\LiquidUI\\Logs";
|
| nolanguagekey = true/false; |
-
You can create *.sjs without specifying a language identifier. This enables using the same scripts across multiple languages. Liquid UI now searches the scripts without a language key. Example: Instead of "SAPMV45A.E0101.sjs" it reads the file "SAPMV45A.0101.sjs" [OR] instead of "ESESSION.sjs" it reads "SESSION.sjs".
-
nolanguagekey = true;
|
| _log = true/false; |
-
The log option is used to store debugging information.
-
_log = true;
|
| debug = true/false; |
-
The debug option is for debugging during development. This option enables you to debug the application when an issue takes place. To enable, debug = true;
-
debug = true;
|
| _blackbox |
-
To generate additional information in log files and dump files, _blackbox=true; should be added in guixt.sjs configuration file. WS Blackbox collect logs on Win32 exception and records more information
-
_blackbox = true or 1; generates additional information in log files
_blackbox = false or 0; Prevent additional information in log files
|