Prerequisites
- Products: Liquid UI WS, Liquid UI Server or Local DLL, Client Software
- Commands: load(), pushbutton(), message()
Purpose
In this article, you will learn how to validate each cell in an excel spreadsheet to check whether it is blank or NULL. To explain this, we'll guide you through the following.
- Load wsoffice.dll file
- Add a toolbar pushbutton to execute the process
- Add a function to show file open dialog
- Add a function to open an excel file from the file selection dialog
- Add a function to select an excel spreadsheet and validate the values in excel cells
User Interface
//Create this file inside your script folder for customizing the SAP Easy Access screen: SAPLSMTR_NAVIGATION.E0100.sjs
//Now, let's start adding the Liquid UI script to the above file and save it.
- Load wsoffice.dll file.
load('wsoffice'); // Need to load this file to display File Selection pop-up - Create a toolbar push button with the label Validate Excel to execute the process called testExcelCellValidation, when clicked.
//create a toolbar pushbutton "validat Excel"
pushbutton([TOOLBAR],"@8T@Validate Excel", "", {"process":testExcelCellValidation});
- Add a function titled selectFileDialog to show file open dialog
// Function to Show File Open Dialog
function selectFileDialog(szPrompt){
    if(szPrompt==void 0)
        szPrompt = 'Select Excel File';
    var dialog = new ActiveXObject('MsComDlg.CommonDialog');
    // dialog.Filter='All Files(*.*)|*.*';
    dialog.Filter='(*.xl*)|*.xl*';  // BD
    dialog.MaxFileSize=32767;
    //dialog.AllowMultiSelect = true;
    dialog.DialogTitle=szPrompt;
    dialog.Flags=0x200|0x80000|0x800|0x4|0x200000
    dialog.ShowOpen();
    //var ret = dialog.FileTitle;
    var ret = dialog.FileName;
    dialog = void 0;
    return ret;
}
- Add a function titled openExcel to open an excel file from the file selection dialog.
/ Function to open Excel File From The File Selection Dialog
function openExcel(filename) {
    if(excelObj == void 0)
        excelObj = new ActiveXObject('Excel.Application');
    excelBook = excelObj.Workbooks.Open(filename);
    excelObj.Visible = true;
    excelObj.ScreenUpdating = true;
}
- Add a function titled testExcelCellValidation to select an excel spreadsheet and validate the values in the excel cells.
// Function to select Excel spreadsheet and validate the values in excel cells
function testExcelCellValidation(){
    OPEN_EXCEL_FILE:;
    if(excelObj == void 0) {
        excelFileName = selectFileDialog('Select Excel File');
        if(excelFileName.length) {
            openExcel(excelFileName);
            excelSheet = excelBook.ActiveSheet;
        } else {
            message('E: No Excel File Selected');
            return;                // If Problem opening selected excel file, stop the process
        }
    } else {                    // Excel is already open (Manually Opened or Re-run for Error Processing)
        try {
            excelSheet = excelBook.ActiveSheet;
            // Check to see if we can read cell value, if not then Re-Open Excel File
            var cellCheckValue = excelSheet.Cells(1, 2).Value;
        }
        catch(err) {
            delete excelObj;
            goto OPEN_EXCEL_FILE;
        }
    }

    // Required columns
    arrReqCol = ['1','2','3'];
    nCurrentRow = 2;

    if(!xlsCellDataValidation(excelSheet,nCurrentRow,arrReqCol,'A')) {
        message('E: Missing Required Values');
        return;
    } else{
        message('S: Validation successful');
    }
}

//strCheck = 'A' - To check for Blank and NULL
//strCheck = 'N' - To check for NULL Only
function xlsCellDataValidation(excelActiveSheet, nCurrentRow, arrColumns, strCheck) {
    nCurrentRow = parseInt(nCurrentRow);
    errorColumnNo = 0;
    var z_valChk = '';
    var validData = true;
    for(var j=0; j<arrColumns.length;j++) {
        var nCurrentCol = arrColumns[j];
        nCurrentCol = parseInt(nCurrentCol);
        // Check for both Blank and NULL Values
        if(strCheck == 'A') {
            z_valChk = excelActiveSheet.Cells(nCurrentRow, nCurrentCol).Value;
            if(isBlank(z_valChk) || z_valChk.toString().toUpperCase() == "NULL") {
                errorColumnNo = nCurrentCol;
                validData = false;
                break;
            }
        }
        // Check for NULL Values Only
        if(strCheck == 'N') {
            z_valChk = excelActiveSheet.Cells(nCurrentRow, nCurrentCol).Value;
            if(isBlank(z_valChk)) {
            } else {
                if(z_valChk.toString().toUpperCase() == "NULL") {
                    errorColumnNo = nCurrentCol;
                    validData = false;
                    break;
                }
            }
        }
    }
    return validData;
}
SAP process
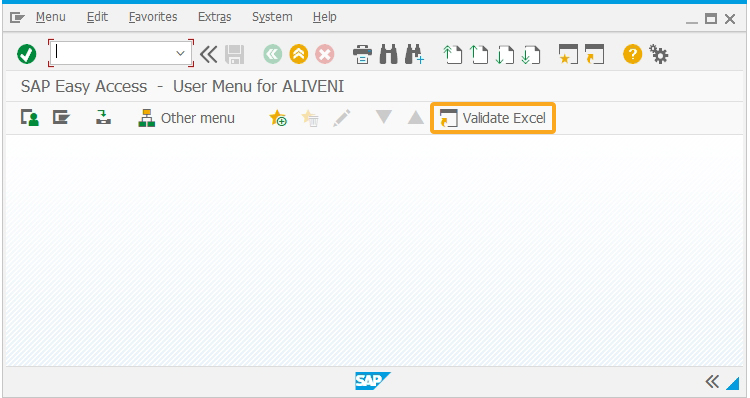
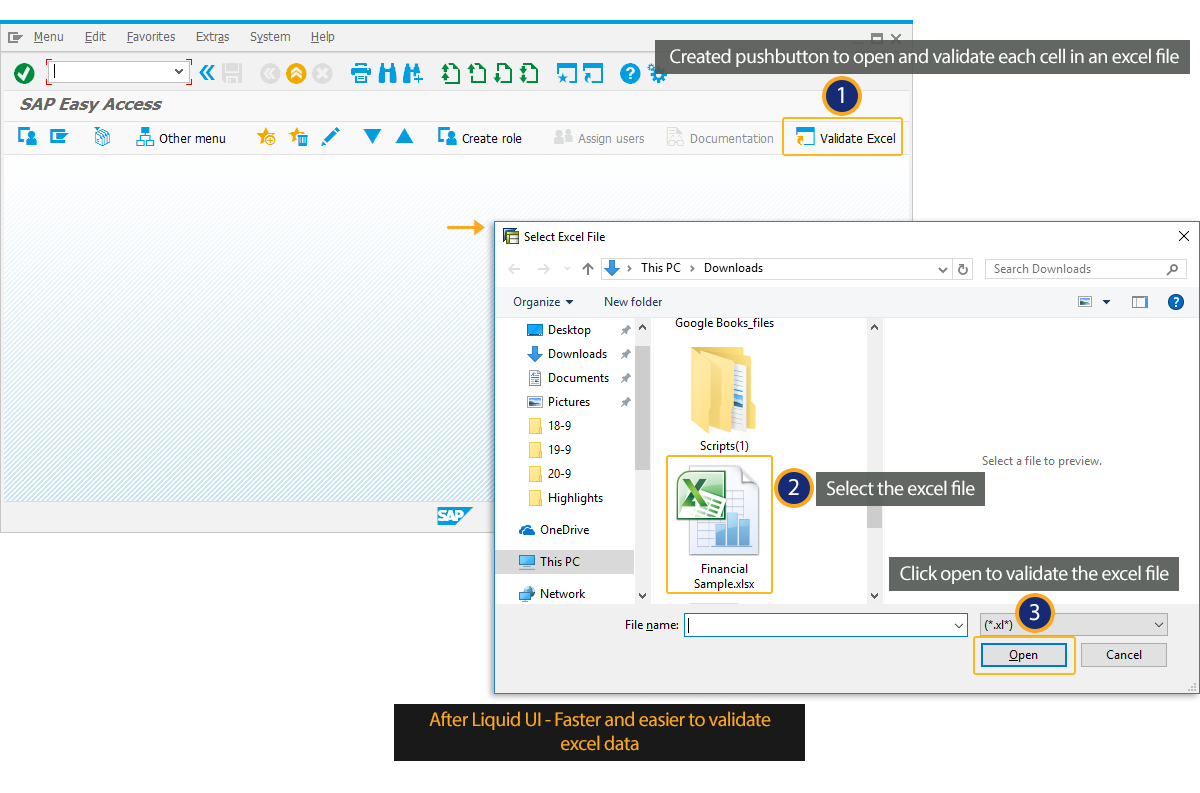
- Logon to SAP, and on the SAP Easy Access Screen, click on the ‘Validate Excel’ push button which will bring a pop-up to select an Excel File from the user system. Select the file and click on Open, as shown below.
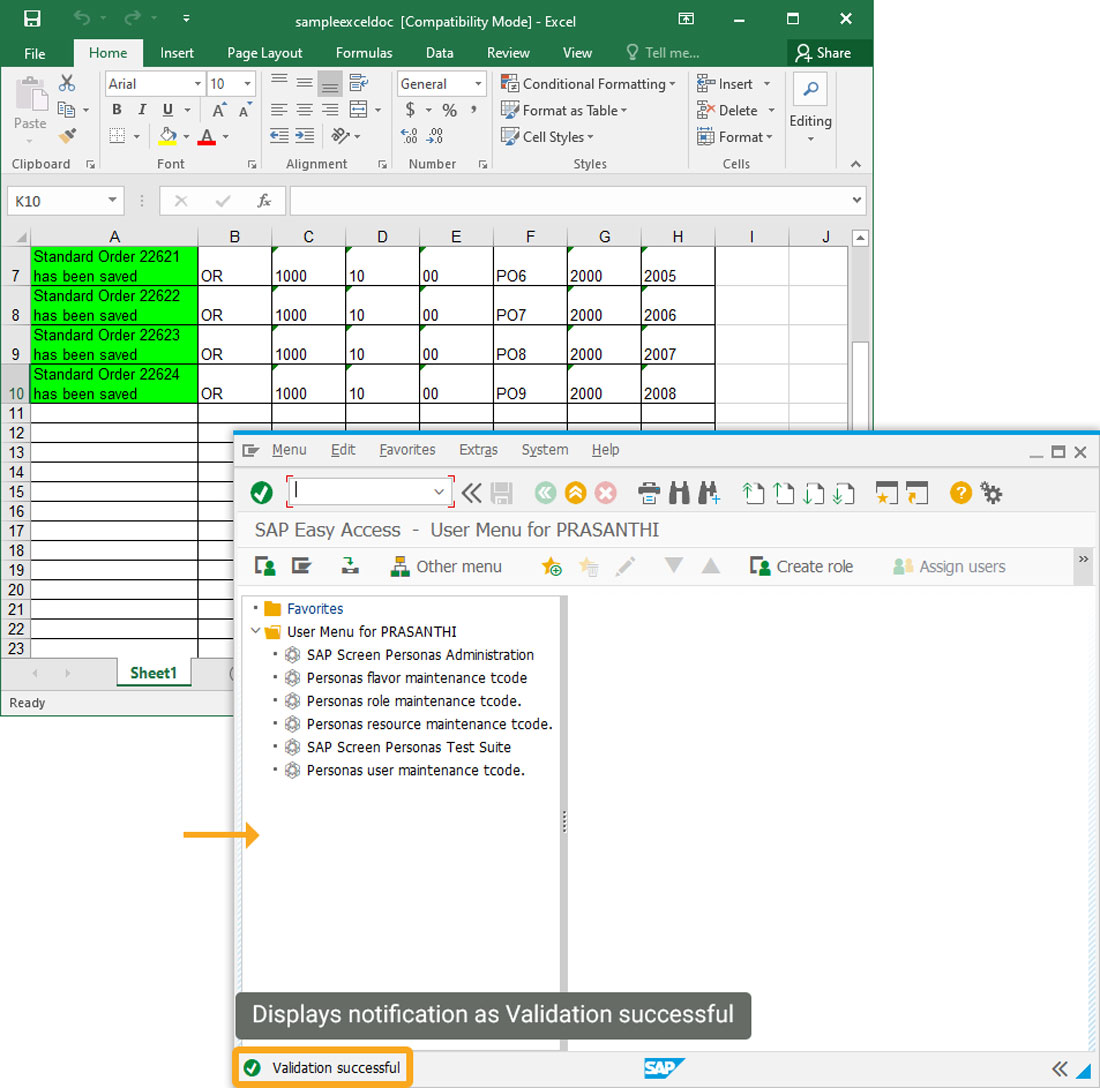
- Then, the selected excel file will get opened in your system, and notification as "Validation Successful" is displayed on the status bar of the SAP screen, as shown in the image below.