Prerequisites
- Products: Liquid UI WS, Liquid UI Server or Local DLL, Client Software
- Commands: pushbutton(), text(), box(), set(), checkbox()
Purpose
In this article, you will learn how to sort values in a column either in ascending or descending order and sort other column values with respect to the sorted column values. We'll guide you through the following steps.
- Delete unnecessary elements on the screen
- Add six group boxes
- Add six pushbuttons
- Add a condition to call setdefault()
- Add setdefault() to add default values in the array
- Add a for loop to add the array values into the respective boxes
- Add sortContent() to arrange the values
User Interface
//Create this file inside your script folder for customizing the SAP Easy Access screen SAPLSMTR_NAVIGATION.E0100.sjs
//Now, let's start adding the Liquid UI script to the above file and save it.
Customization
- Logon to SAP. Delete the image container on the SAP Easy Access screen using the del command, as shown below.
//Deletes Image container on the SAP Easy Access screen.
del("X[IMAGE_CONTAINER]");
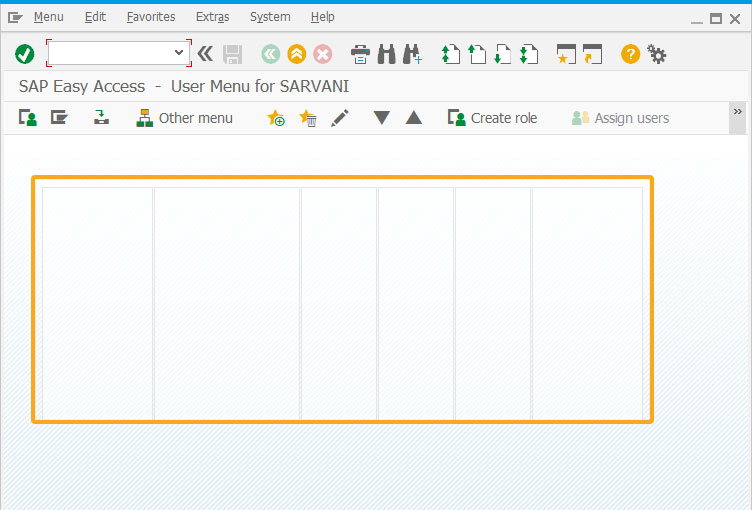
- Add six group boxes without labels in a sequence, as shown in the image below.
// Creates six group boxes with required row and column coordinates
box([2,5], [12,19]);
box([2,21], [12,40]);
box([2,42], [12,51]);
box([2,53], [12,62]);
box([2,64], [12,73]);
box([2,75], [12,89]);
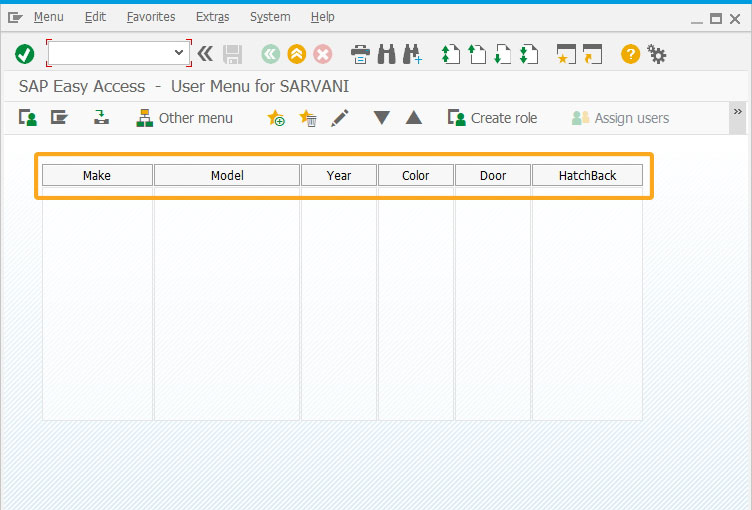
- Add six pushbuttons with labels as Make, Model, Year, Color, Door, and HatchBack to execute sortContent() on click, as shown in the image below:
//Creates six pushbuttons to execute sortContent function using col parameter on click
pushbutton([1,5], "&V[btn_sort_icon_0]Make", "?", {"process":sortContent, "size":[1,15], "using":{"col":"0"}});
pushbutton([1,21], "&V[btn_sort_icon_1]Model", "?", {"process":sortContent, "size":[1,20], "using":{"col":"1"}});
pushbutton([1,42], "&V[btn_sort_icon_2]Year", "?", {"process":sortContent, "size":[1,10], "using":{"col":"2"}});
pushbutton([1,53], "&V[btn_sort_icon_3]Color", "?", {"process":sortContent, "size":[1,10], "using":{"col":"3"}});
pushbutton([1,64], "&V[btn_sort_icon_4]Door", "?", {"process":sortContent, "size":[1,10], "using":{"col":"4"}});
pushbutton([1,75], "&V[btn_sort_icon_5]HatchBack", "?", {"process":sortContent, "size":[1,15], "using":{"col":"5"}});
- Add a condition to check the z_default_flag value and execute the setDefault function.
// If condition to execute the setDefault()
if(!z_default_flag){ setDefault(); } - Add a function to create variables and also an array with required values.
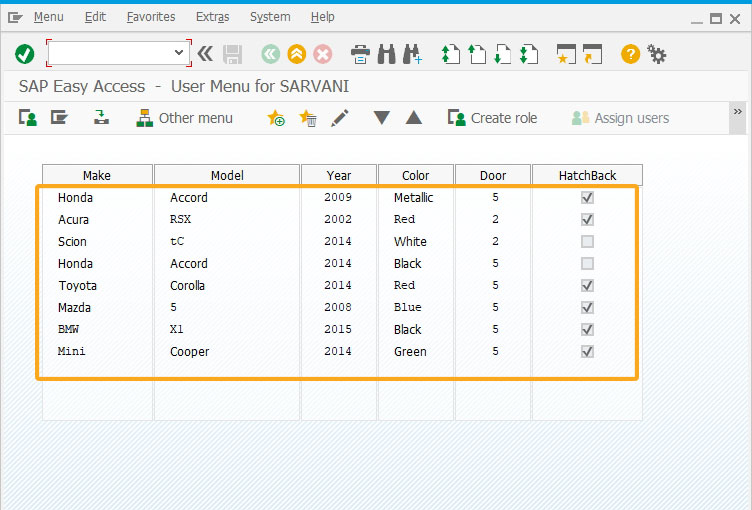
// Creates a function that assigns default values into an array and other required variables
function setDefault(){

//Default all button icons to be empty
   btn_sort_icon_0 = "";
   btn_sort_icon_1 = "";
   btn_sort_icon_2 = "";
   btn_sort_icon_3 = "";
   btn_sort_icon_4 = "";
   btn_sort_icon_5 = "";

//Default data array for display
   data_ary = [];
   data_ary.push(["Honda", "Accord", "2009", "Metallic", "5", " "]);
   data_ary.push(["Acura", "RSX", "2002", "Red", "2", "X"]);
   data_ary.push(["Scion", "tC", "2014", "White", "2", "X"]);
   data_ary.push(["Honda", "Accord", "2014", "Black", "5", " "]);
   data_ary.push(["Toyota", "Corolla", "2014", "Red", "5", " "]);
   data_ary.push(["Mazda", "5", "2008", "Blue", "5", "X"]);
   data_ary.push(["BMW", "X1", "2015", "Black", "5", "X"]);
   data_ary.push(["Mini", "Cooper", "2014", "Green", "5", "X"]);

  // Create a backup for data array
   data_ary_bkup = [];
   for(var i=0; i<data_ary.length; i++){
      data_ary_bkup.push(data_ary);
   }

   //Set start and end value for display
   start_row = 0;
   end_row = data_ary.length;

   //Default an array to store sorting status for each column
   sort_order_ary = [];
   for(var i=0; i<6; i++){
      sort_order_ary.push("X");
   }

   //Set default flag to true for only running default function one time
   z_default_flag = true;
}
- Add a for loop to create text using the array values dynamically assigned with the given coordinates. You can see the columns are filled dynamically with the values, as shown in the image below.
// Creates a for loop to place array values at the respective coordinate values
for(var i=start_row; i<end_row; i++){
   text([2+i,7], data_ary[i][0]);
   text([2+i,23], data_ary[i][1]);
   text([2+i,45], data_ary[i][2]);
   text([2+i,55], data_ary[i][3]);
   text([2+i,69], data_ary[i][4]);
   set("V[check_&V]", data_ary[i][5]);
   checkbox([2+i,82], "", {"name":"check_&V", "readonly":true});
}
- Now, add a function to sort content in either ascending or descending order. This function will let you arrange the values based on the column value.
//Creates a function sortContent to assign null values to all the variables with the technical names starting with z_
//Function to sort content
function sortContent(param){
   set("V[btn_sort_icon_*]", " ");         //Reset icon for all the button

   var column = param.col;               //Copy the value of passed column number
   if(sort_order_ary[column]=='X')         //Set the column of status array to 0 if it's defaulted to "X"
      sort_order_ary[column] = 0;

   if(sort_order_ary[column] == 1){
      set("V[btn_sort_icon_&V[column]]", '@0H@');
      sort_order_ary[column] = 2;         //Change column of status array to 2 (descending order)
      data_ary.sort(function (a,b) {
         a = a[column].toLowerCase();   //Convert both value to lower case for following comparison
         b = b[column].toLowerCase();
         return a == b ? 0 : (a < b ? 1 : -1);   //Compare elements. if it's the same, don't switch; else if b is larger than a, switch; else, reverse
      });
   } else if(sort_order_ary[column] == 0){
      set("V[btn_sort_icon_&V[column]]", '@0I@');
      sort_order_ary[column] = 1;         //Change column of status array to 1 (ascending order)
      data_ary.sort(function (a,b) {
         a = a[column].toLowerCase();
         b = b[column].toLowerCase();
         return a == b ? 0 : (a < b ? -1 : 1);
      });
   } else {
      set("V[btn_sort_icon_&V[column]]", ' ');
      sort_order_ary[column] = 0;         //Change column of status array to 0 (non-sorted order)
      data_ary = [];
      for(var i=0; i<data_ary_bkup.length; i++){         //Copy data from backup array
         data_ary.push(data_ary_bkup);
      }
   }
}
SAP Process
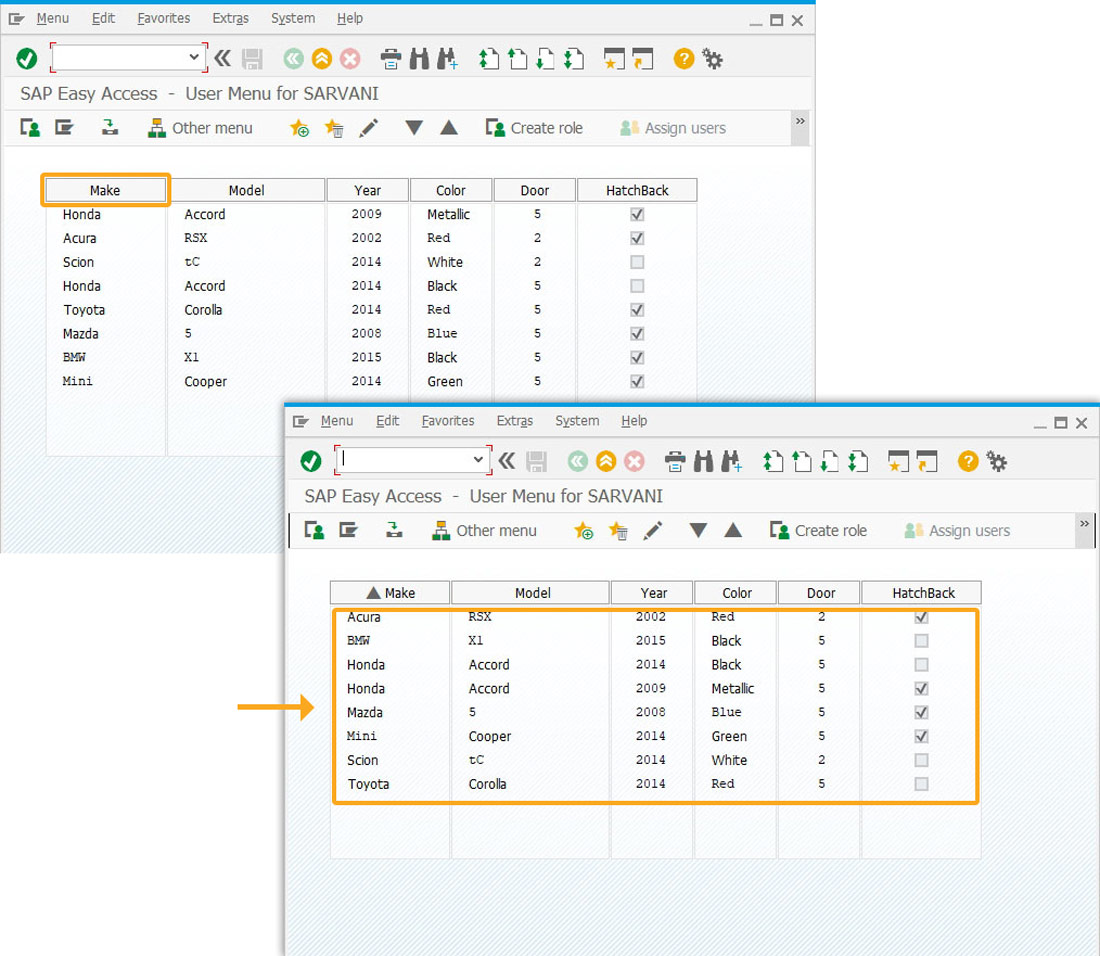
- Click the Make push button to display the column values in ascending order. And, you can see the values of other columns are also arranged with respect to the arranged values, as shown in the image below.
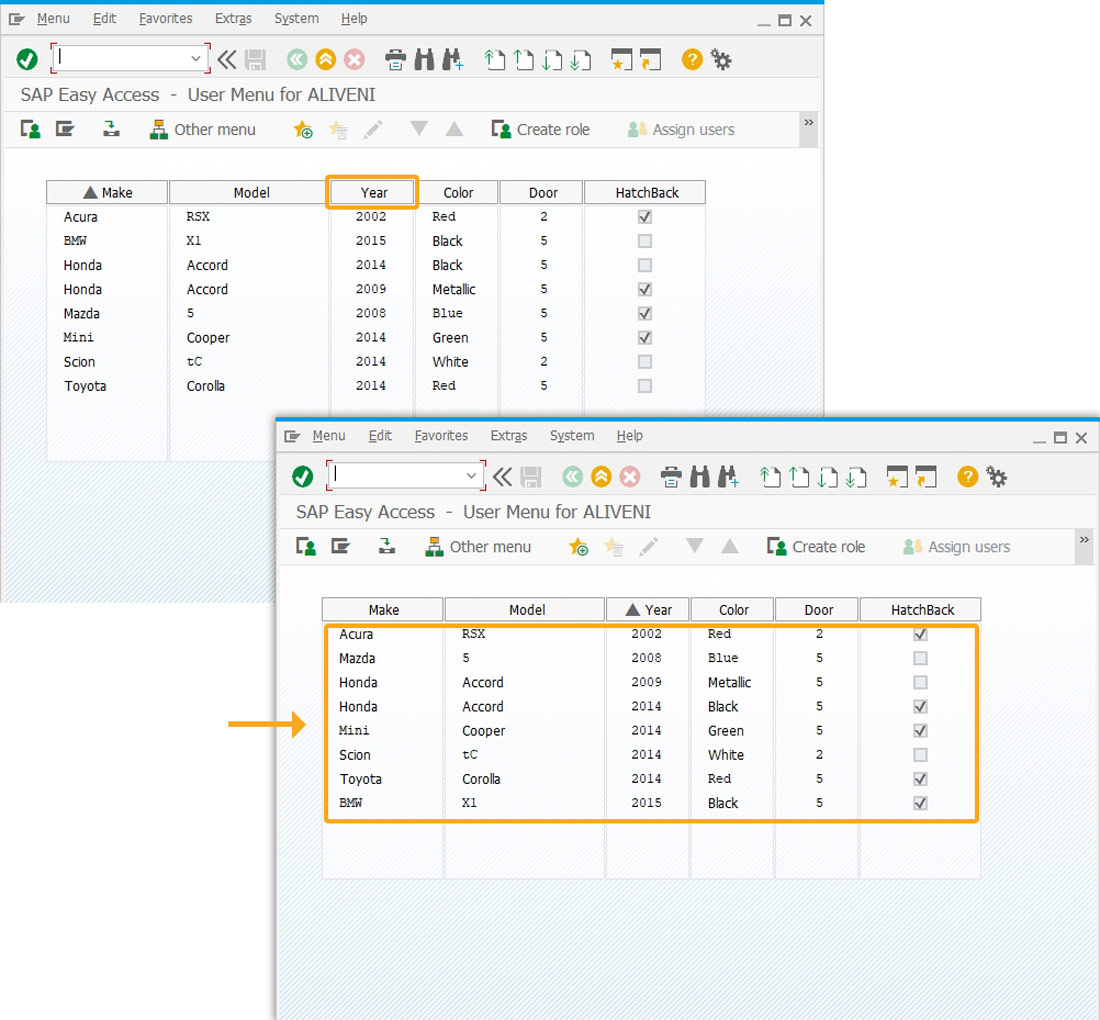
- Now, click the Year push button to display the year values in ascending order and also arrange the values of other columns accordingly, as shown below.
Next Steps

Change read only status dynamically
Learn how to make the status of the required fields readonly.
Learn how to make the status of the required fields readonly.
10 min.
This article is part of the Liquid UI Variables tutorial.


