Configuring Liquid UI Server aka GuiXT Server as a Message Server
As previously introduced in the Load Balancing section, you can configure Liquid UI Server as a message server. This enables you to deploy multiple Liquid UI Servers and spread the load evenly amongst them. To configure Liquid UI Server as a message server, you must first configure your server via the sapproxy.ini file and then enter the appropriate settings into the SAP System Properties when you create your connection on the client system.
Sapproxy.ini Entries
When Liquid UI Server is being used as a message server, you must create an entry in the sapproxy.ini file. Our example entry in the sapproxy.ini file would look as follows.
[Control]Messageserver=/M/GuiXTMSSRVR/T/10
proxycount=1
[Proxy]Listenport=3290
TargetServer=[servername]
TargetServerPort=3200
GuiXT=10
You must also ensure that GuiXT is not active on any clients that you will be using in this deployment. When Liquid UI Server is deployed, all Liquid UI customization is handled centrally, so you do not need to have Liquid UI enabled on the individual client systems.
SAP System Properties
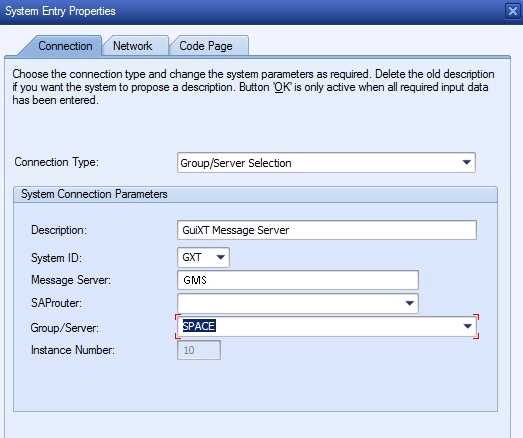
The system properties box for SAP 7.10 looks as shown below:

This system properties dialog box contains the following information:
- Description
-
The description can be literally anything. Typically, this is either the name of the SAP server or the Liquid UI Server that the user will connect to. In our example, the description is ‘GuiXT Message Server’.
- System ID
-
The System ID is the SAP box to which the Server will be connecting. The System ID is typically a three-digit code and can be different depending on the corporate environment. Some examples might be ‘DEV’ for development, ‘QAS’ for regression testing or ‘PRD’ for production. Each of these can have specific data and restrictions associated. For example, development might be prohibited in PRD so as not to risk damaging the production system or data. In our example, we will use the ID 'GXT'.
- Message Server
-
The message server is the name of the Liquid UI message server that you will connect to. In our example, the message server is named ‘GuiXTMSSRVR’, but you should use the hostname of the machine hosting the Message Server.
- System Number
-
The system number is the system number of the application server. In most real-world cases, this will be ‘00’ as in our example.
Setting Up a Liquid UI Message Server
To configure a Liquid UI message server, please do the following.
-
First, open the sapproxy.ini file on the message server. This file will typically be located in the following directory.
C:\Program Files\Synactive Inc\GuiXTServer
-
Enter the following information.
[control]
		Messageserver=/M/GXT/T/10
		proxycount=1
This information is defined as follows. The proxycount specifies how many servers are being defined. Since this is a message server, only a single entry will be defined in the sapproxy.ini file. The messageserver entry specifies the message server itself. The '/M/' parameter defines the name of the message server. In our example it is 'GXT'. The '/T/' parameter defines the interval for communications between the message server and the other Liquid UI Servers. In this case we are connecting directly to a single SAP system, so we will not define any group parameters in the connection string.
-
In the sapproxy.ini file, enter the following information.
[Proxy 1]
		ListenPort=3210
		TargetServer=GXT
		TargetServerPort=3200
		GuiXT=10
The above information is defined as follows. The ListenPort is the port used by the Liquid UI Servers to listen for data from the message server. The TargetServer value is the name of the SAP Application Server that the Liquid UI Servers will connect to. The TargetServerPort is the port used by the Liquid UI Servers and the SAP Application Server to communicate with each other.
-
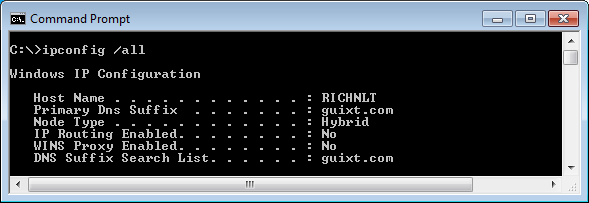
Save your changes and close the file. You will need the hostname of the system where the message server resides. To find this information, open a command prompt and type the following.
ipconfig /all
The command prompt should display the system name as shown in the example below.
-
Copy the sapproxy.ini file and place the exact same file on each of the Liquid UI Servers that will be connecting through the message server.
Note: If the same sapproxy.ini file does not exist on each of the Liquid UI Servers, the load-balancing configuration will not succeed. -
Open the Windows services file with a text editor such as Notepad. This file is usually found in the following location.
C:\Windows\System32\drivers\etc
-
At the end of the services file, type in the following entry.
sapmsGXT 3600/tcp
This entry specifies the port number and type (TCP) that the message server will use to communicate with the SAP GUI Logon Pad. The other ports used by the Liquid UI Servers to communicate are specified in the sapproxy.ini file.
- Open the SAP Logon Pad and click the New Item... button.
-
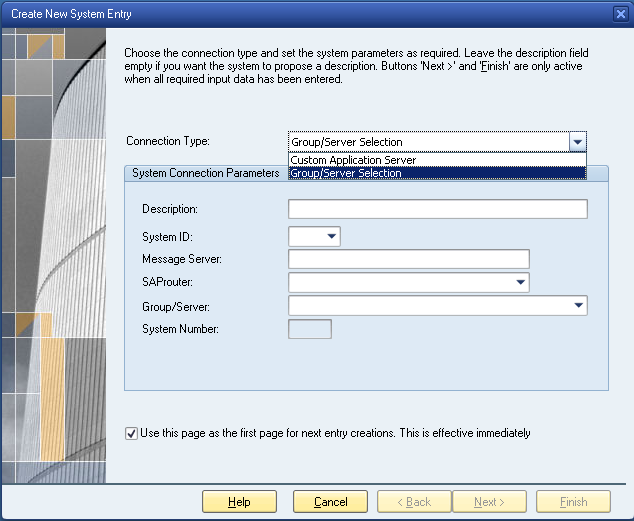
Select the 'Group/Server Selection' from the Connection Type drop-down list as shown below.
-
The following screen will display.
-
In the 'Description' field, enter a description of the connection. We will call our example 'GuiXT Message Server'.
-
In the System ID field, enter the system ID. In our example, we will use the value 'GXT'.
-
In the 'Message Server' field', enter the name of the message server. In our example, it is 'GuiXTMSSRVR', but you should use the hostname of the system hosting the message server.
-
Now click the 'Group/Server' field. If no groups are specified, the entry will be the default 'Space' as shown below.
-
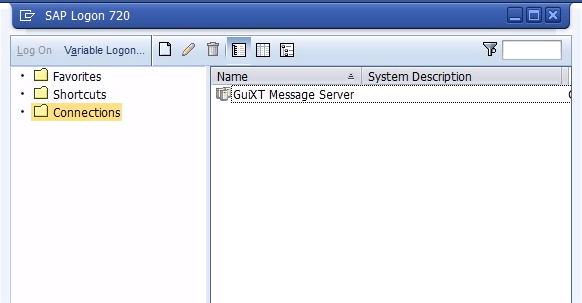
Click the Finish button. The new connection entry is now in the connection list as shown below.
-
You are now ready to start the Liquid UI Servers. The message server will distribute the load amongst them as needed.


