Show Posts

This section allows you to view all posts made by this member. Note that you can only see posts made in areas you currently have access to.


Topics - Rahul Gera

Pages: 1 [2] 3 4 ... 6
16
Purpose: To provide installed Liquid UI Android License Information on the Android device.

Steps to navigate to Liquid UI Android Insider (App Settings) Screen, for License Section.
1. Open "Liquid UI" app on your device and click on the "Menu" icon at the top left corner.
2. Click on the "App Settings".
3. Scroll vertically to "License" section in Insider screen.
4. Tap and Hold on the "License" section, for "License information" Pop Up.


17
Purpose: Download and installation of Liquid UI Designer on a Physical or a Virtual Machine.

Software download link, for the latest version of Liquid UI Designer Download

Note: Installation of the above Setup file(s), needs to be performed by an ADMIN on the machine, and as an Administrator (Right Click on the .exe, and choose "Run as administrator".

Default Liquid UI Designer installation location, on a Windows Machine
32 Bit O.S  -->  C:\Program Files\Liquid UI\LUI Designer
64 Bit O.S  -->  C:\Program Files (x86)\Liquid UI\LUI Designer

License is required to Execute Liquid UI Designer software.
Request Liquid UI Designer license from Synactive.
Installation of Liquid UI Designer License.

18
Purpose: Download and installation of Liquid UI Server on a Physical or a Virtual Machine.

Highly Recommended: Installation of latest or available SAPgui

Software download links, for the latest version of Liquid UI Server
32 Bit O.S  -->  Download
64 Bit O.S  -->  Download

Note: Installation of the above Setup file(s), needs to be performed by an ADMIN on the machine, and as an Administrator (Right Click on the .exe, and choose "Run as administrator".

Default Liquid UI Server installation location, on a Windows Machine
32 Bit O.S --> C:\Program Files\Liquid UI\Liquid UI Server
64 Bit O.S --> 32 Bit Liquid UI Server Software --> C:\Program Files (x86)\Liquid UI\Liquid UI Server
64 Bit O.S --> 64 Bit Liquid UI Server Software --> C:\Program Files\Liquid UI\Liquid UI Server

Below step is needed only, if Liquid UI Server being Migrating Liquid UI Server to New Hardware
Please copy and paste, the below from the Backup
   1. SAPPROXY.ini
   2. GuiXT.sjs


License is required to Execute Liquid UI Server software.
Request Liquid UI Server license from Synactive.
Installation of Liquid UI Server License.


19
Purpose: To Troubleshooting steps when executing Liquid UI Server.
Issue: Modified screens not displayed when scripts are being executed from SAP Web Repository and connections are through Liquid UI Server.

Steps to STOP Liquid UI Service:
1. Windows + R, Type Services.MSC.
2. Navigate to Synactive R/3 Proxy in the list of Services.
3. Select "Synactive R/3 Proxy", and choose "STOP" service option.

GuiXT.sjs Flags, to display console log for debugging
OPENCONSOLE    =    0x00008000;
HIDECONSOLE    =    0x00000000;
TRACE_RFCCALL   =    0x10000000;

// TRACEFLAGS = HIDECONSOLE;
TRACEFLAGS = OPENCONSOLE;
// TRACEFLAGS = OPENCONSOLE|TRACE_RFCCALL;

Steps to open Liquid UI Server in Console Mode
Method 1: Using Batch File
Navigate to Liquid UI Server installed folder, and execute "ConsoleMode.bat" file.

Method 2: Using command prompt
Step 1: Windows + R, type "cmd" and hit "Enter"
Step 2: In command prompt, navigate to Liquid UI Server installed folder.
Step 3: Once in the desired folder in command prompt, type SAPPROXY.exe -debug
Step 4: The command prompt window, will be used as a Debug window.

Files needed to Read Liquid UI Scripts from SAP Web Repository
LibRFC32.dll in Liquid UI Server folder, when Liquid UI Server is executed in console mode.
LibRFC32.dll in,
32Bit O.S --> C:\Windows\System32
64Bit O.S --> C:\Windows\System32
64Bit O.S --> 32Bit Liquid UI Server Software --> C:\Windows\SysWOW64

20
Purpose: Different options in Liquid UI Table columns

Syntax:
Numeric Input:                "numeric":true
Read-Only Column Field: "readonly":true
Uppercase:                      "uppercase":true

Searchhelp options
  • SearchHelp:                         "searchhelp":
  • SearchHelp Selection Name:"shselname1":
  • SearchHelp Selection Value: "shselvalue1":
  • SearchHelp Name:                "shname1":
  • SearchHelp Destination:       "shdest1":

table([15,1], [25,150], {"name":"z_engr_bomtable", "title":"Create BOM", "rows":10});                                       // Liquid UI Table Generation
column("Item", {"table":"z_engr_bomtable", "name":"item_no", "position":1, "size":4, "numerical":true});         // Liquid UI Column accepting only Numeric Values
column("Document", {"table":"z_engr_bomtable", "name":"doc_no", "position":2, "size":25, "searchhelp":"CV01", "shselname1":"DOKAR", "shselvalue1":"DES",
                                    "shname1":"DOKAR","shdest1":"cell[z_engr_bomtable,Type,row]","uppercase":true});
column("Type", {"table":"z_engr_bomtable", "name":"doc_type", "position":3, "size":3, "readonly":true});         // Liquid UI Column Read-Only
column("Part", {"table":"z_engr_bomtable", "name":"doc_part", "position":4, "size":3, "searchhelp":"CV01", "fname0":"DOKTL", "uppercase":true});         // Liquid UI Column changing the input to UPPERCASE
column("Version", {"table":"z_engr_bomtable", "name":"doc_version", "position":5, "size":2, "searchhelp":"CV01", "fname0":"DOKVR", "uppercase":true});


21
Purpose: Enterprise License re-installation with an upgrade to the latest version of Liquid UI for Android App from Google Play.

Pre-Requisite:Liquid UI Portal License installed on a Android Device.
Liquid UI Android Version:  3.0.6.0 and below

Due to compliance with Google Play Store policies, Liquid UI Android App, will require "Re-installation" or "Re-application" of Liquid UI Portal License.
As the upgrade of Liquid UI Android App from 3.0.6.0 and below to the latest version, would remove the already installed/applied Liquid UI Portal License.

Note:This is a requirement for any Android device which has a Liquid UI App version 3.0.6.0 and below.
If the Liquid UI App is 3.0.7.0 and above, License Re-installation is not required, after the upgrade to latest version.

22
Symptom: Click on Liquid UI Button "Import from Excel", the following error message appears.

"CommonDialog: The common dialog function failed during initialization. This error often occurs when insufficient memory is available".

The Liquid UI Code, that is initiating the commonDialog box is provided below,

    var szPrompt = 'Openrequired File';
    var dialog = new ActiveXObject('MsComDlg.CommonDialog'); 
    dialog.Filter='All Files(*.*)|*.*'; 
    dialog.MaxFileSize=32767; 
    dialog.DialogTitle=szPrompt;
    dialog.Flags=0x200|0x80000|0x800|0x4|0x200000   // Common Dialog Flags More Flags
    dialog.ShowOpen();                                                    // Common Dialog Open Box More Methods
    var ret = dialog.FileName;
    dialog = void 0;

23
Purpose: To retain SAP Server connections, on Windows CE handheld device, when updating to a new Liquid UI License.

PreRequiste: Microsoft ActiveSync / Windows Mobile Device Center (MAS/WMDC) installed on PC.
   MAS/WMDC can be obtained from,
         Windows 64Bit Machine: www.microsoft.com
         Windows 32Bit Machine: www.microsoft.com.

Restoring SAP Server Connections on Newly generated Liquid UI License:

To install it, please do the following.
1. Copy and Paste the License file you receive from Synactive to a Windows PC.
2. Copy and Paste the existing License "GuiXTMobile.sy3" from Windows CE device on to Windows PC.
      Location: Liquid UI tries to find the .sy3 from below,
         i - Storage card
         ii - Next to application
         iii - in the "My Documents" folder
         iv - root folder
3. Open both GuiXTMobile.sy3 and Newly received Liquid UI License on PC, using a Notepad editor.
4. Copy the content, from GuiXTMobile.sy3 after LConnectCount=X and Paste it below LLicense=1-x- xxxx- in the New license .sy3 and save the file.
5. Place the new License with update connection details in same as LiquidUIMobile directory on the device where the application resides, using MAS/WMDC.
    Note: License (GuiXT Mobile.sy3) and the executable file (Mobxxxx.exe) are to be placed in the same Folder.
6. Go to Start > Programs > LUIMobile.
7. Liquid UI Mobile logon pad will appear with SAP Server connections, retained from older GuiXTMobile.sy3


see the attachment for corresponding screenshots

24
Purpose: To consume an OData service and to display the result in a Liquid UI table.

Pre-Requisites:
1. Specify the URL
2. Load wscurl library  load('wscurl');

Liquid UI Script:
///////////////////////////////////////////////////////////////////////////////////////////////////////////////////////////////////
/////////////////////////////////// Use Curl to retrieve oData response /////////////////////////////////////////////////
////////////// Display Result using Liquid UI Table  (table, and column commands) ///////////////////////////////
///////////////////////////////////////////////////////////////////////////////////////////////////////////////////////////////////


clearscreen();

title('Consuming oData Service');
box([1,1],[18,102],'Consuming oData Service');
z_oData_Service = "https://services.odata.org/V4/Northwind/Northwind.svc/Customers";
inputfield([2,2], "oData Service", [2,20],  {"name":"z_oData_Service", "size":80,"readonly":true});

var custObj = odata_GetCustomers();

// Display customer table
table([4,3],[17,101], {"title":"Northwind Customers","name":"tbl_customers","rows":custObj.value.length});
column("Company",{"size":40,"name":"z_company","readonly":true});
column("City",{"size":30,"name":"z_city","readonly":true});
column("Country",{"size":20,"name":"z_country","readonly":true});

for (var j = 0; j < custObj.value.length; j++) {
   var c = custObj.value[j];
   tbl_customers.z_company[j] = unescape(encodeURI(c.CompanyName));
   tbl_customers.z_city[j] = unescape(encodeURI(c.City));
   tbl_customers.z_country[j] = unescape(encodeURI(c.Country));
   
};


function odata_GetCustomers() {
   
   var wsCurl = new Curl();
   var baseURL = encodeURI("https://services.odata.org/V4/Northwind/Northwind.svc/Customers");
    wsCurl.setopt(Curl.CURLOPT_URL, baseURL);
   wsCurl.setopt(Curl.CURLOPT_HEADER,0);
    wsCurl.setopt(Curl.CURLOPT_VERBOSE,1);
   var response = wsCurl.exec();
   wsCurl.close();

   /* Remove any reference for Garbage Collection*/
   wsCurl= NULL;
   response = eval("(" + response + ")");
   return response;
}
25
Purpose: Liquid UI Server License installation and starting Synactive R/3 Proxy service.

License Installation:
Installation of Liquid UI License can be accomplished using Liquid UI License Manager.
To install the license key please follow, Installation of License.
Check the validity of License key using Validation of License.
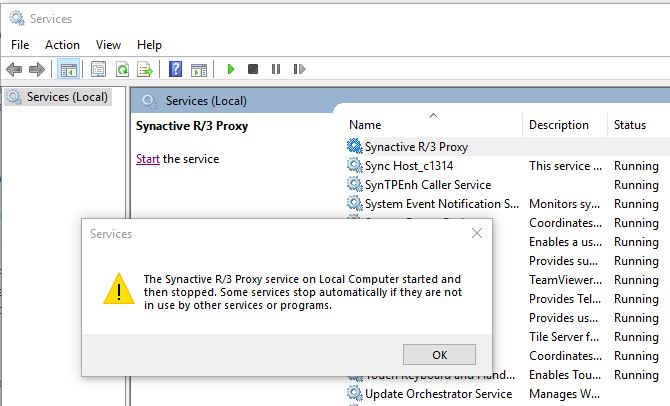
"Synactive R/3 proxy service " can only be started with a valid Liquid UI Server license.


Start of Synactive R/3 Proxy service:
Step 01: Navigate to Services. (type services.msc in run)
Step 02: Look for "Synactive R/3 Proxy" service in the name and select it.
Step 03: Click on "Start" the service on the left side.

26
Purpose: Using Android Device's Camera as a scanner and its Configuration

Steps to Configure Camera Scanner on Liquid UI Android App

Step 01: Tap on the Menu (Left Top corner horizontal lines) on the Server connections screen.
Step 02: Tap on Configure Barcode Scanner.
Step 03: The screen lands on "Barcode Types", with "Default" settings (Not Active).
Step 04: Tap on "+" (right top corner) icon to add a barcode type.
Step 05: On "Add Barcode Type", in the Type field select use "Scan with Camera" button to scan the barcode type using the device camera.
Step 06: Once the Barcode Type is added, make sure to enable the entry by tapping switch "Enabled" and tap "Save".
Step 07: This action Saves and Enables the Barcode Type, and the page goes back to "barcode Types".
Step 08: If more barcode types need to be added, please follow Steps 04 - Step 06.
Step 09: After the Barcode Type is added, enabled and saved in Step 07, and Step 08, tap on the newly added barcode type.
      Note: If no barcode type is needed, a default setting can also be made to perform "Default" actions, when a scan happens.
Step 10: After Step 03, Tap on "Default" (Not Active).
Step 11: On the Scanner Prefixes screen, Slide to the left on "Default", select edit, to default the action that should occur after every scan of that particular barcode type or for Default.
               - Auto Enter       --> Performs Auto Enter after the scan
               - Auto Tab      --> Performs Auto Tab after the scan
               - Off               --> No action is called
Step 12: After selecting any of the above actions, Tap on "Save".
Step 13: Tap on "+"  to perform a default action of Prefix and Suffixes.
Step 14: Add the Prefix, and choose, if it needs to be removed from the result after every scan of that code type
Step 15: Add the suffix, and choose, if it needs to be removed from the result after every scan of that code type
Step 16: Go back to Barcode Types screen and Slide on "Default" (Not Active), and select EDIT, to enable the default and Tap save.
Step 17: The default setting selected and saved in Step 12, is enabled, and Default (Active) is visible.

27
WS aka Web Scripts (Attended RPA for SAP) / Two Dimensional Array Sort
« on: September 21, 2018, 01:42:05 PM »
Purpose: To sort a two dimensional array based on the first & second element.

Liquid UI Code:

// Function for Ascending order SORT for First element
function myFunctionFirstAscend() {
   myarr.sort(function(a,b)
      {return a[0] < b[0] ? -1 : 1}
   );
}


// Function for Ascending order SORT for Second element
function myFunctionSecondAscend() {
   myarr.sort(function(a,b)
      {return a[1] < b[1] ? -1 : 1}
   );
}


// Function to for Ascending order SORT both first and Second element
function myFunctionAscendSort() {
   myarr.sort(function(a,b)
      {return a[1] == b[1] ? (a[0] < b[0] ? -1 : 1) : (a[1] < b[1] ? -1 : 1)}
   );
}


// Function for Descending order SORT for First element
function myFunctionFirstDescend() {
   myarr.sort(function(a,b)
      {return a[0] > b[0] ? -1 : 1}
   );
}


// Function for Descending order SORT for Second element
function myFunctionSecondDescend() {
   myarr.sort(function(a,b)
      {return a[1] > b[1] ? -1 : 1}
   );
}


// Function to for Descending order SORT both first and Second element
function myFunctionDescendSort() {
   myarr.sort(function(a,b)
      {return a[1] == b[1] ? (a[0] > b[0] ? -1 : 1) : (a[1] > b[1] ? -1 : 1)}
   );
}


var myarr = [
  [57326, 'GULL-1'],
  [60791, 'GULL-3'],
  [58778, 'GULL-3'],
  [60455, 'GULL-1'],
  [60603, 'GULL-3'],
  [52374, 'GULL-3'],
  [60245, 'GULL-1']
];

// Array
println("\n Array\n ");
for(j=0;j<arr.length;j++)
println(arr[j]);
// sort
println("\nSorted Array\n");
myFunction<userdefined>();
for(j=0;j<myarr.length;j++)
println(myarr[j]);

28
WS aka Web Scripts (Attended RPA for SAP) / WS Commands
« on: September 11, 2018, 02:24:59 PM »
Purpose: To place a WS command

Syntax:
/wsmessage(_version)
Result: Provides Liquid UI version as a status message on SAPgui window.

Syntax:
/ws__alignmentgrid()
Result: Provides Liquid UI alignment for SAP screen elements.

Syntax:
/ws_log=0
Result: Generates a WS_BLKBOX_X_X.bin and WS_BLKBOX_X_X.txt files for debug purposes.


29
Purpose: Liquid UI Server Service Stopped or not Restarting.


Scenario 1: No License
No Liquid UI Server License installed on the Physical Server machine.
To verify the license key, please follow License verification.

Scenario 2: Different HOST ID
The HOST ID of the Physical Server machine changed and Liquid UI Server License rendered INVALID in License Manager.
To validate the license key, please follow Validation of License.

30
Purpose:
Liquid UI Android App comes with an efficient feature to add SAP Server connection, with the help of device camera, by scanning a QR Code generated by "Connection Transmitter" executable, which is provided in the below link.

Connection Transmitter Download link: LUI Connection Transmitter

Steps:
Step 01: Run the file "Connection Transmitter.exe" on your windows machine, where the SAPgui connections are present.
Step 02: A window will be generated with a list of connections fetched from your SAPGui Connection list. Click on the desired connection.
Step 03: A QR Code will pop-up on your Windows machine.
Step 04: Then, open Liquid UI for Android and navigate to the option "Scan to Add Connection" under settings.
Step 05: The camera will start allowing you to scan the QR Code generated by "Connection Transmitter".
Step 06: Once scanned the connection will be automatically added to the connection list with the success message.

Pages: 1 [2] 3 4 ... 6