Recent Posts
81
Desktop Product (SAP GUI, Excel and PDF) / How to install Liquid UI runtime license for SAP GUI?
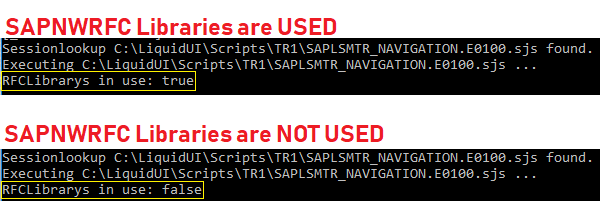
« Last post by sarvani.kusuri@guixt.com on August 14, 2019, 03:19:55 AM »Liquid UI for SAP GUI is a license-based software. After installation, you need a valid license for the Liquid UI WS to run successfully. You can request a Liquid UI for SAP GUI/WS license by sending an email to Synactive at rfi@guixt.com. The WS license is typically issued for a year and must remain valid to receive updates.
Note: Although the license is not required to install the software, it is required to run the software.
Install license steps:
To install Liquid UI for SAP GUI license, you will need to copy the license key data present in the license file (*.sy3), which was sent to you through an email and paste it in the guixt.sjs file.
The following steps describe the procedure to install a license.
1. You can request a license by sending an email to Synactive Inc. at rfi@guixt.com.
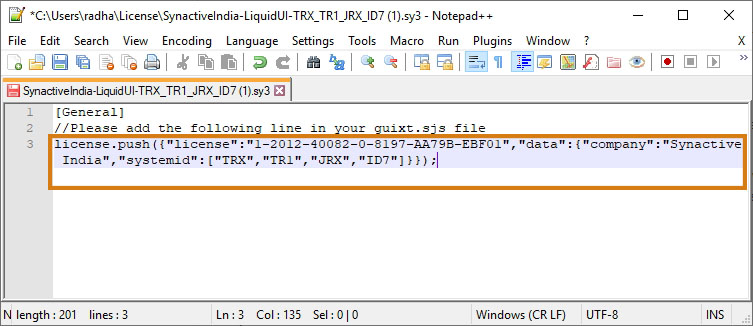
2. You will receive a license file in .sy3 file format, as shown like SynactiveIndia-LiquidUI-TRX_TR1_JRX_ID6.sy3.
3. Open the .sy3 license file in a text editor (such as notepad), you will find the license key details. You will need to copy the license key data (license.push command line) present in the file.
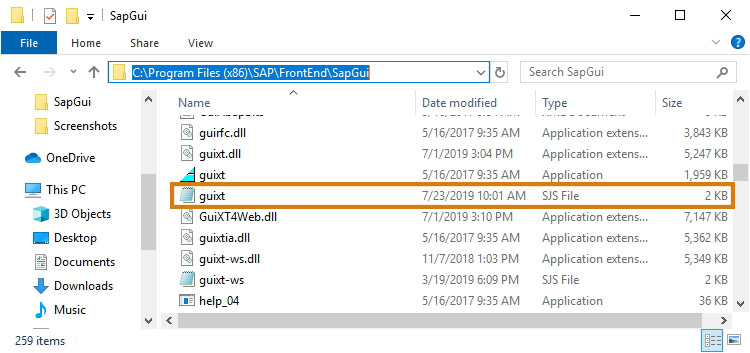
4. Navigate to the SAP GUI Installed folder on the machine. Open the guixt.sjs file present in the SAPgui folder on the machine.
C:\Program Files\SAP\FrontEnd\SAPgui → 32bit O.S
C:\Program Files(x86)\SAP\FrontEnd\SAPgui → 64bit O.S
6. Paste the copied license.push command line from the .sy3 license file into the guixt.sjs file, after "license=[]".
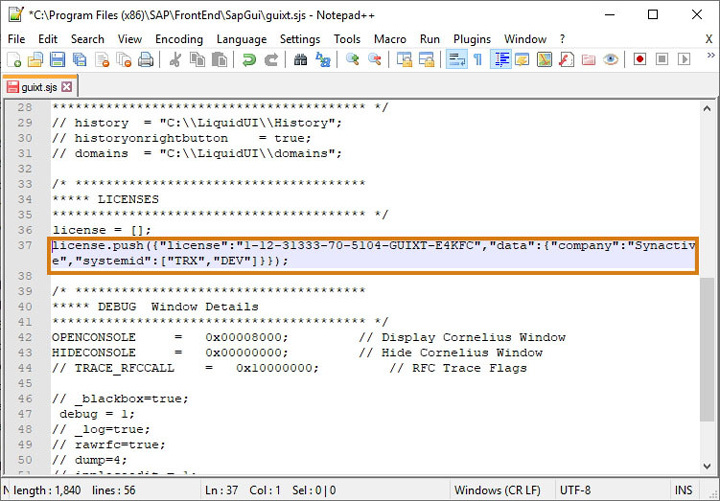
7. Save your changes and close the guixt.sjs file. If you have moved the guixt.sjs file outside the SAPgui directory to edit, replace the file in the SAPgui directory. The license gets active until the validity date.
Note: To use Liquid UI Web Server, Liquid UI Server, or any other product components together with the Liquid UI for SAP GUI, you must have a valid license for each component. Please see the respective product documentation for instructions on installing a relevant license.
Note: Although the license is not required to install the software, it is required to run the software.
Install license steps:
To install Liquid UI for SAP GUI license, you will need to copy the license key data present in the license file (*.sy3), which was sent to you through an email and paste it in the guixt.sjs file.
The following steps describe the procedure to install a license.
1. You can request a license by sending an email to Synactive Inc. at rfi@guixt.com.
2. You will receive a license file in .sy3 file format, as shown like SynactiveIndia-LiquidUI-TRX_TR1_JRX_ID6.sy3.
3. Open the .sy3 license file in a text editor (such as notepad), you will find the license key details. You will need to copy the license key data (license.push command line) present in the file.
4. Navigate to the SAP GUI Installed folder on the machine. Open the guixt.sjs file present in the SAPgui folder on the machine.
C:\Program Files\SAP\FrontEnd\SAPgui → 32bit O.S
C:\Program Files(x86)\SAP\FrontEnd\SAPgui → 64bit O.S
6. Paste the copied license.push command line from the .sy3 license file into the guixt.sjs file, after "license=[]".
7. Save your changes and close the guixt.sjs file. If you have moved the guixt.sjs file outside the SAPgui directory to edit, replace the file in the SAPgui directory. The license gets active until the validity date.
Note: To use Liquid UI Web Server, Liquid UI Server, or any other product components together with the Liquid UI for SAP GUI, you must have a valid license for each component. Please see the respective product documentation for instructions on installing a relevant license.