Prerequisites
- Products: Liquid UI WS, Liquid UI Server or Local DLL, Client Software
- Commands: inputfield(), pushbutton(), set(), onscreen(), enter()
Syntax
In Liquid UI Desktop
   // In this case the action "Enter" is executed after waiting for 3 seconds i.e 3000 milliseconds
      enter(3000);
[OR]
  // In this case the function code "/11" [Save] is executed after waiting for 3 seconds
     enter("/11",3000);
In Liquid UI Server
 // Waits for 3 seconds before performing the "Enter" action
    sleep(3000);
    enter();
[OR]
  // Waits for 3 seconds before the enter "/11" action
     sleep(3000);
     enter("/11");
Purpose
You will learn how to specify time delay in enter() before triggering an action. This delay in time is required in cases where the screen displays a status message specifying that it is locked by the current user or if you would like to wait for a certain time before executing an action.
- Delete unnecessary elements
- Reposition the required screen elements
- Add groupboxes
- Add radiobuttons
- Add inputfields
- Add checkbox
- Add pushbutton
- Add function to create a material
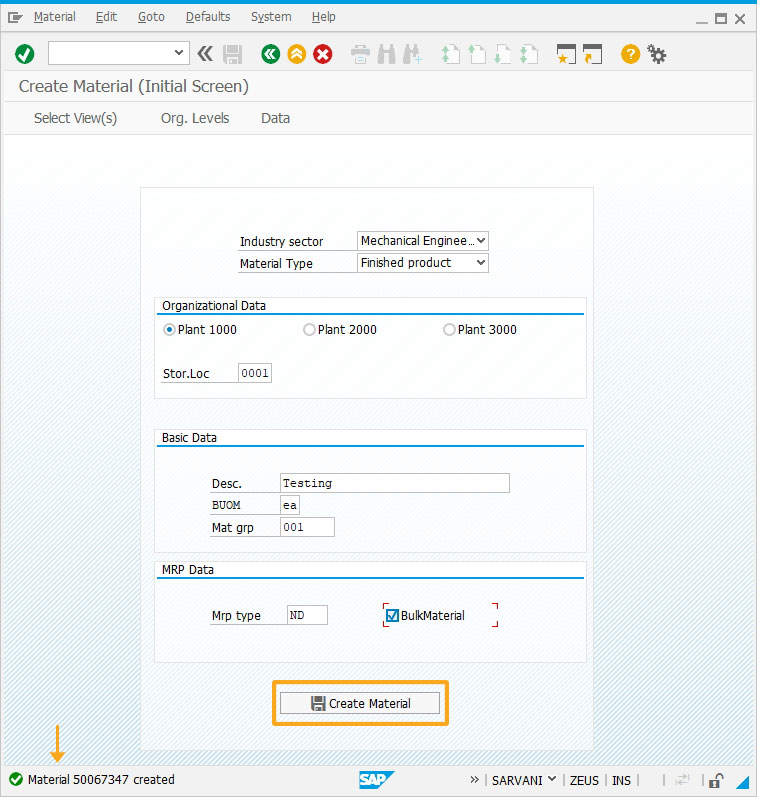
- Enter the required values in the fields and create material.
//Create this file inside your script folder for customizing Create Material screen: SAPLMGMM.E0060.sjs
//Now let's start adding the content to the above file
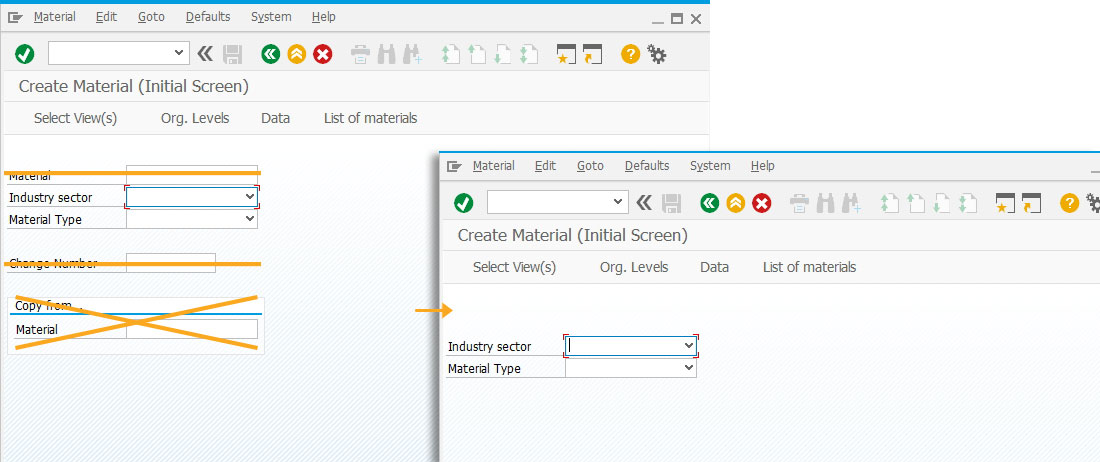
- Delete unnecessary screen elements on the Create Material screen.
//Deletes Material inputfield
del("F[Material]");
//Deletes Change Number inputfield
del("F[Change Number]");
//Deletes Copy from... groupbox
del("G[Copy from...]");
- Change the position of the Industry sector and Material type fields.
// Changes the position of the Industry Sector inputfield
pos("F[Industry sector]", [4,33]);
// Changes the position of the Material Type inputfield
pos("F[Material Type]", [5,33]);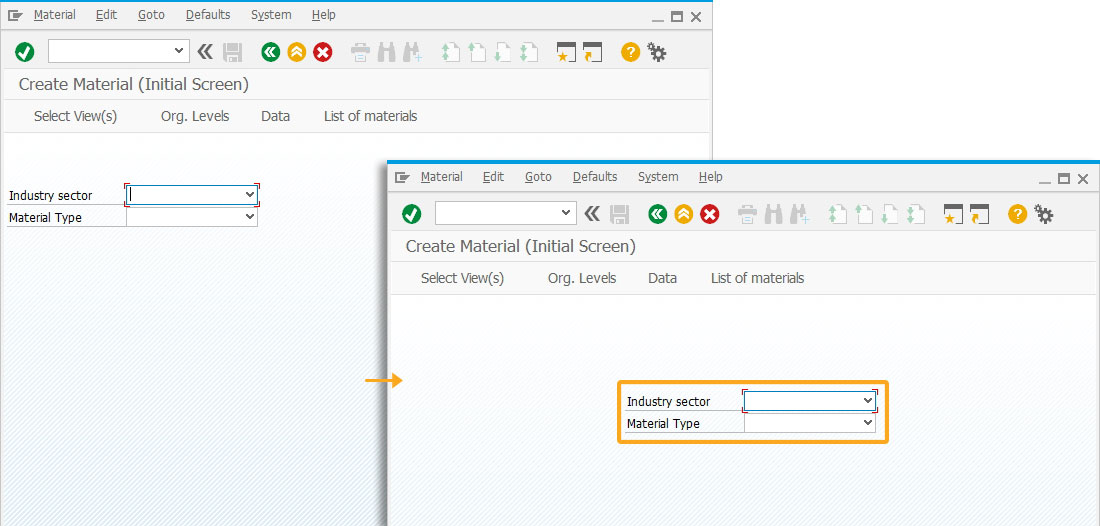
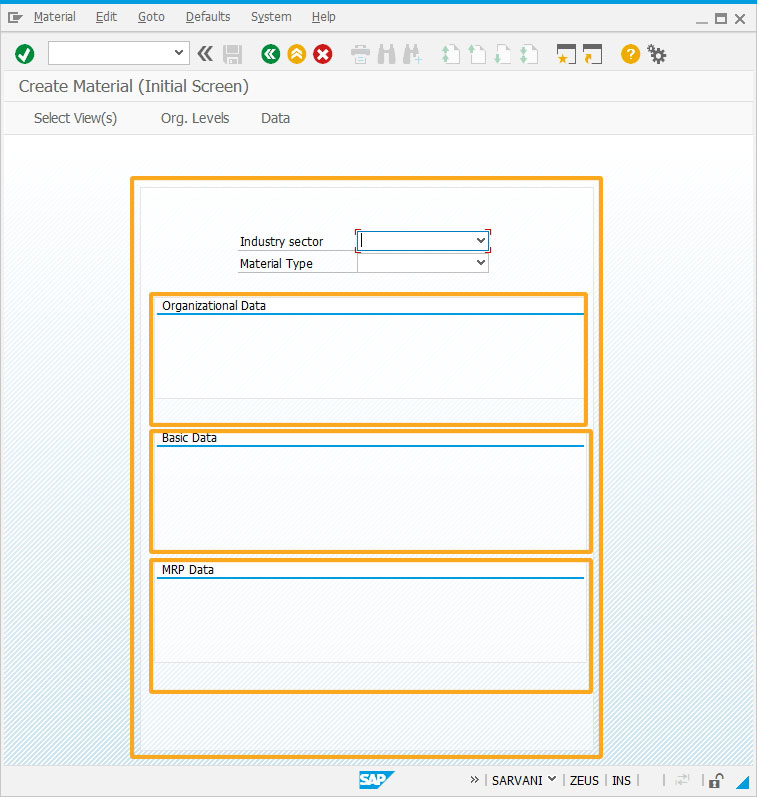
- Add four groupboxes Organizational Data, MRP Data, and Basic Data to add the relevant fields.
//Creates a groupbox with no label
box([2,19], [27,82], "");
//Creates a groupbox with Organizational Data as label
box([7,21], [11,81], "Organizational Data");
//Creates a groupbox with MRP Data as label
box([19,21], [23,81], "MRP Data");
//Creates a groupbox with Basic Data as label
box([13,21], [18,81], "Basic Data");
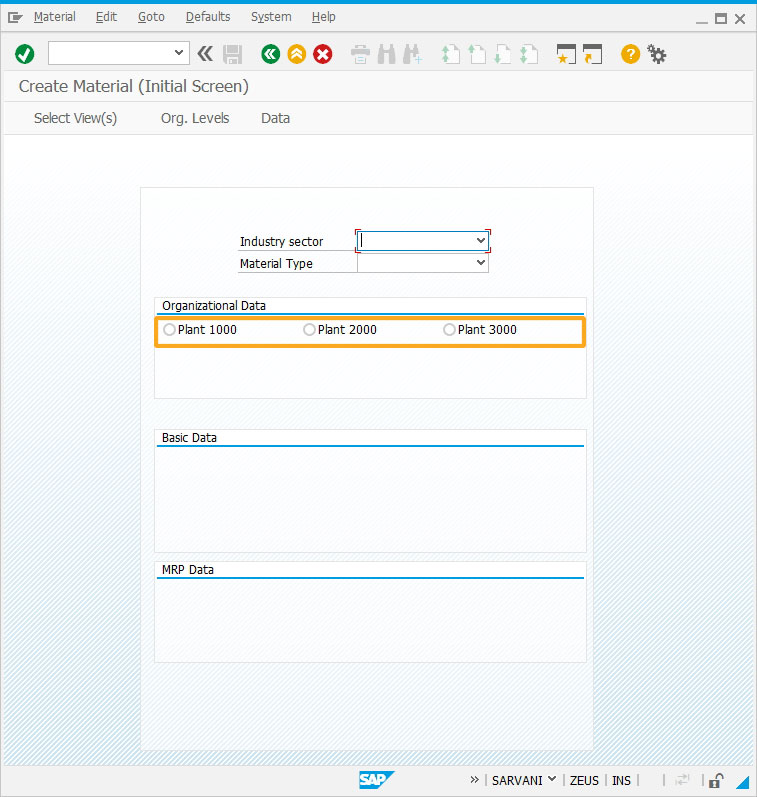
- Add three radiobuttons with the label as Plant 1000, Plant 2000, and Plant 3000 to select any of the required plant value.
//Creates a radiobutton Plant 1000 with technical name as z_mm01_plant and value as 1000
radiobutton([8,22], "Plant 1000",{"name":"z_mm01_plant", "value":1000});
//Creates a radiobutton Plant 2000 with technical name as z_mm01_plant and value as 2000
radiobutton([8,42], "Plant 2000",{"name":"z_mm01_plant", "value":2000});
//Creates a radiobutton Plant 3000 with technical name as z_mm01_plant and value as 3000
radiobutton([8,62], "Plant 3000",{"name":"z_mm01_plant","value":3000});
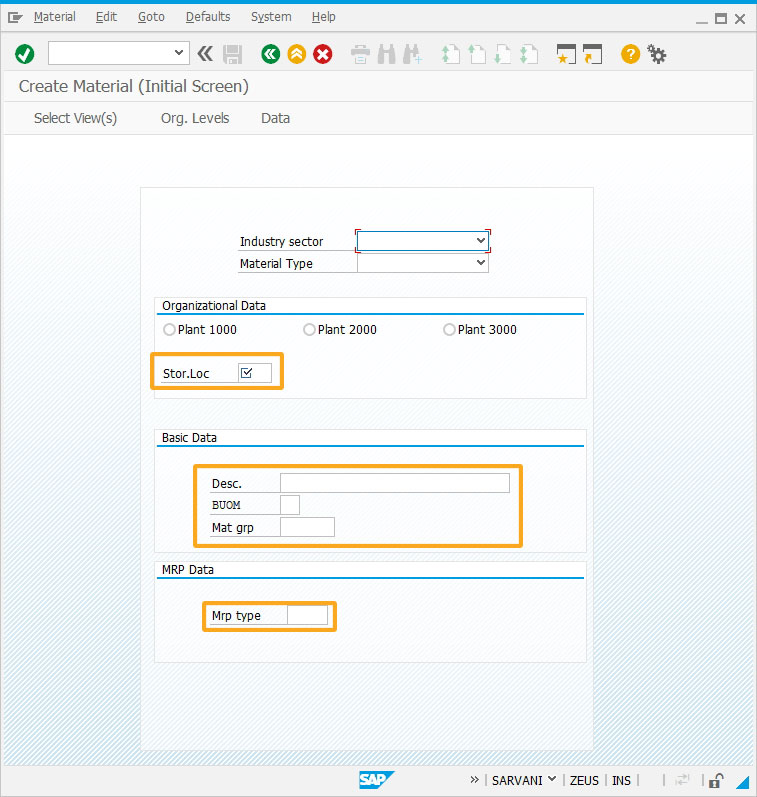
- Add five inputfields Stor. Loc, Desc, BUOM, Mat grp, Mrp type to enter the values to create a material.
//Creates an inputfield Stor.Loc with technical name as z_mm01_storloc, searchhelp value as H_T001L, and it is a mandatory field
inputfield( [10,22], "Stor.Loc", [10,33],{ "name":"z_mm01_storloc", "size":4, "required":true, "searchhelp":"H_T001L"});
//Creates an inputfield Desc. with technical name as z_mm01_desc
inputfield( [15,29], "Desc.", [15,39],{ "name":"z_mm01_desc", "size":32});
//Creates an inputfield BUOM with technical name as z_mm01_buom and technical name as MARA-MEINS
inputfield( [16,29], "BUOM", [16,39],{ "name":"z_mm01_buom", "size":2, "techname":"MARA-MEINS"});
//Creates an inputfield Mat grp with technical name as z_mm01_matgrp
inputfield( [17,29], "Mat grp", [17,39],{ "name":"z_mm01_matgrp", "size":7});
//Creates an inputfield Mrp type with technical name as z_mm01_mrptype
inputfield( [21,29], "Mrp type", [21,40],{ "name":"z_mm01_mrptype", "size":5});
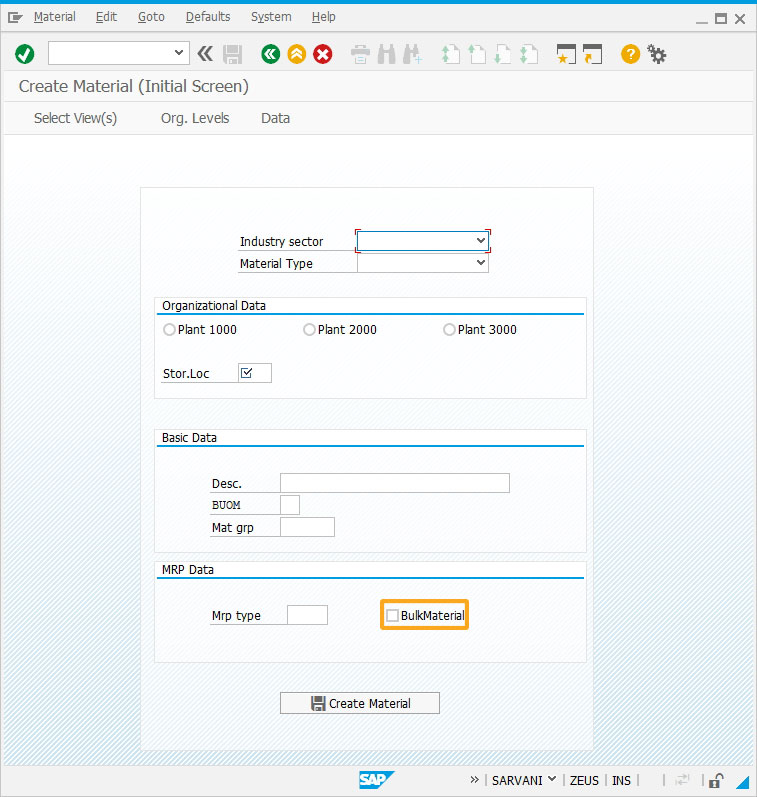
- Add the Bulk Material checkbox to assign its value.
//Creates Bulk Material checkbox with technical name as z_mm01_blkmat
checkbox([21,54], "Bulk Material",{"name":"z_mm01_blkmat", value:"bulk"});
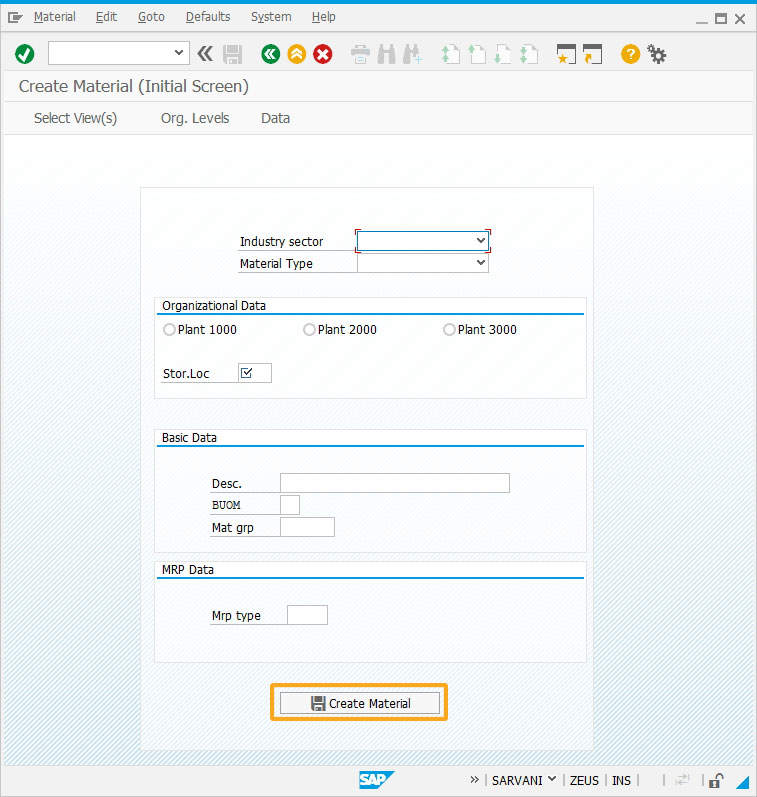
- Add a pushbutton Create Material to run the required process on click to create a material.
//Creates Create Material pushbutton to run mm01_create process.
pushbutton([25,39], "@2L@Create Material   ",{ "process":mm01_create});
- Add a function to assign values to the required fields, table cells, and checkboxes to create a material. You will see the enter command delay 3 seconds before saving the material details.
//Create mm01_screen function to retain the Liquid UI design even after opening a new session.
function mm01_create_material(){
// Create Material (Initial Screen)
onscreen 'SAPLMGMM.0060'
enter('/5');
// Create Material (Initial Screen)
onscreen 'SAPLMGMM.0070'
set('Cell[Table,0,1]','X');
set('Cell[Table,0,4]','X');
set('Cell[Table,0,6]','X');
set('Cell[Table,0,12]','X');
set('Cell[Table,0,13]','X');
set('Cell[Table,0,14]','X');
enter('/6');
// Create Material (Initial Screen)
onscreen 'SAPLMGMM.0080'
set('F[Plant]','&V[z_mm01_plant]');
set('F[Stor. Location]','&V[z_mm01_storloc]');
set('F[Sales Org.]','1000');
set('F[Distr. Channel]','10');
enter();
// Create Material  (Finished product)
onscreen 'SAPLMGMM.4004'
set('F[MAKT-MAKTX]', '&V[z_mm01_desc]');
set('F[Base Unit of Measure]','&V[z_mm01_buom]');
set('F[Material Group]','&V[z_mm01_matgrp]');
enter('=SP04');
// Create Material  (Finished product)
onscreen 'SAPLMGMM.4000'
set('cell[TABLE,Tax classification,1]','1');
set('cell[TABLE,Tax Classification,2]', '1');
enter('=SP06');
// Create Material  (Finished product)
onscreen 'SAPLMGMM.4200'
set('cell[TABLE,Tax Classification,2]', '1');
set('cell[TABLE,Tax Classification,3]', '1');
set('cell[TABLE,Tax Classification,4]', '1');
set('cell[TABLE,Tax Classification,5]', '1');
set('cell[TABLE,Tax Classification,6]', '1');
set('cell[TABLE,Tax Classification,7]', '1');
set('cell[TABLE,Tax Classification,8]', '1');
enter("/27");
// Create Material  (Finished product)
onscreen 'SAPLMGMM.4000'
enter("=SP06");
// Create Material  (Finished product)
onscreen 'SAPLMGMM.4000'
set('F[Trans. Grp]','0001');
set('F[LoadingGrp]','0001');
enter('=SP12');
// Create Material  (Finished product)
onscreen 'SAPLMGMM.4000'
set('F[MRP Type]','&V[z_mm01_mrptype]');
enter('=SP13');
// Create Material  (Finished product)
onscreen 'SAPLMGMM.4000'
set('F[SchedMargin key]','000');
if (z_mm01_blkmat=='X')
set('C[Bulk Material]','X');
else
{
set('C[Bulk Material]', ' ');
}
enter('=SP14');
// Create Material  (Finished product)
onscreen 'SAPLMGMM.4000'
//specifying time delay of 3000 milliseconds
enter('/11',3000);
}
- Enter values into the fields and click Create Material pushbutton. You will see the Material created message at the status bar.
Next Steps

This article is part of the Invoking functions tutorial.