Prerequisites
- Products: Liquid UI WS, Liquid UI Server or Local DLL, Client Software
- Commands: pushbutton(), inputfield(), radiobutton(), del(), onscreen(), onUIEvents(), message()
Purpose
You will learn how to pass radiobutton value to other elements on the same screen using radiobuttonname.value property in Liquid UI. We will walk you through the following steps.
- Delete unnecessary elements
- Add groupboxes
- Add radiobuttons
- Add inputfields
- Add pushbuttons
- Change screen title
- Add a function to check radiobutton value.
//Create this file inside your script folder for customizing SAP Easy Access screen SAPLSMTR_NAVIGATION.E0100.sjs
//Now let's start adding the content to the above file
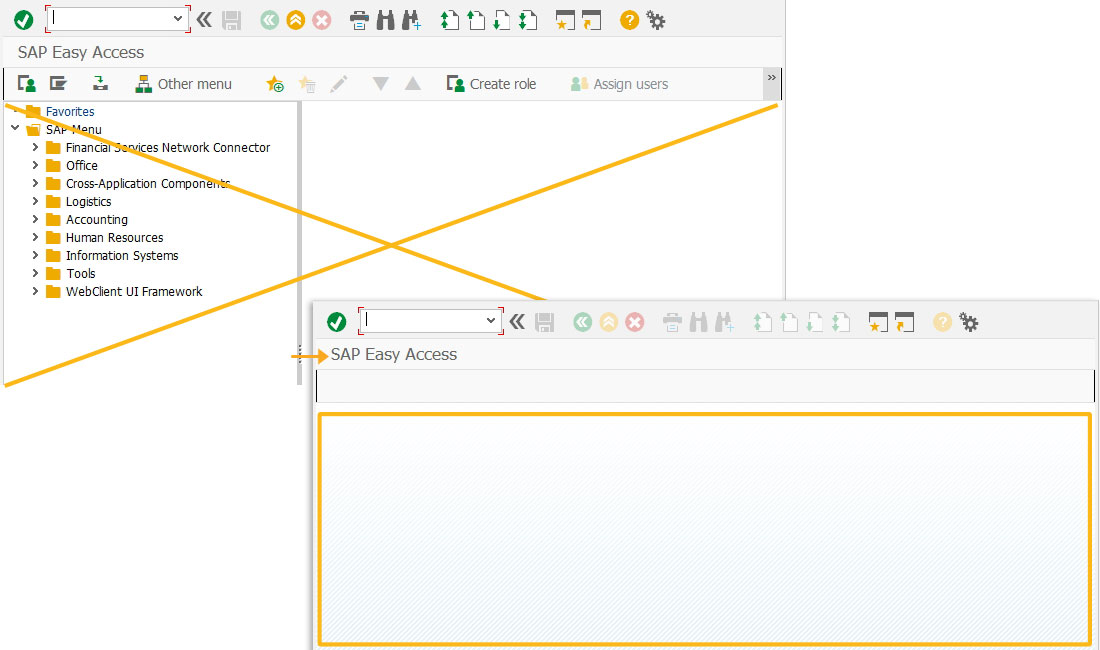
- Open SAP Easy Access screen and delete the image container on the SAP Easy Access screen.
// Deletes an image container on the SAP Easy Access screen
del("X[IMAGE_CONTAINER]");
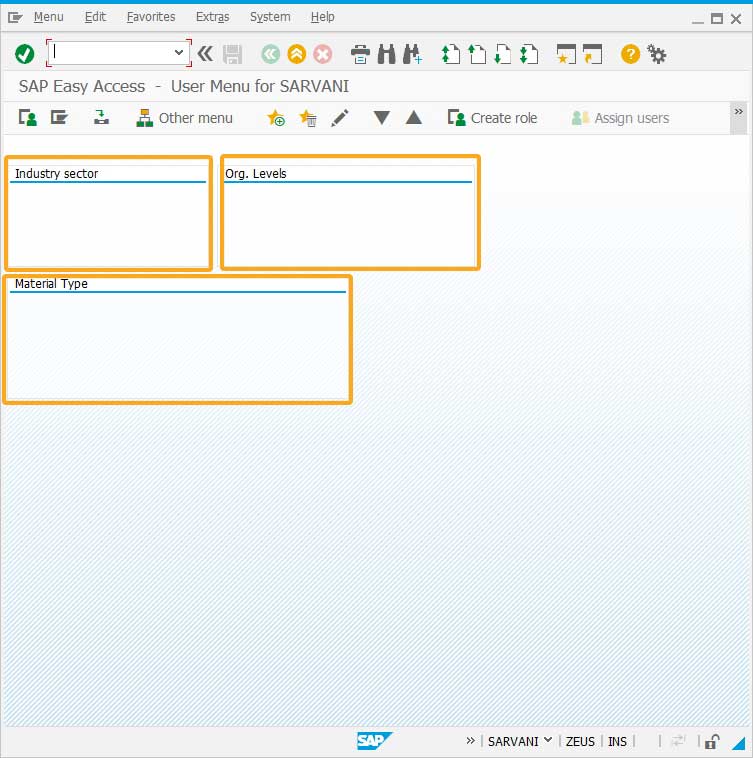
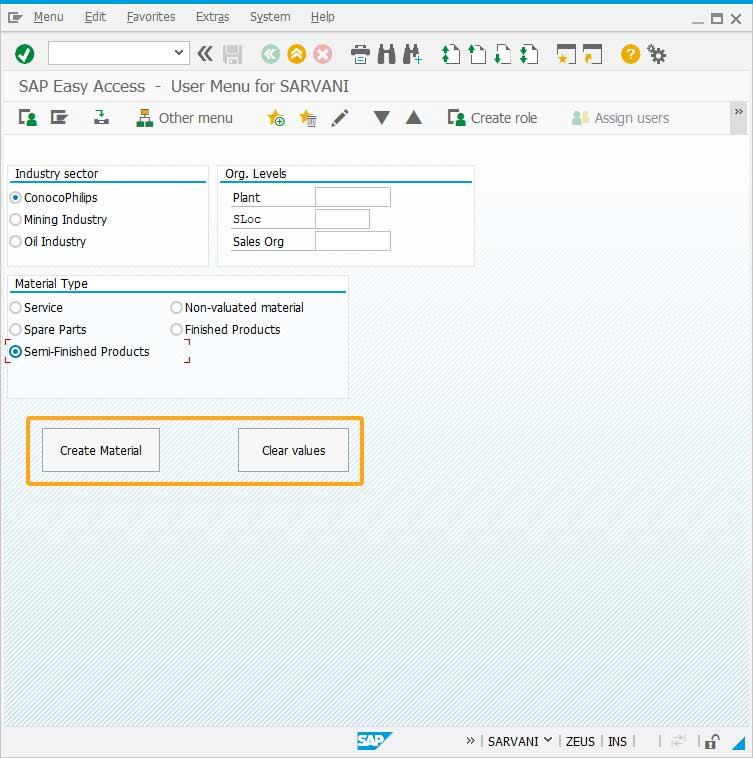
- Add three groupboxes namely Industry sector, Org. Levels, Material Type as shown below:
// Creates three groupboxes indicating sizes and label names
box([1,0], [5,27], "Industry sector");
box([1,30], [5,65], "Org. Levels");
box([6,0], [11,47], "Material Type");
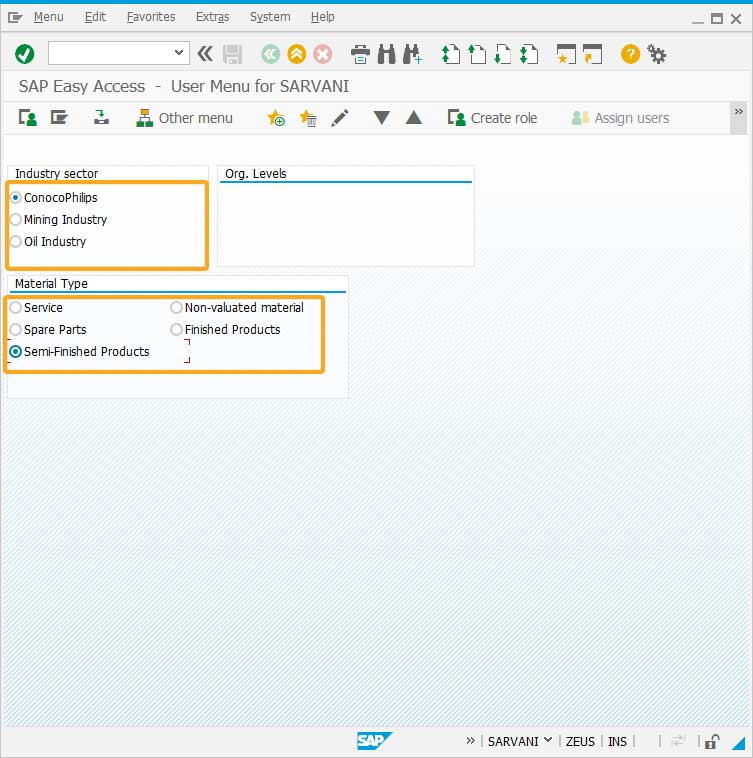
- Add radiobuttons with technical names and values as shown below:
// Creates radiobuttons with label names, technical names and values defined
radiobutton([9,0], "Semi-Finished Products",{"name":"z_radio","value":"Semi-Finished","size":10});
radiobutton([7,23], "Non-valuated material",{"name":"z_nonval","value":"Non-valuated material", "size":10});
radiobutton([8,0], "Spare Parts", {"name":"z_spare","value":"Spare parts","size":[2,15]});
radiobutton([4,0], "Oil Industry",{"name":"z_oil","value":"Oil Industry","size":[2,15]});
radiobutton([2,0], "ConocoPhilips",{"name":"z_coco","value":"ConocoPhilips", "size":[2,15]});
radiobutton([8,23], "Finished Products",{"name":"z_finished", "value":"Finished products"});
radiobutton([7,0], "Service",{"name":"z_service","size":[2,15], "value":"Service"});
radiobutton([3,0], "Mining Industry",{"name":"z_mining","size":[2,15],"value":"MN"});
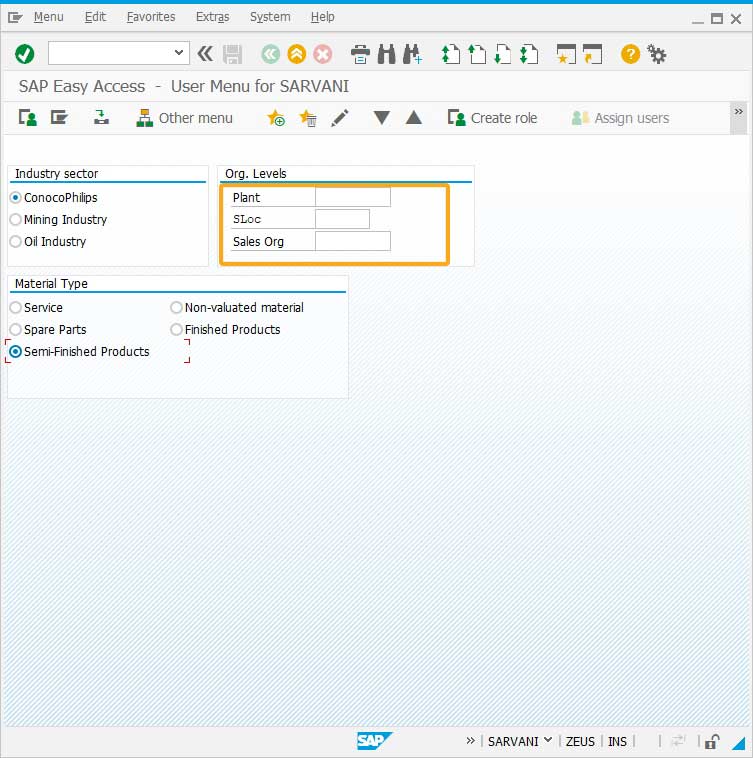
- Add three inputfields to enter Plant, SLoc, and Sales Organization values as per the requirement.
// Creates three inputfields namely Plant, SLoc, and Sales Org. with technical names in required sizes
inputfield( [2,32], "Plant", [2,44],{"name":"z_plant","size":10});
inputfield( [3,32], "SLoc", [3,44],{"name":"z_loc", "size":7});
inputfield( [4,32], "Sales Org",[4,44],{"name":"z_sales",,"size":10});
- Add two pushbuttons Create Material and Clear values on the screen to execute function on click.
// Creates a pushbutton Create Material to run z_proc on click
pushbutton([13,5], "Create Material  ",{"process":z_proc, "name":"z_CreateMat","size":[2,16]});
// Creates a pushbutton to clear values in  all the fields
pushbutton([13,33], "Clear values    ",{"name":"z_clear","size":[2,15]});
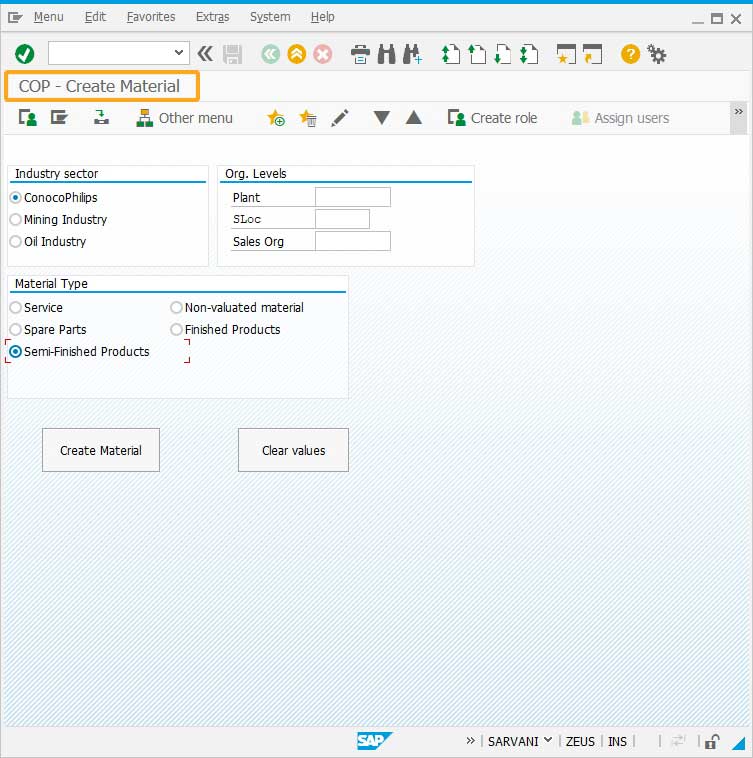
- Change screen title as COP - Create Material.
// Changes the title of the screen
title("COP - Create Material");
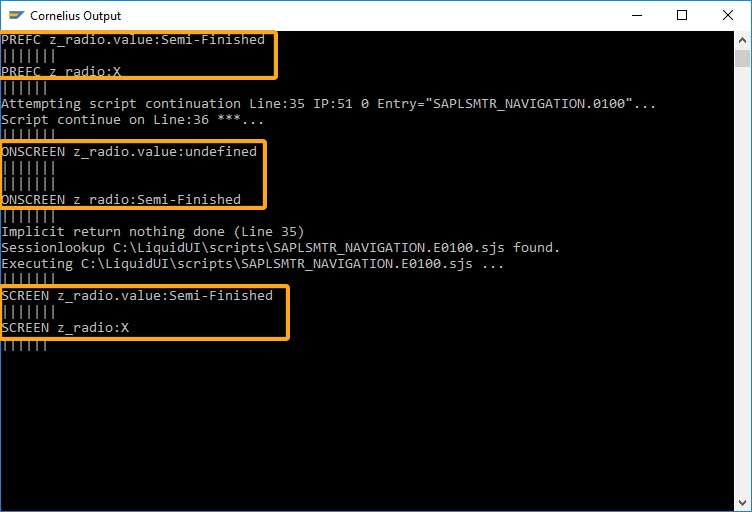
- Displays the radio button value using the .value property. You can see the z_radio.value and z_radio values of Semi-finished products radiobutton before executing the function. Click enter to execute the z_proc function defined in the script file.
// Display radiobutton value on the same screen
println("|||||||\nSCREEN z_radio.value:" + z_radio.value +"\n|||||||\nSCREEN z_radio:" + z_radio+"\n||||||");
onUIEvents["enter"] = z_proc;
- Add a function to observe and display z_radio.value and z_radio values when accessed on the same screen and on a different screen.
// Function to display z_radio.value and z_radio values during automation process and  after performing navigation to another screen
function z_proc(){
	// radiobutton value during automation process
	println("|||||||\nPREFC z_radio.value:" + z_radio.value +"\n|||||||\nPREFC z_radio:" + z_radio+"\n||||||");
	message("z_proc PREFC hit!!");
	onscreen '*'
		message("z_proc ONSCREEN hit!!");
		//radiobutton value when accessed on the other screen
	println("|||||||\nONSCREEN z_radio.value:" + z_radio.value +"\n|||||||");
	println("|||||||\nONSCREEN z_radio:" + z_radio +"\n|||||||");
		enter();
}
- Select the Semi-Finished radiobutton and perform enter to display the z_radio.value and z_radio values on the same screen, during automation of the screen and when accessed on different screen as shown below.
Example 2: Accessing radiobutton value in Create Activity screen during Automation
Purpose
You will learn how to pass radiobutton values to other elements on the same screen and also on different screen (Create Activity screen) using radiobuttonname.value property in Liquid UI. We will walk you through the following steps.
- Delete unnecessary elements
- Add three radiobuttons
- Add a function to display radiobutton values
//Create this file inside your script folder for customizing SAP Easy Access screen SAPLSMTR_NAVIGATION.E0100.sjs
//Now let's start adding the content to the above file
- Open SAP Easy Access screen and Delete the image container on the SAP Easy Access screen.
// Deletes an image container on the SAP Easy Access screen
del("X[IMAGE_CONTAINER]");
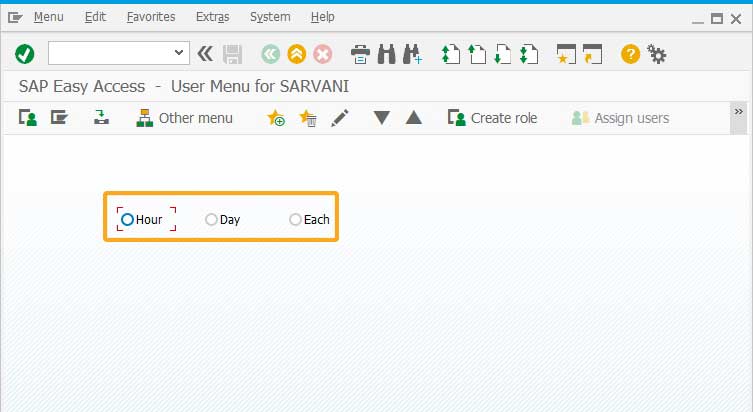
- Add three radiobuttons namely Hour, Day, and Minutes to select the required as per your requirement as shown below:
// Creates three radiobuttons indicating sizes and label names
radiobutton([3,16],"Hour",{"name":"z_act_unit","value":"H"});
radiobutton([3,28],"Day",{"name":"z_act_unit","value":"DAY"});
radiobutton([3,40],"Minutes",{"name":"z_act_unit","value":"EA"});
- On performing enter, function process_enter will be executed.
// OnUIEvents command executes process_enter function when user performs enter
onUIEvents["enter"] = process_enter;
- Add a function to display activity unit value on the same screen and on the different screen after performing screen automation.
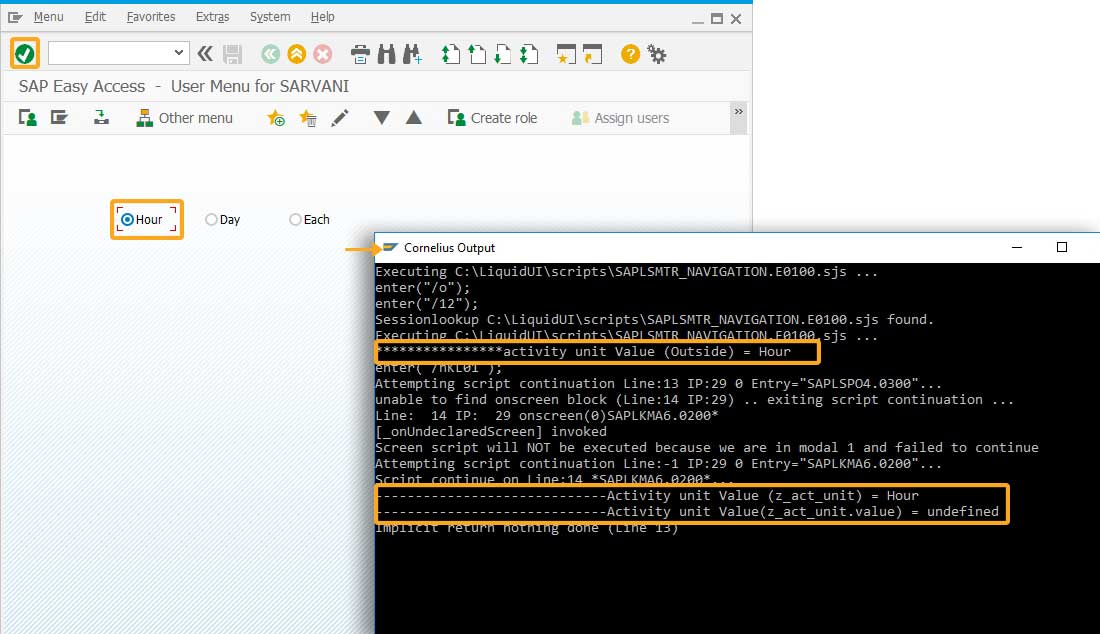
// Creates process_enter function to display radiobutton value on the same screen and on different screen (Create Activity screen)
function process_enter()
 {
 println("****************activity unit Value (Outside) = " + z_act_unit.value);
 enter("/nKL01");
 // println("****************Allocation Cost Element Value (Outside) = " + z_cost_elem.value);
  onscreen "SAPLKMA6.0200"
  println("-----------------------------Activity unit Value (z_act_unit) = " + z_act_unit);
  println("-----------------------------Activity unit Value(z_act_unit.value) = " + z_act_unit.value);
 enter();
 }
- Select any radiobutton to pass its value to Create Activity screen. You will see different values for the radiobutton when accessed on the same screen and on the different screen as shown below on the console window.
Next Steps
This article is part of the Invoking functions tutorial.

Learn how to add a time delay in a process to perform required actions.
10 min.
This article is also a part of the Javascript functions tutorial.


