Prerequisites
- Products: Liquid UI WS, Liquid UI Server or Local DLL, Client Software
- Commands: del(), load(), pushbutton(), message(), set(), onscreen, enter()
- File: wsoffice.dll
Purpose
Learn how to copy the List screen data to excel with a pushbutton created on an SAP screen. To explain this, we'll guide you through the following steps.
- Add a pushbutton to call the function
- Create a function to copy data from the List screen, and assign it to an array
- Create a function to copy data to an excel file

Note: Make sure to place the wsoffice.dll and RVKRED02.E1000.sjs files in your scripts folder.
User Interface
//Create this file inside your script folder for customizing the SD Documents screen RVKRED01.E0120.sjs
//Now, let's start adding the Liquid UI script to the above file and save it.
Customization
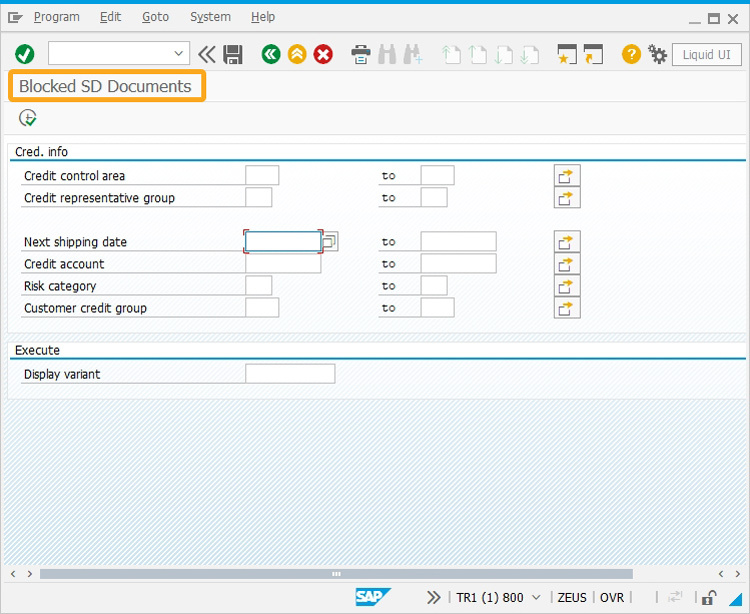
- Log into SAP, and navigate to the VKM1(Blocked SD Documents) screen.
Screen Script
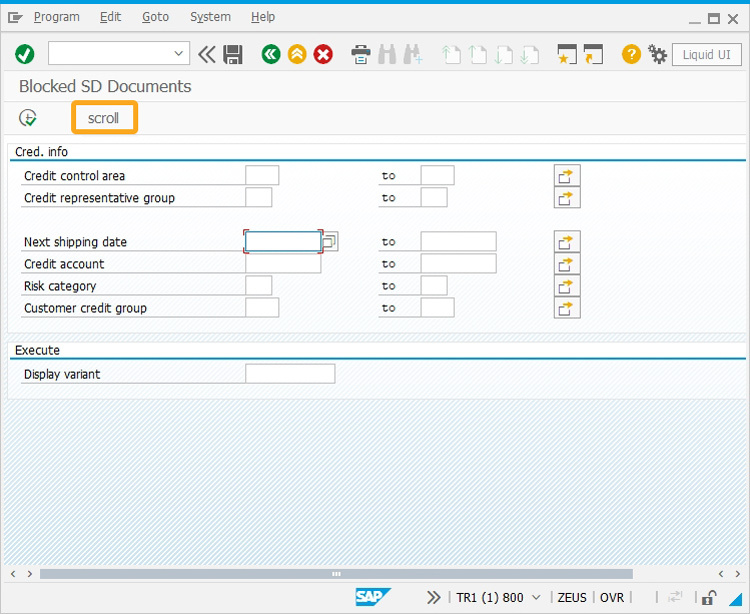
- Add a pushbutton with the label as scroll to execute the process z_readfromlist, when clicked.
// Creates a pushbutton with the label as scroll to call a function when clicked.
pushbutton([TOOLBAR],""scroll"",{"process":z_readfromlist});
- Use the load command to add the wsoffice.dll file to RVKRED01.E0120.sjs; this allows you to access the functions included in it.
// wsoffice.dll is required to be installed
load('wsoffice');
- Now, add the following Liquid UI script to this file, and save it.
// function to read data from the List screen and assign it to an array

functionz_readfromlist(){
 z_doc = [];                // array to store data
 z_doc1 = [];               // array to store data
 z_doc2 = [];               // array to store data

ifvrow = 1;
 onscreen 'RVKRED01.0120'
 SCROLL_NEXT:;
 enter("/scrolltoline=&V[lfvrow]");       //scroll the list vertically

 onscreen 'RVKRED01.0120'
 enter("/hscrollto=0");                   //scroll list horizontally

//To go to the end of the function when the end of the List screen is reached.

if(lfvrow >= _listlastvisiblerow){
goto END;
}
 START:;
 ifvrow = _listfirstvisiblerow;
 llvrow = _listlastvisiblerow;
 z_row = 3;
 LOOP:;
 set("V[V[doc_val]]","&#["+z_row+",30]");
 set("V[V[doc_val1]]","&#["+z_row+",72]");
 set("V[V[doc_val2]]","&#["+z_row+",97]");
 z_doc.push(doc_val);
 z_doc1.push(doc_val1);
 z_doc2.push(doc_val2);
 lfvrow = lfvrow+1;
 if(lfvrow <= _listlastvisiblerow){
 z_row = z_row+1;
 goto LOOP;
 }
 else{
goto SCROLL_NEXT
 }
END;

 // To display array elements on Cornelius output window

for(i=0;i<z_doc.length;i++){
 println("*******************************************************");
 println("document number at z_doc["+i+"]="+z_doc[i]);
 println("document Name at z_doc["+i+"]="+z_doc1[i]);
 println("document City at z_doc["+i+"]="+z_doc2[i]);
 println("*******************************************************");
 }
 copy_To_Excel(zdoc,zdoc1,zdoc2)
 }

//function to copy the data from list screen to excel file.

 function copy_To_Excel(zdoc,zdoc1,zdoc2)
 var ExcelApp = new ActiveXObject("Excel.Application");
 var ExcelSheet = new ActiveXObject("Excel.Sheet");

 ExcelSheet.ActiveSheet.Cells(1,1).Value = "Document Number";
 ExcelSheet.ActiveSheet.Cells(1,2).Value = "Name of the Person";
 ExcelSheet.ActiveSheet.Cells(1,3).Value = "City";
 for(i=2;i<z_doc.length;i++) {
 ExcelSheet.ActiveSheet.Cells(i,1).Value = z_doc[i];
 ExcelSheet.ActiveSheet.Cells(i,2).Value = z_doc1[i];
 ExcelSheet.ActiveSheet.Cells(i,3).Value = z_doc2[i];
 }
 var str = "C:\\LiquidUI\\scripts\LISTSCREENDATA.XLS";
 var fso = new ActiveXObject("Scripting.FileSystemObject");
 if(fso.FileExists(str)){
 message("E:FILE ALREADY EXISTS PLEASE REMOVE OLD FILE");
 }
 else{
 ExcelSheet.SaveAs(str);
 ExcelSheet.Application.Quit();
 }
 }
SAP Process
- Now, refresh the SAP screen, and click the Execute button, as shown below.
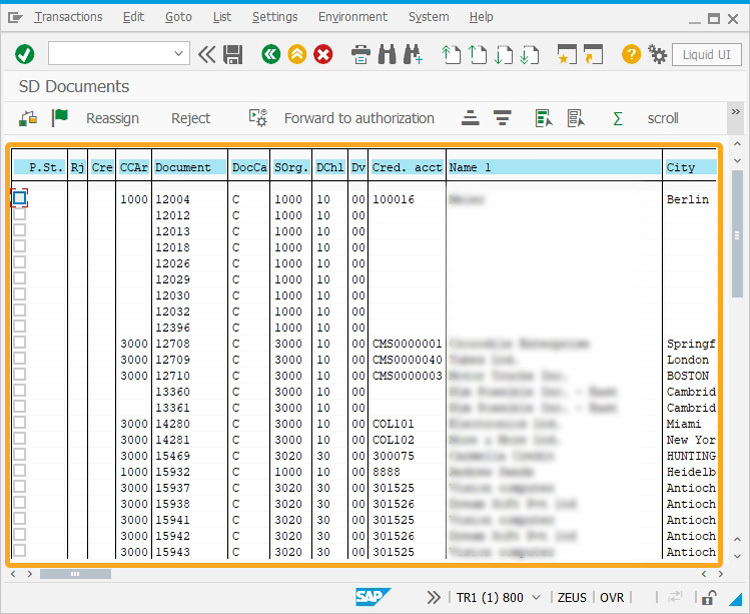
- Then the following screen appears, now click the scroll toolbar pushbutton to store the values into an array.

- Then a screen appears with the data stored, as shown in the image below.
 Note: A new excel file will be created with the name LISTSCREENDATA.xls in your script directory.
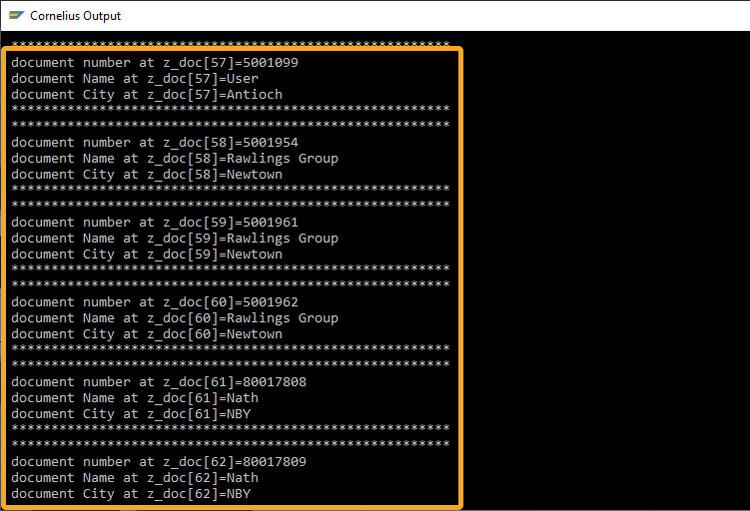
 - Now, open the Cornelius window to see the output, i.e., the data copied from the List screen to the array, as shown in the following image.
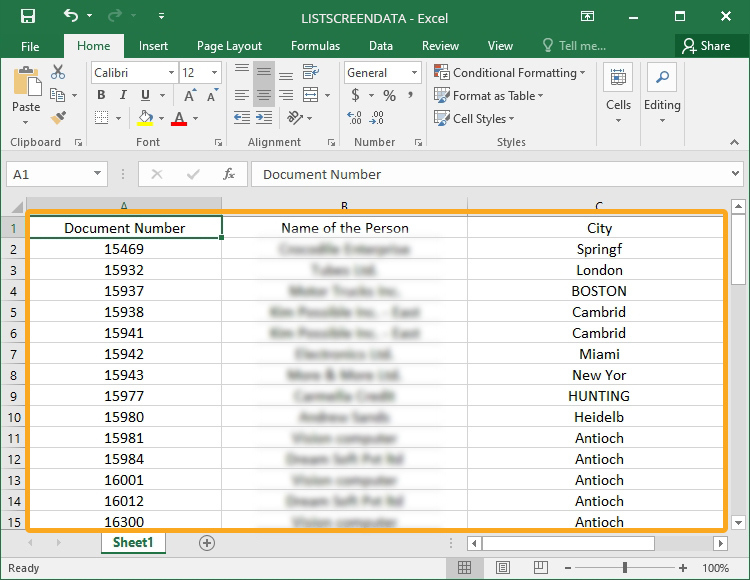
- Finally, open the excel file LISTSCREENDATA.xls, which is created and stored in your scripts folder to see the output, i.e., data copied from the List screen, as shown in the following image.