Prerequisites
- Products: Liquid UI WS, Liquid UI Server or Local DLL, Client Software
- Commands: del(), pushbutton(), load(), set(), inputfield(), table(), column(), onscreen, enter(), gettableattribute(), message()
- File: wsoffice.dll
Purpose
Learn how to create a pushbutton on an SAP screen to call a function that contains an ActiveXObject, used to call the local file system to retrieve and rename it. We'll guide you through the following steps.
- Delete unnecessary elements on the SAP screen
- Add an input field to enter the order number
- Add a pushbutton to get the values to excel on click
- Add a Liquid UI table
- Create a function to assign SAP table values to the Liquid UI table
- Create a function to retrieve Liquid UI table values into an excel file
- Scenario to show the customized process

Note: You need to place the wsoffice.dll file in your scripts folder.
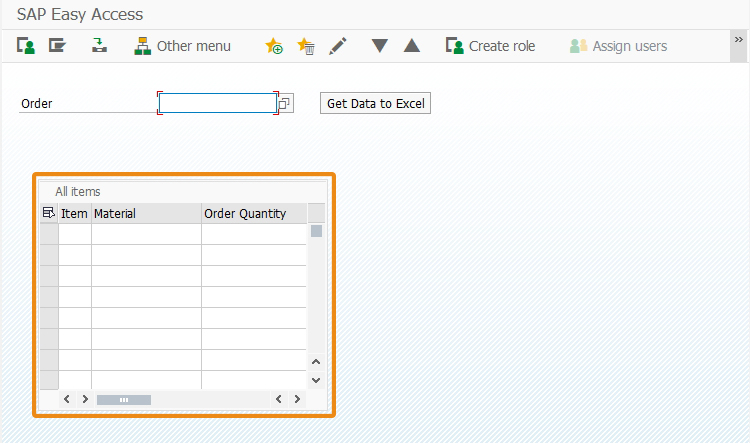
User Interface
//Create this file inside your script folder for customizing SAP Easy Access screen SAPLSMTR_NAVIGATION.E0100.sjs
//Now, let's start adding the Liquid UI script to the above file and save it
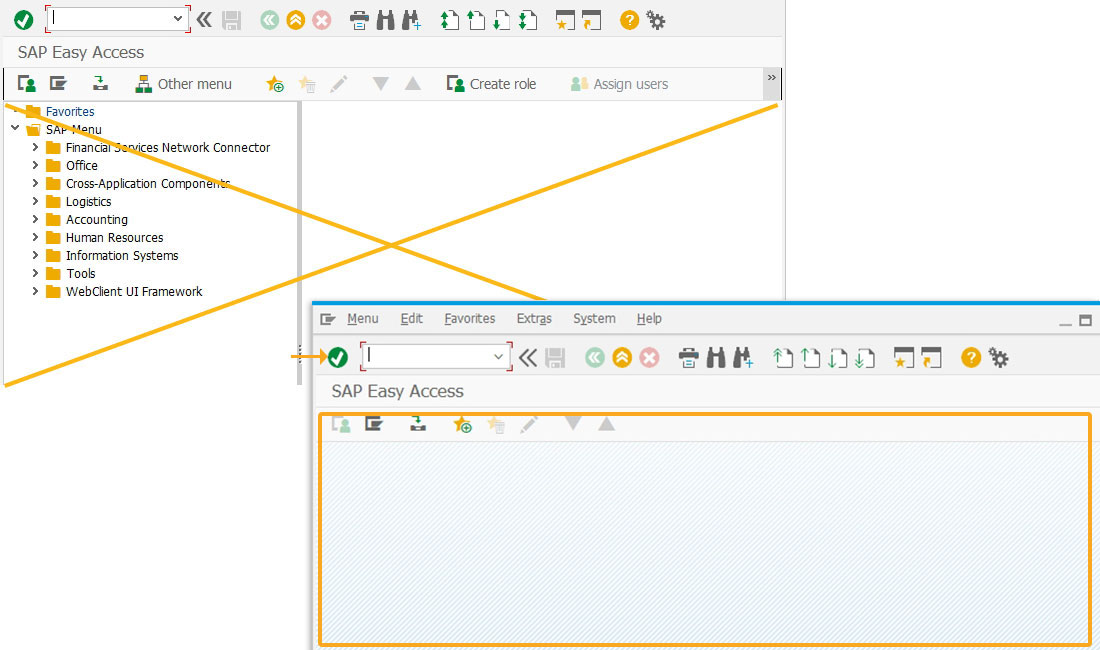
- Delete the unnecessary elements on the screen using del()
//Deletes unnecessary screen elements on the SAP Easy Access screen.
del('X[IMAGE_CONTAINER]');
del('P[Documentation]');
del('P[Assign Users]');
del('P[Other roles]');
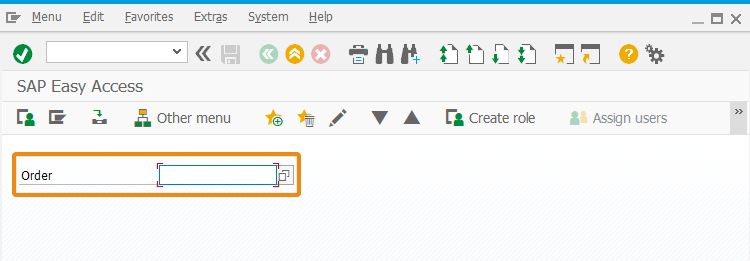
- Add an input field to enter the Order number of your Sales Order with searchhelp values, as shown below.
// Create an inputfield with its label as Order with searchhelp value as VMVA and searchhelp parameter value as VBELN
inputfield( [1,2], "Order", [1,22],{"name":"z_message_info","shname":"VBELN", "size":16, "searchhelp":"VMVA"});
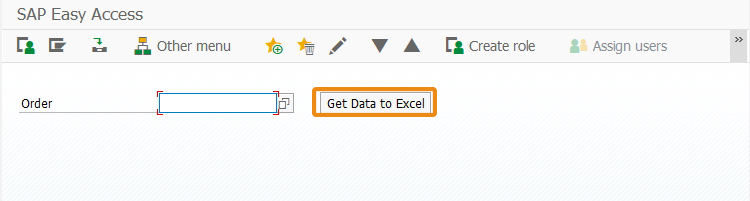
- Add a pushbutton with the label "Get Data to Excel" to execute a process called z_AssigntoSAPTable, when clicked.
// Creates a pushbutton with the label as Get Data to Excel and executes z_AssigntoSAPTable process usin z_messae_info paramters on click or refreshing the screen
pushbutton([1,45], "Get Data to Excel","?",{"process":z_AssigntoSAPTable,"size":[1,15],"using":{"z_message_info":z_message_info}});
- Add a table "All Items" as its title and three columns named Item, Material, and Quantity on the SAP Easy Access screen, to enter the captured SAP table data of the Change Sales Order Overview.
// Create a table with All items as its title with three columns and 10 rows
table([5,5],[15,45],{"name":"va01_AllItems","title":"All items", "rows":10, "rowselection":true,"columnselection":true});
column('Item',{"table":"va01_AllItems","size":4,"name":"z_va01_item","position":1});
column('Material',{"table":"va01_AllItems","size":15,"name":"z_va01_material","position":2});
column('Order Quantity',{"table":"va01_AllItems","size":15,"name":"z_va01_Orderquantity","position":3});
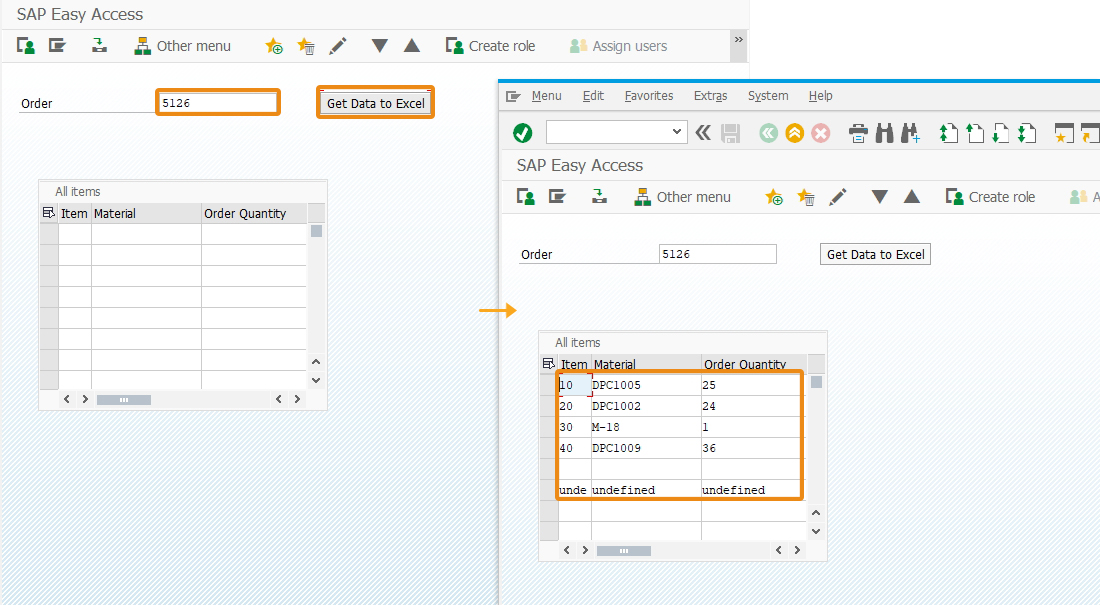
- Add a function to retrieve the required column values of an SAP table into the Liquid UI table. In the below function, we have created a new ActiveXObject named 'fso', which allows us to call the file system through the wsoffice.dll. Methods of this new object are then utilized to get the text file and rename it when the function below is called using a pushbutton.
//Create a function to retrieve required column values of an SAP table into Liquid UI Table
function z_AssigntoSAPTable(param){

	println(param.z_message_info);
	temp_items=[];
	temp_material=[];
	temp_quantity=[];
	enter('/nva02');

	onscreen 'SAPMV45A.0102'
		set('F[Order]', "&V[z_message_info]");
		enter();


	onscreen 'SAPMSDYP.0010'
		enter();

	onscreen 'SAPMSDYP.0010'
		enter();


	onscreen 'SAPMV45A.4001'
		absrow = 1;
		relrow = 1;
		gettableattribute("T[All items]", {"firstvisiblerow":"FVisRow", "lastvisiblerow":"LVisRow", "lastrow":"LastRow"});
		if(FVisRow==1) {
			goto new_row;
		}
		enter("/ScrollToLine=&V[absrow]", {"table":"T[All items]"});
		new_screen:;

	onscreen 'SAPMV45A.4001'
		gettableattribute("T[All items]", {"firstvisiblerow":"FVisRow", "lastvisiblerow":"LVisRow", "lastrow":"LastRow"});   relrow = 1;
		new_row:;
        if(absrow>LVisRow){
			enter("/ScrollToLine=&V[absrow]", {"table":"T[All items]"});
			goto new_screen;
		}
		if(absrow>LastRow){
			goto end_of_table;
		}

		set("V[z_va01_item]","&cell[All items,Item,&V[relrow]]");
		set("V[z_va01_mat]","&cell[All items,Material,&V[relrow]]");
		set("V[z_va01_OQ]","&cell[All items,Order Quantity,&V[relrow]]");
		println('The item Data is '+z_va01_item+':');
		println('The Material Data is '+z_va01_mat+':');
		println('The Order Quantity Data is '+z_va01_OQ+':');
		temp_items.push(z_va01_item);
		temp_material.push(z_va01_mat);
		temp_quantity.push(z_va01_OQ);


		absrow++;
		relrow++;
		goto new_row;
		end_of_table:;
		enter("/ScrollToLine=1", {"table":"T[All items]"});
		enter("/n");


	onscreen 'SAPLSMTR_NAVIGATION.0100'
		gettableattribute("T[va01_AllItems]", {"firstvisiblerow":"FisRow", "lastvisiblerow":"LisRow", "lastrow":"LatRow"});
		var z=1;

		for(var i=0;i<=temp_items.length;i++)
		{
			va01_AllItems.z_va01_item[i] = temp_items[i];
			va01_AllItems.z_va01_material[i] = temp_material[i];
			va01_AllItems.z_va01_Orderquantity[i] = temp_quantity[i];
			z=z+1;

		}


		copy_To_Excel(temp_items,temp_material,temp_quantity)
		enter("?");

}
- Add a function to copy the SAP table data into an excel file. In the below function, we have created new ActiveXObjects named 'ExcelApp' and 'ExcelSheet', which allow us to make calls to the file system through the wsoffice.dll. A method of the new object is then utilized to get the excel file and save the table data in it when the function below is called using a pushbutton. Save the changes made to your script file.
//Create a function to copy the SAP table data into an excel file
 function copy_To_Excel(temp_items,temp_material,temp_quantity)
{
	var ExcelApp = new ActiveXObject("Excel.Application");
	var ExcelSheet = new ActiveXObject("Excel.Sheet");
	ExcelSheet.ActiveSheet.Cells(1,1).Value = "Items";
	ExcelSheet.ActiveSheet.Cells(1,2).Value = "Materials";
	ExcelSheet.ActiveSheet.Cells(1,3).Value = "Quantity";
	var k=0;
	for(p=2;p<temp_items.length;p++) {
		ExcelSheet.ActiveSheet.Cells(p,1).Value = temp_items[k];
		ExcelSheet.ActiveSheet.Cells(p,2).Value = temp_material[k];
		ExcelSheet.ActiveSheet.Cells(p,3).Value = temp_quantity[k];
		k=k+1;
	}
	var str = "C:\\LiquidUI\\scripts\\SAPAllitems_Info.XLS";
	var fso = new ActiveXObject("Scripting.FileSystemObject");
		if(fso.FileExists(str)){
              // Displays messae in the status bar
		message("E:FILE ALREADY EXISTS PLEASE REMOVE OLD FILE");
	}
	else{
		ExcelSheet.SaveAs(str);
		//ExcelApp.Workbooks.Open(str);
        ExcelSheet.Application.Quit();

	}
}
Note: You need to place the wsoffice.dll file in your scripts folder
SAP Process
- Refresh the SAP screen and then enter a Sales Order number in the Order input field. Click on the Get Data to Excel pushbutton to initiate the function, and then, you will see the SAP table data of the Sales Order is copied into the Liquid UI table "All items" created on the same screen.
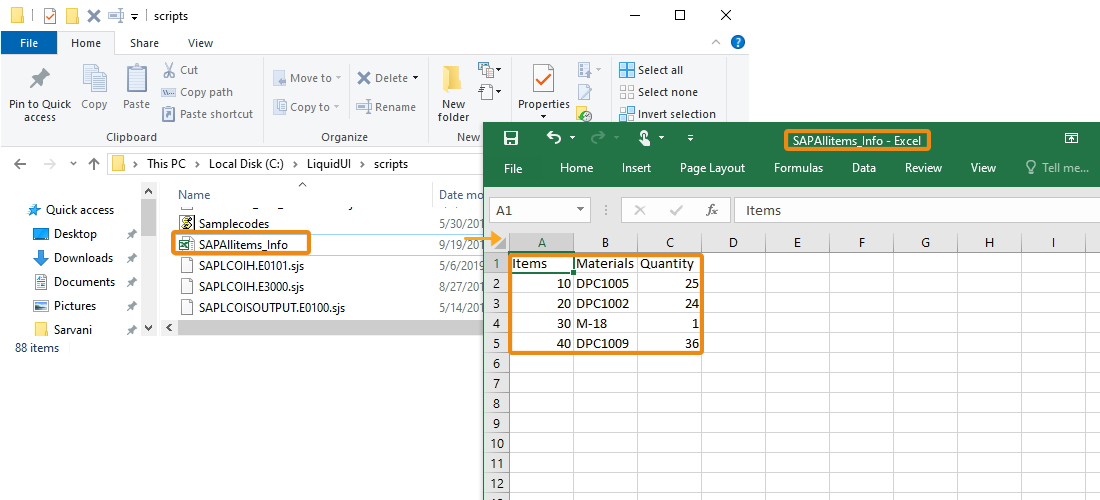
- Now, verify your scripts folder for the excel file created with the SAP table data that is created in your scripts folder, as shown below.