Prerequisites
- Products: Liquid UI WS, Liquid UI Server or Local DLL, Client Software
- Commands: pushbutton(), box(), set(), del(), onscreen, enter(), return(), text(), onUIEvents()
Purpose
The article demonstrates how to create invisible Liquid UI fields and display the description of given input values on the SAP screen, based on the SAP Easy Access screen. Here, we’ll perform the following actions:
- Delete the image container on the SAP Easy Access screen.
- Add a box with a title to add hidden input fields and their descriptions.
- Add input fields to enter the values.
- Add text commands to display the description of input fields.
- Add a function to read the text values of input fields.
- Add a command to call the function.
User Interface
//Create the file SAPLSMTR_NAVIGATION.E0100.sjs inside your scripts folder for customizing the SAP Easy Access screen.
//Now, add the Liquid UI script to the above file and save it.
Customization
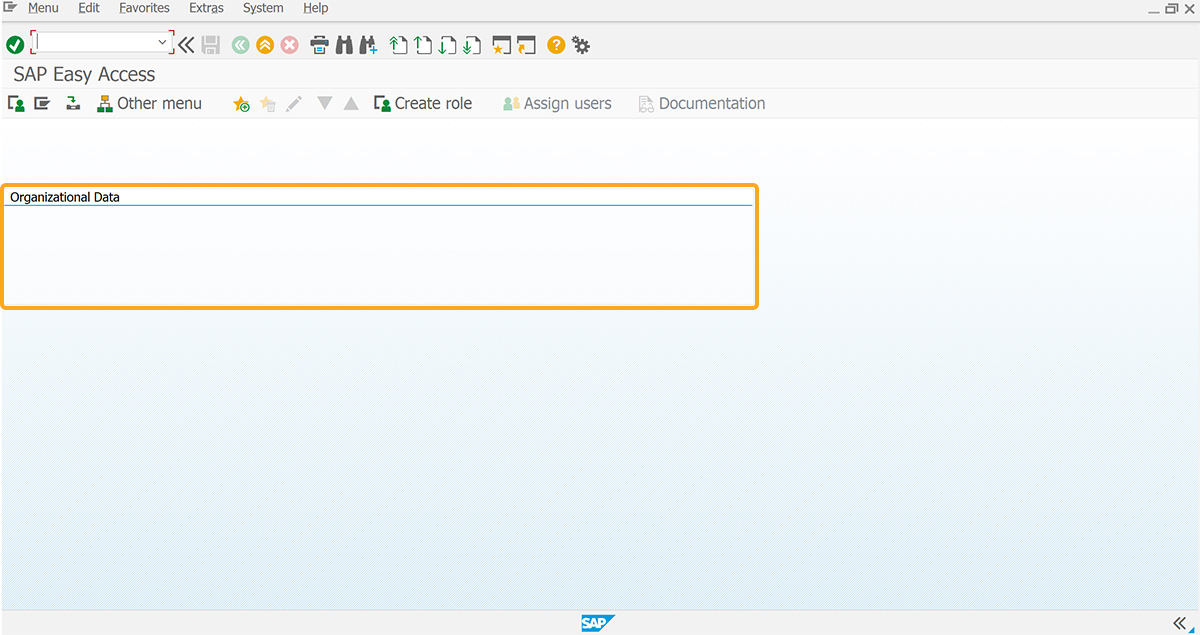
- Delete the image container on the SAP Easy Access screen using del().
//Deletes the image container on the SAP screen
del('X[IMAGE_CONTAINER]');
- Add a box labeled Organizational Data to add hidden input fields and display their descriptions, as shown below.
// Creates a box with the label Organizational Data to create the input fields.
box([3,0],[8,98], "Organizational Data");
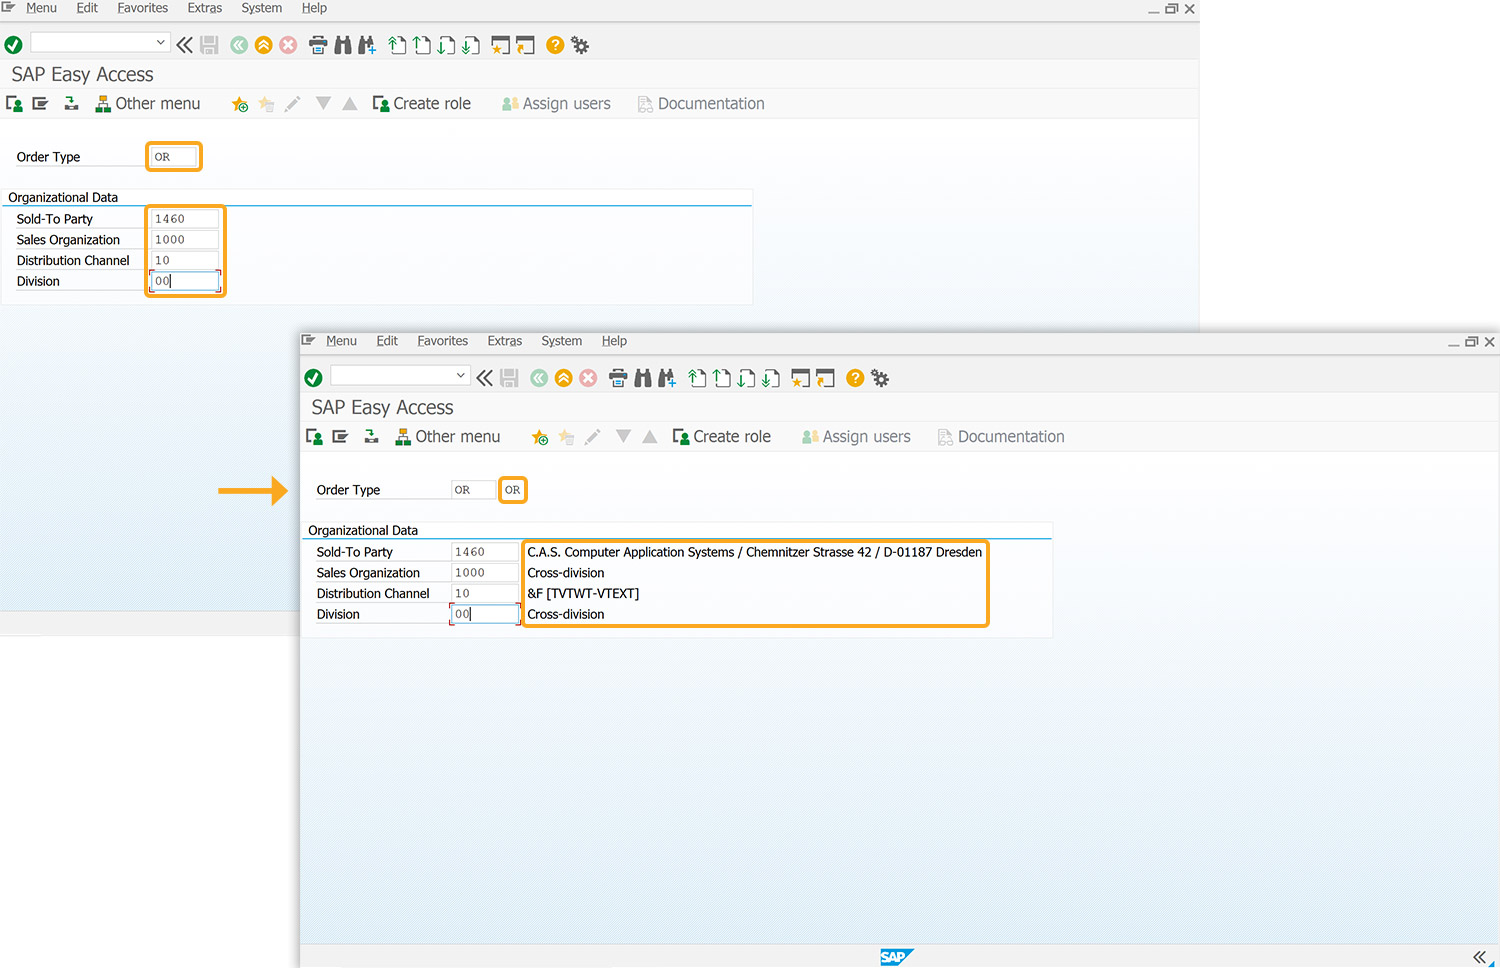
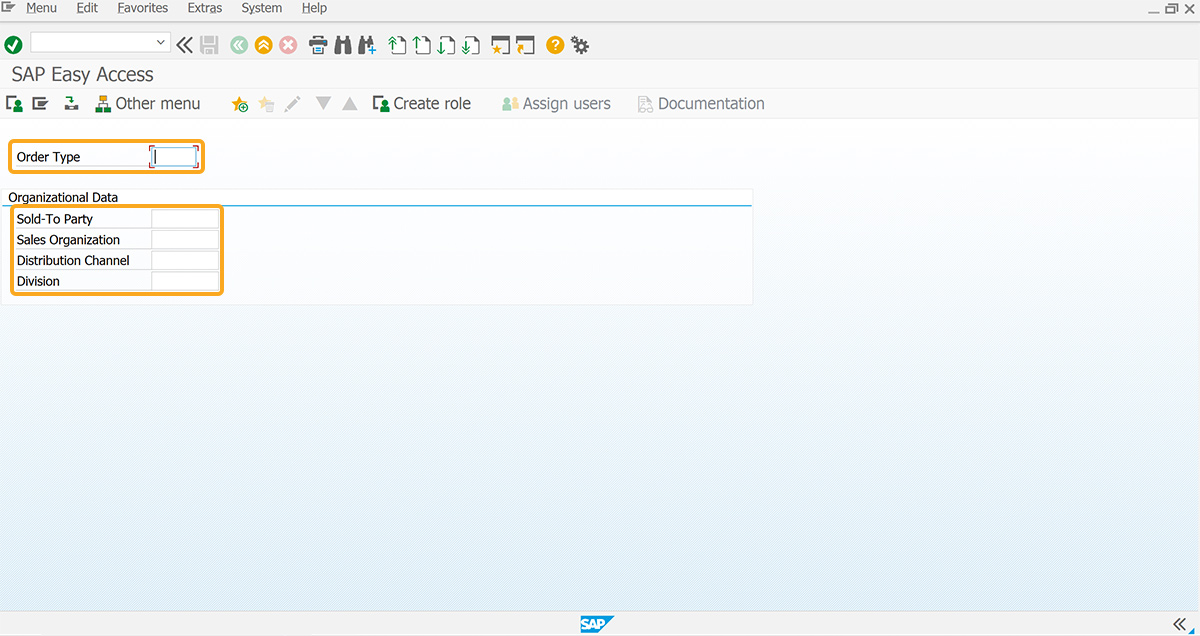
- Add five input fields labeled Order Type, Sold-To Party, Sales Organization, Distribution Channel, and Division to enter the order-related values, as shown below.
//Creates input fields to enter the values
inputfield([1,2],"Order Type",[1,20],{"name": "z_ordertype","size":5});
inputfield([4,2],"Sold-To Party",[4,20],{"name": "z_soldtoparty","size":8});
inputfield([5,2],"Sales Organization",[5,20],{"name": "z_salesorganization","size":8});
inputfield([6,2],"Distribution Channel",[6,20],{"name": "z_distrchnl","size":8});
inputfield([7,2],"Division",[7,20],{"name": "z_div","size":8});
- Add five text commands for each input field to display their related description.
//Creates text commands to display the description
text([1,27],"&V[z_ordertype]",{"size":20});
text([4,30],"&V[z_soldtopartyvalue]",{"size":22});
text([5,30],"&V[z_salesorg]",{"size":20});
text([6,30],"&V[z_distributionchannel]",{"size":22});
text([7,30],"&V[z_division]",{"size":20});
- Add the getvalue function to read the Text/Name value of the fields.
//Function to read the Text/Name Value of the Fields
function getvalue(){
 onscreen 'SAPLSMTR_NAVIGATION.0100'
 enter("/nva01");
 onscreen 'SAPMV45A.0101'
 set("F[Order Type]","&V[z_ordertype]");
 set("F[Sales Organization]","&V[z_salesorganization]");
 set("F[Distribution Channel]","&V[z_distrchnl]");
 set("F[Division]","&V[z_div]");
 enter();
 onerror
 enter("/n");message(_message);
 goto End;
 onscreen 'SAPMV45A.4001'
 set("F[Sold-To Party]","&V[z_soldtoparty]");
 enter();
 onscreen 'SAPMV45A.4001'
 enter("/2");
 set("F[Sold-To Party]);","&V[z_soldtoparty]");
 enter();
 onscreen 'SAPMV45A.4001'
 enter("/2");
 set("V[z_soldtopartyvalue]);","&F[KUAGV-TXTPA]");
 enter("/3");
 onscreen 'SAPMV45A.4001'
 enter("/3");
 onscreen 'SAPLSPO1.0100'
 enter("=NO"); onscreen 'SAPMV45A.0101'
 set("V[z_salesorg]);","&F[TSPAT-VTEXT]");
 set("V[z_distributionchannel]);","&F [TVTWT-VTEXT]");
 set("V[z_division]);","&F[TSPAT-VTEXT]");
 enter("/3");
 End:;
 }
- Now, call the getvalue function using the OnUIEvents command.
//Calling the Function through on User Event (onUIEvents):
onUIEvents["Enter"]={"process":getvalue};

Note: Here, the function getvalue is recorded using Liquid UI Designer.
SAP Process
- Refresh the SAP screen, enter the values, and hit Enter. Then, the descriptions of the input fields are displayed on the SAP screen, as shown in the image below.