Prerequisites
- Products: Liquid UI WS, Liquid UI Server or Local DLL, Client Software
- Commands: del(), onmessage, pos(), box(), radiobutton(), onUIEvents(), onscreen(), enter(), set()
Purpose
In this article, you will learn how to handle errors on a customized SAP screen, particularly customizations where elements from multiple screens are combined.
Typically, a customized screen is made by adding required fields from different SAP screens to simplify SAP processes. But when you enter invalid values in the input fields of a customized screen, you will be redirected to another screen. This screen will display the particular input field and an error message.
To prevent this redirect, we will use the onmessage command to handle any errors on the customized screen itself. To demonstrate this, we'll use the Create Material screen as an example and will walk you through the following steps:
- Delete the unnecessary screen elements on the MM01 (Create Material - Initial Screen).
- Change the position of the screen elements
- Add required screen elements on the SAP screen
- Add a function to perform required actions and navigate to the Basic Data1 screen
- Add Create Material - Basic Data1 screen script file, which includes the customized script to create a material.
- Navigate to the required customized transaction screen to run the defined SAP process (In this case, the Create Material screen).
User Interface
//Create this file inside your script folder for customizing the Create Material screen SAPLMGMM.E0060.sjs
//Now, let's add the Liquid UI script to this file and save it.
Customization
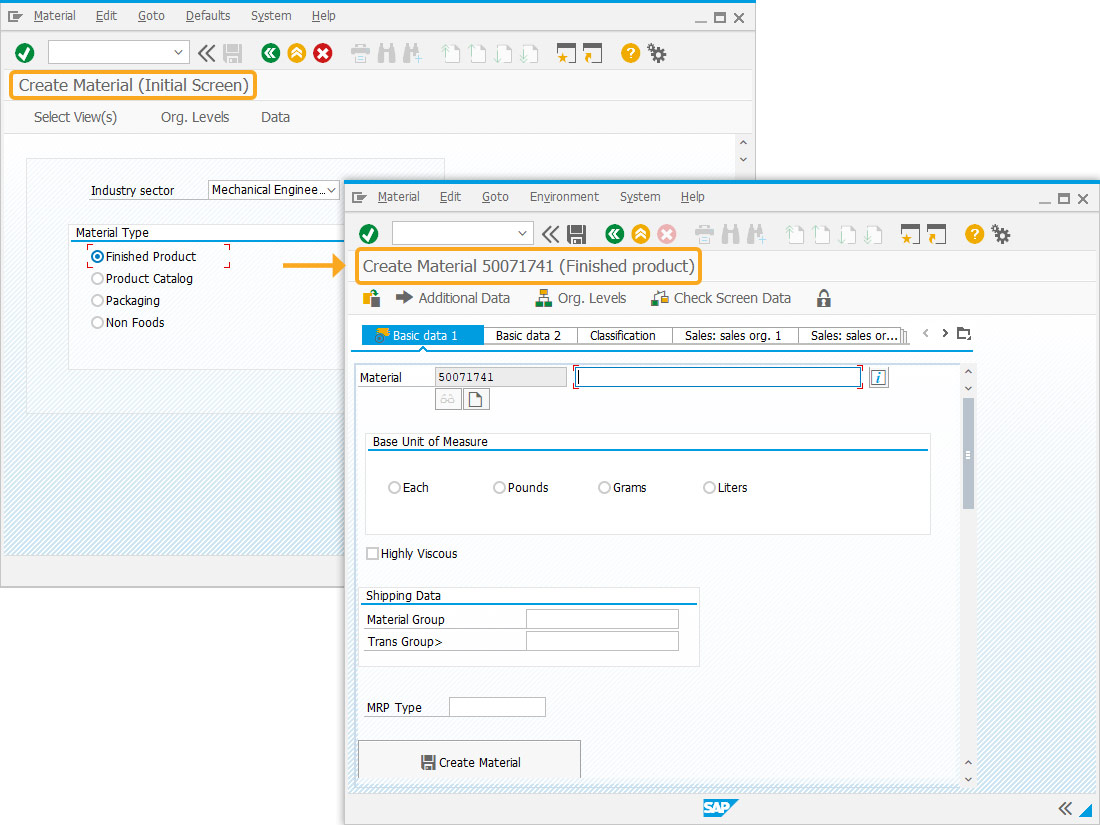
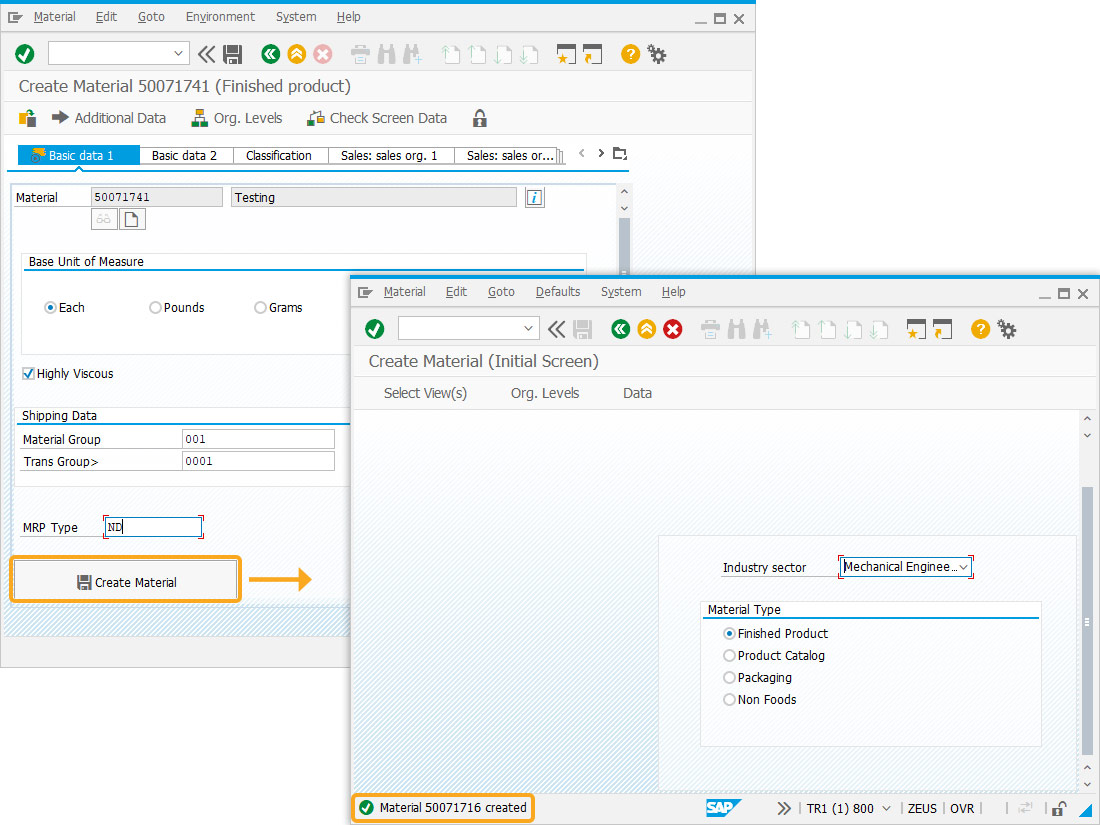
Customize Create Material - Initial screen
- Delete elements that are not required for this particular scenario on the Create Material (Initial Screen).
//Deletes all the unnecessary elements on the Create Material screen
//Deletes Copy from inputfield
del("G[Copy from...]");
//Deletes Material inputfield
del("F[Material]");
//Deletes Material Type inputfield
del("F[Material Type]");
//Deletes Change Number inputfield
del("F[Change Number]");

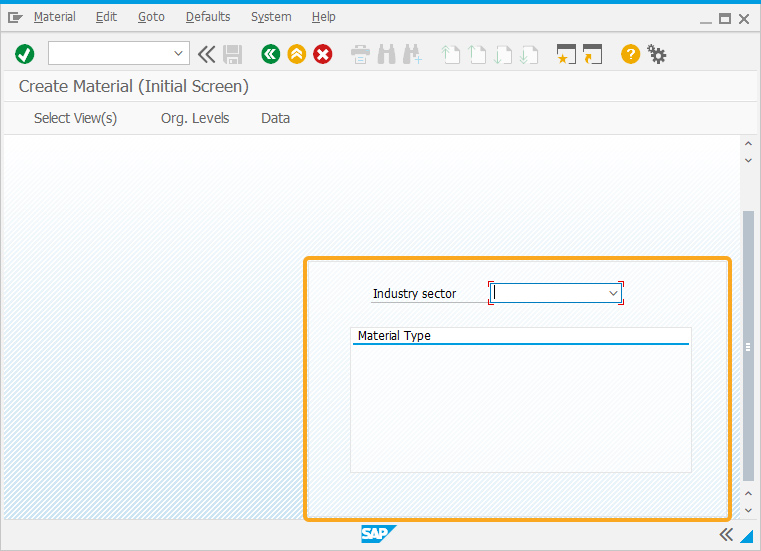
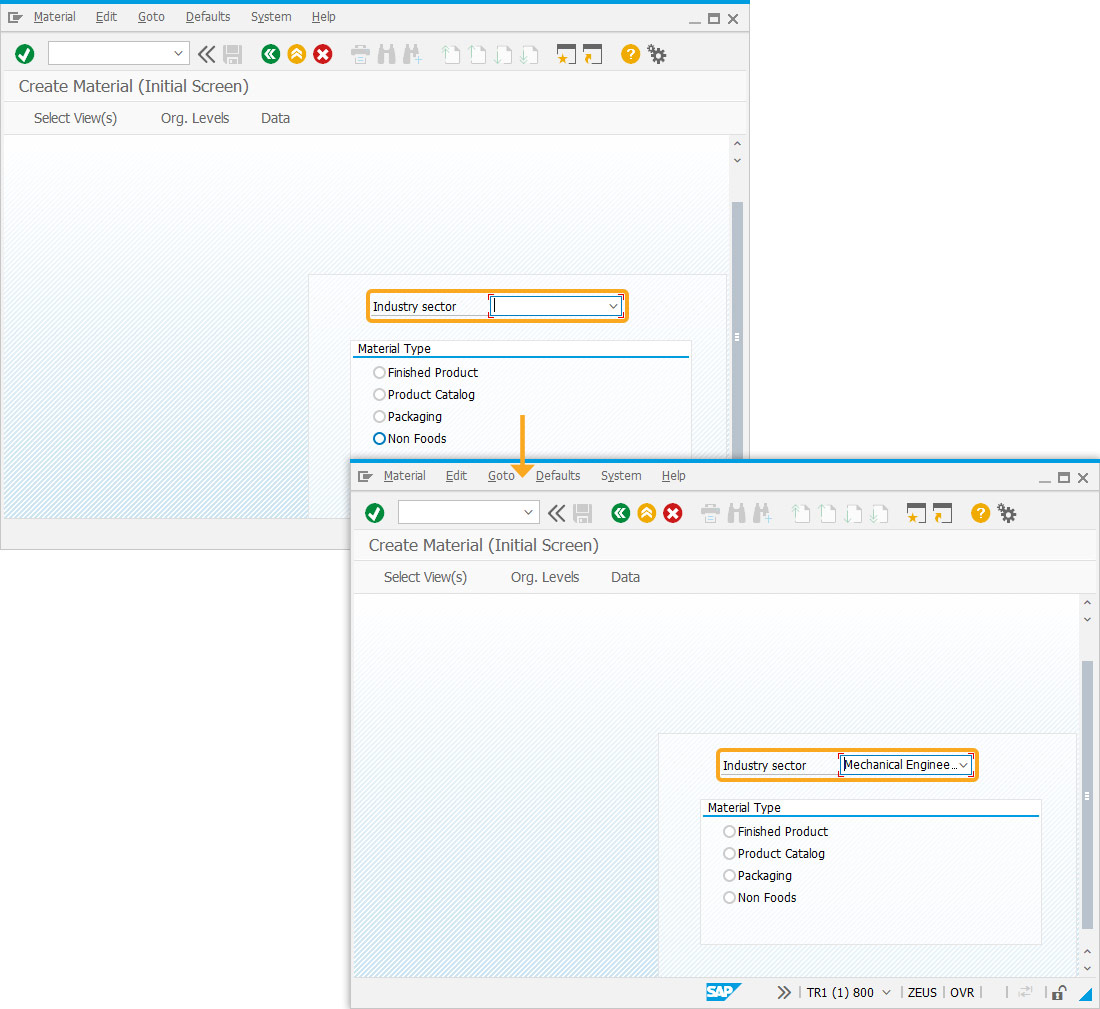
- Change the position of the Industry sector dropdown list, as shown below:
//Moves the Industry sector input field on the screen
pos("F[Industry sector]", [9,52]);
- Add group boxes with labels Material Type, " " to arrange screen elements, as shown below:
//Creates group box without title
box([8,43], [19,101], "");
//Creates group box with Material Type title
box([11,49], [17,96], "Material Type");
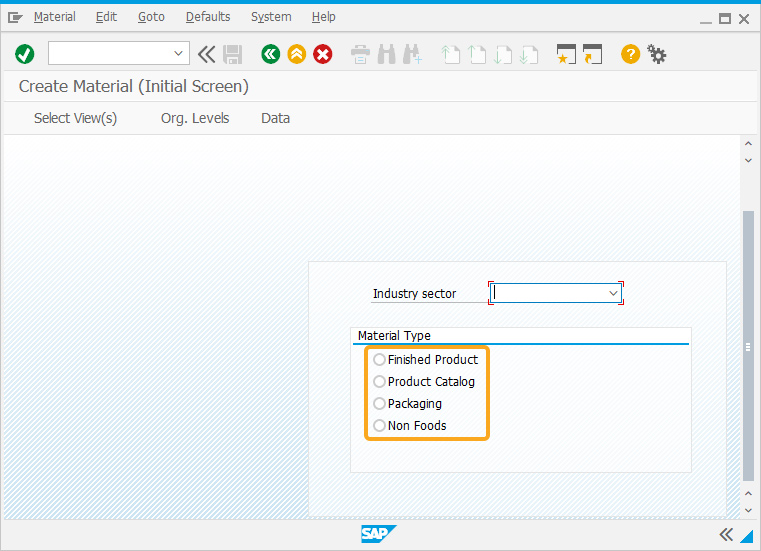
- Add four radio buttons with labels Product Catalog, NonFoods, Finished Product, and Packaging, which assign value to the Material Type on selection.
//Creates radio button with Product Catalog as its text and WERB as its value
radiobutton([13,52], "Product Catalog",{"[Material Type]":"WERB"});
//Creates radio button with Non Foods as its text and NOF1 as its value
radiobutton([15,52], "Non Foods",{"[Material Type]":"NOF1"});
//Creates radio button with Finished Product as its text and FERT as its value
radiobutton([12,52], "Finished Product",{"[Material Type]":"FERT"});
//Creates radio button with Packaging as its text and VERP as its value
radiobutton([14,52], "Packaging",{"[Material Type]":"VERP"});
- Set the value M to the Industry sector input field, where M refers to Mechanical Engineering.
// By default, the Industry sector is set to Mechanical Engineering
set("F[Industry sector]", "M”);
- Press enter to execute the process SelectViews.
//Executes SelectViews on performing enter
onUIEvents["Enter"]={"process":SelectViews}
- Add a function to select views and assign values on the required fields on the popup windows that appear while creating a material.
//Function to check the select views
function SelectViews(){
// Create Material (Initial Screen)
onscreen 'SAPLMGMM.0060'
enter("/5");
// Create Material (Initial Screen)
onscreen 'SAPLMGMM.0070'
set("cell[Table,0,1]","X");
set("cell[Table,0,2]","X");
set("cell[Table,0,4]","X");
set("cell[Table,0,6]","X");
set("cell[Table,0,8]","X");
set("cell[Table,0,12]","X");
set("cell[Table,13]","X");
set("cell[Table0,14]","X");
enter("/6");
// Create Material (Initial Screen)
onscreen 'SAPLMGMM.0080'
set('F[Plant]', '1000');
set('F[Stor. Location]', '0001');
set('F[Sales Org.]', '1000');
set('F[Distr. Channel]', '10');
enter();
}
Customize Create Material - Basic Data1 screen
User Interface
//Create this file inside your script folder for customizing the Create Material - Basic Data 1 screen SAPLMMGMM.E4004.sjs
//Now, let's add the Liquid UI script to this file and save it.
Customization
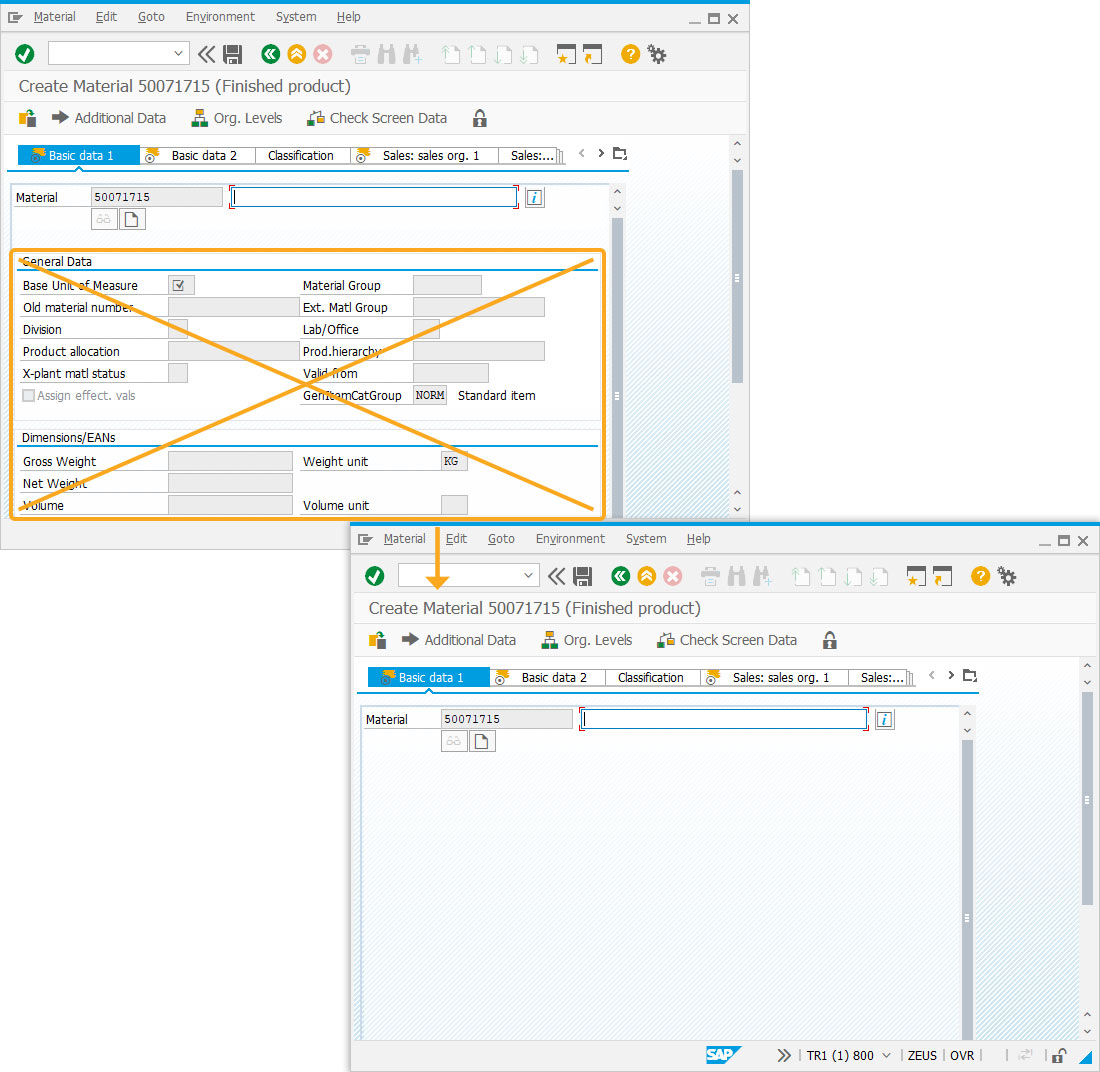
- Delete elements that are not required for this particular scenario on the Create Material - Basic Data1 screen.
//Deletes General Data, Basic Data Texts,Packaging material data and Dimensions/EANs group boxes along with the field
del("G[General Data]");
del("G[Basic Data Texts]");
del("G[Packaging material data]");
del("G[Dimensions/EANs]");
- Add the script to check for the Basic Data 1 screen and run the scripts to add the screen elements.
// Checks for the required screen and adds the screen elements accordingly
if(_page.exists("Basic data 1")){
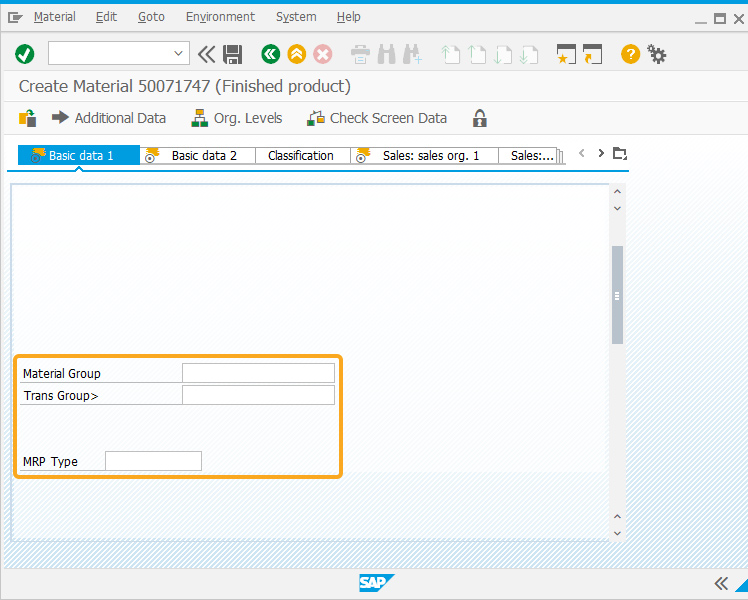
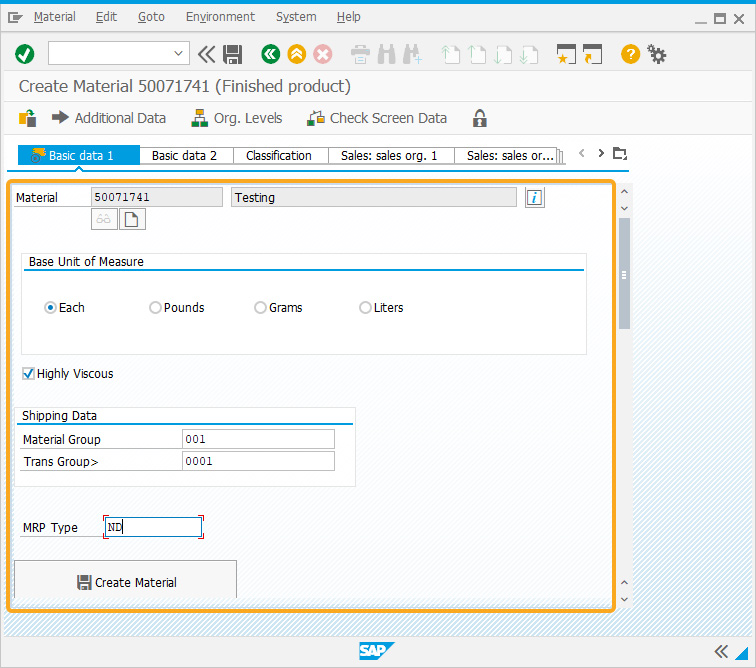
- Add three input fields with labels Trans Group, Material, and MRP Type.
//Adds three input fields with labels Trans Group, Material and MRP Type to select an item
inputfield([14,2],"Trans Group>",[14,25],{"name":"z_transgroup","size":21});
inputfield([13,2],"Material Group",[13,25],{"name":"z_matgroup","size":21});
inputfield([17,2],"MRP Type",[17,14],{"name":"z_mrptype", "size":13});
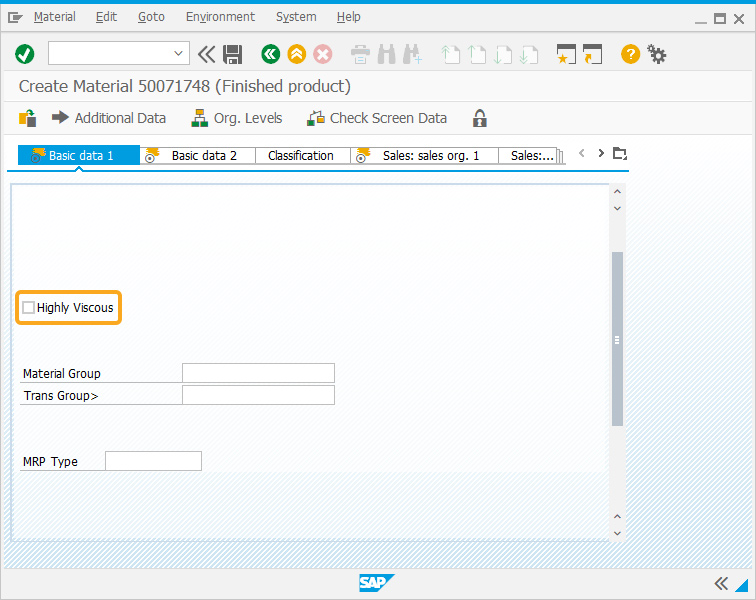
- Add a checkbox with the label Highly Viscous that allows you to select the option.
//Adds a checkbox that allows you to select the option
checkbox([10,2], "Highly Viscous",{"name":"z_highvis"});
- Add four radio buttons with labels Grams, Each, Liters, and Pounds.
//In the radio button's options, we specify what input field this pertains to
radiobutton([7,35],"Grams",{"[Base Unit of Measure]":"G"});
box([5,2],[9,81],"Base Unit of Measure");
radiobutton([7,5],"Each",{"[Base Unit of Measure]":"EA"});
radiobutton([7,50],"Liters",{"[Base Unit of Measure]":"L"});
radiobutton([7,20],"Pounds",{"[Base Unit of Measure]":"PSI"});
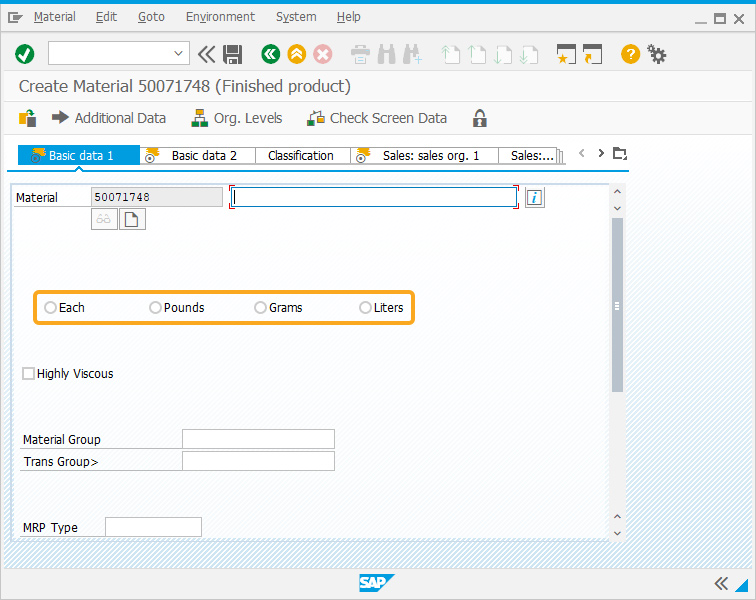
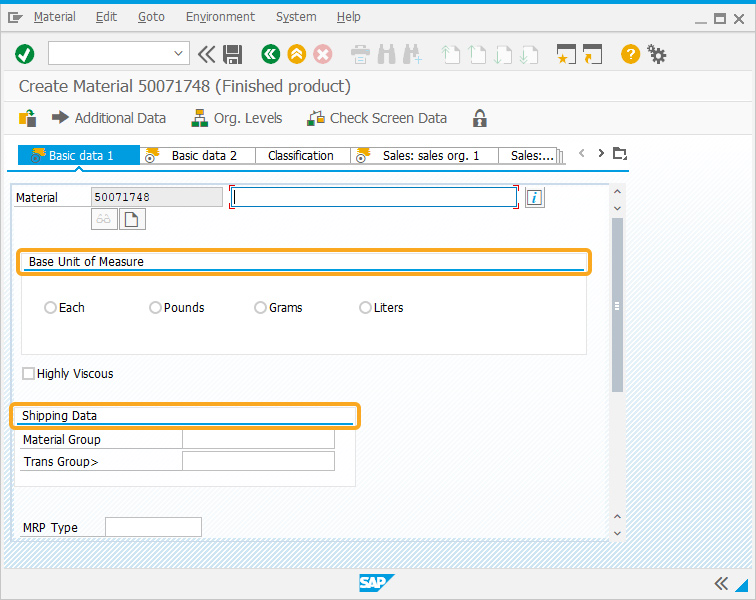
- Add two group boxes with labels Shipping Data, and Basic Unit of Measure.
// Creates a group box with Shipping Data, and Basic Unit of Measure as labels
box([12,1],[15,48],"Shipping Data");
box([5,2],[9,81],"Base Unit of Measure");
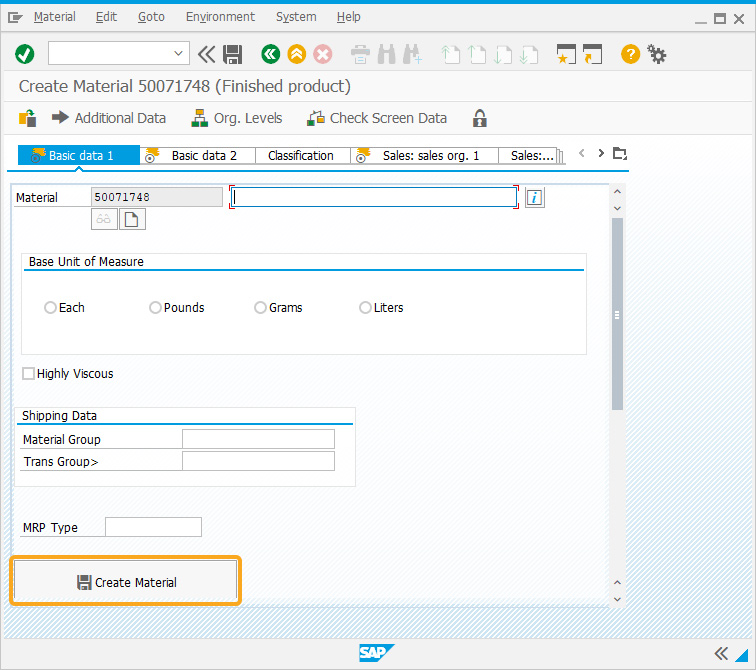
- Create a pushbutton with the label Create Material which on click performs an event.
// Creates a pushbutton which on click performs an event
pushbutton([19,1],"@2L@Create Material",{"process":mm01_create,"size":[2,31]});
}
- Now, add the following Liquid UI script to this file, and save it.
// Add functionality that performs required actions, creates a material and generates an error message when entered incorrect details
function mm01_create(){
// Create Material (Finished product)
onscreen 'SAPLMGMM.4004'
set('F[Material Group]','&V[z_matgroup]');
enter("=SP02");
// Create Material  (Finished product)
onscreen 'SAPLMGMM.4004'
set('C[In bulk/liquid]', 'X');
set('C[Highly viscous]', '&V[z_highvis]');
enter("=SP04");
// Create Material (Finished product)
onscreen 'SAPLMGMM.4000'
set('F[Division]','00');
set('cell[TABLE,Tax classification,1]', '1');
set('cell[TABLE,Tax classification,2]', '1');
enter("=SP06");
// Create Material (Finished product)
onscreen 'SAPLMGMM.4000'
set('F[Trans. Grp]','0001');
set('F[LoadingGrp]', '0002');
enter("=SP12");
// Create Material (Finished product)
onscreen 'SAPLMGMM.4000'
set('F[Lot size]','PK');
set('F[MRP Type]','&V[z_mrptype]');
set('F[MRP Controller]','001');
enter("=SP13");
// On displaying any error message on the SAP screen then it will display the message on the customized screen itself
onmessage
if(_message.substring(0,2)=="E:"){
println("Inside the onmessage")
set("V[z_error]",_message);
onscreen 'SAPLMGMM.4000'
enter("?");
onscreen 'SAPLMGMM.4000'
set('F[MRP Type]', 'ND');
enter("/3");
onscreen 'SAPLMGMM.4000'
set('F[Planning calendar]', '001');
enter("=SP01");
message(z_error);
	goto SCRIPTEND;
}
// Create Material (Finished product)
onscreen 'SAPLMGMM.4000'
set('F[In-house production]', '1');
set('F[Planning calendar]', '001');
set('F[SchedMargin key]', '000');
enter("/11");
SCRIPTEND:;
}
SAP Process
- Refresh the SAP screen and select the Material type as per your requirement. Then click enter to navigate to the customized Basic Data 1 screen, as shown below:
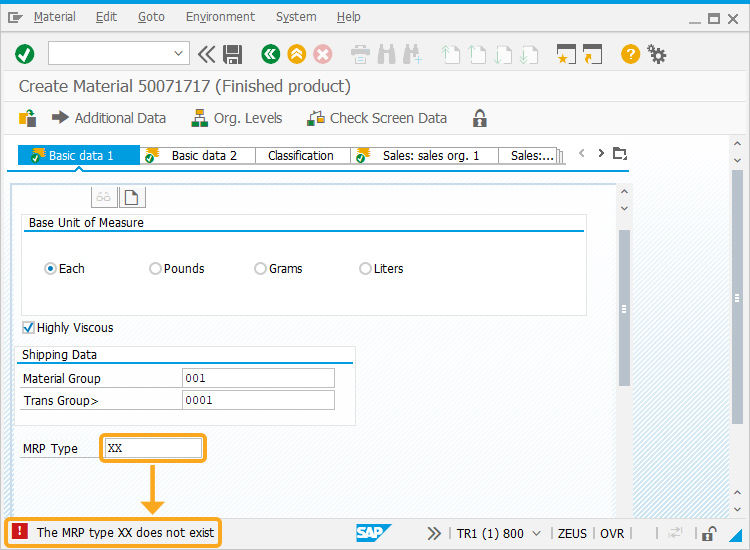
- To create a material, enter values in the fields, as shown below:
- Once valid details are entered in their respective fields, click the Create Material pushbutton. A message stating that the material was created successfully will appear.
- Here we have entered an invalid MRP Type value, and the error message appeared on the same customized screen, instead of redirecting to the MRP Type field relevant screen.