Show Posts

This section allows you to view all posts made by this member. Note that you can only see posts made in areas you currently have access to.


Topics - Benjamin Dasari

Pages: 1 [2] 3 4 ... 7
16
WS aka Web Scripts (Attended RPA for SAP) / Validate file/folder exists
« on: December 18, 2017, 11:08:58 AM »
Purpose:
Checks if a file or folder exists in the specified location.

Syntax:
system.queryExists("file/folder path");

Liquid UI Code:
----------------------------------------------------------------------------------------------------------------------------------------------
Script File Name: SAPLSMTR_NAVIGATION.E0100.sjs       // Easy Access
----------------------------------------------------------------------------------------------------------------------------------------------
function isBlank(jvar){
   return(jvar == null || jvar == "" || jvar == void(0));
}

function fileRead(){
   // Check if the file/folder exists or not and returns boolean
   if(!system.queryExists("C:\\LiquidUI\\Scripts\\file.txt")){
      message("E: Cannot find the file to be read");
      enter("?");
      goto SCRIPT_END;
   }

   openfile('file.txt', {"delimiter":","});
   READ:{
      readfile('file.txt', {"z_first_&V[idx]":true, "z_second_&V[idx]":true, "z_third_&V[idx]":true});
   }

   set("V[z_currField]" , "&V[z_first_&V[idx]]");
   if(isBlank(z_currField)) {
      goto FILE_END;
   }

   idx++;
   goto READ;
   FILE_END:;
   closefile('file.txt');
   SCRIPT_END:;
}

// User Interface
clearscreen();
pidx = 0;
idx=0;

text([0,0],  "Material" , {"size":20});
text([0,22],  "Item" , {"size":20});
text([0,44],  "Description" , {"size":20});

CREATE:{     
   inputfield([pidx + 1,0], {"size":20, "readonly":true, "name":"z_first_&V[pidx]" ,"nolabel":true});
   inputfield([pidx + 1,22], {"size":20, "readonly":true, "name":"z_second_&V[pidx]" ,"nolabel":true});
   inputfield([pidx + 1,44], {"size":20, "readonly":true, "name":"z_third_&V[pidx]" ,"nolabel":true});
}
pidx++;

set("V[z_checkfld]", "&V[z_first_&V[pidx]]");
if(isBlank(z_checkfld)){
   goto END;
}

goto CREATE;
END:;
pushbutton([1,67],"@0V@Enter","?",{"process":fileRead});


See attachments for code samples!

17
WS aka Web Scripts (Attended RPA for SAP) / System variable - _directoryN
« on: December 14, 2017, 11:44:32 AM »
Purpose:
_directoryN is a system variable used to check the location of the scripts in the specified directory.
"N" should be replaced with the directory number, i.e., either 0 to 4.
This can serve as a quick lookup to find out the scripts location as compared to finding it out by navigating to the guixt.sjs file in SAPgui folder.

EXAMPLE:
_directory1 returns the location specified under directory1 in guixt.sjs (config) file.

NOTE:
You can type the below command in the SAPgui command field(tcode field) and it will return the path on the status bar.
/wsmessage(_directory1)

18
Purpose:
Trust can be established between LUI Server and SAP ERP Server by utilizing the appropriate certificates and private key.
This trust relationship enables LUI Server to log into SAP ERP, thereby enabling the use of a common user database, such as Microsoft Active Directory or an LDAP Server.
Additionally, it is required to support new features of Liquid UI such as fingerprint and retina scan login from the Mobile devices.

Prerequisites:
Liquid UI Server Version 3.5.561.0 and above
Synssl.dll Version 2.0.0.0 and above
Need administrative access to Transaction "STRUSTSSO2" in SAPgui to import certificate

NOTE:
The following components are necessary to establish proper working trust for SSO.
1. Configuration in sapproxy.ini
2. Certificate in .DER format to be imported into SAP ERP
3. Private key and Certificate in .p12 to be configured in sapproxy.ini
4. Configuration in SSTRUSTSSO2 transaction in SAP ERP to import the certificate and set up the ACL

Setup on sapproy.ini:
Set up in sapproxy of trust is activated with this key, strustsso2, like:
[proxy1]
ListenPort=3200
TargetServer=juneau
TargetServerPort=3200
GuiXT = 10
strustsso2=msad,388,LUX,r:\synactive\sapproxy\LuiKeyPair.p12,p12password
defaultdomain=syndom

NOTE:
The above "strustsso2" option is specified with-
1. Msad - to signify authentication through Microsoft Active Directory. (Future versions may support LDAP)
2. 000 - is the client number of this Liquid UI Server. It can be any 3 digit number, but this same number must be used to set up in the ACL in the ERP transaction.
3. LUX - a 3 character system ID of this Liquid UI Server.
4. The encrypted p12 file, containing the private key (this can be exported from a Portal that has an existing trust). This will be set up in the ACL of STRUSTSSO2 transaction.
5. The password for the p12 file.

Confirming that SSO is turned on and configured properly:
r:\SYNACTIVE\sapproxy\x64\Debug>sapproxy -debug
GuiXT Server x64 Version 3.5 (Build 561).
Debugging Synactive R/3 Proxy.
RPC Server listening ..
LFH NOT TURNED ON!
SSO function retrieved.

Creating certificates:
1. Place the "Synssl.dll", "openssl.exe" and "openssl.cnf" in the Liquid UI Server folder.
2. Run command prompt as administrator.
3. Certificate can be generated with the online openssl.exe tool, with the following commands-
(Replace path to the file location):
>>set OPENSSL_CONF=C:\Program Files\Synactive Inc\GuiXTServer\openssl.cnf
>>openssl dsaparam -noout -out luikey.pem -genkey 1024
>>openssl req -x509 -new -sha1 -days 7300 -key luikey.pem -out luicert.pem

You are about to be asked to enter information that will be incorporated into your certificate request.
What you are about to enter is what is called a Distinguished Name or a DN.
There are quite a few fields but you can leave some blank
For some fields there will be a default value,
If you enter '.', the field will be left blank.
-----
Country Name (2 letter code) [AU]:US
State or Province Name (full name) [Some-State]:CA
Locality Name (eg, city) []:
Organization Name (eg, company) [Internet Widgits Pty Ltd]:Liquid UI Server
Organizational Unit Name (eg, section) []:LUX
Common Name (e.g. server FQDN or YOUR name) []:
Email Address []:
>>C:\Users\te\sec\setup>openssl pkcs12 -export -inkey luikey.pem -in luicert.pem -out LuiKeyPair.p12
Enter Export Password:
Verifying - Enter Export Password:

Installation in SAP ERP:
1. Go to transaction STRUSTSSO2, and select Import Certificate.
2. You will see the details appear in "Certificate" section.
3. Now, click on "Add to Certificate List" and click on "Add to ACL"
4. When selecting "Add to ACL", you will be presented with a dialog, enter the client number and system ID of the Liquid UI Server.
5. Verify that your certificate is appearing in the ACL. Setup for SAP ERP is now complete.
6. Click on Save.

Once this is all set up, now connect your Liquid UI client to the Liquid UI Server, and enter "domain\username", and enter your domain password.
Once you are authenticated, make sure that your username matches the SAP username, and you will be logged in.


Check attached document with screenshots!

19
Purpose:
Load balancing is a technique used to spread work between two or more servers in order to get optimal results.
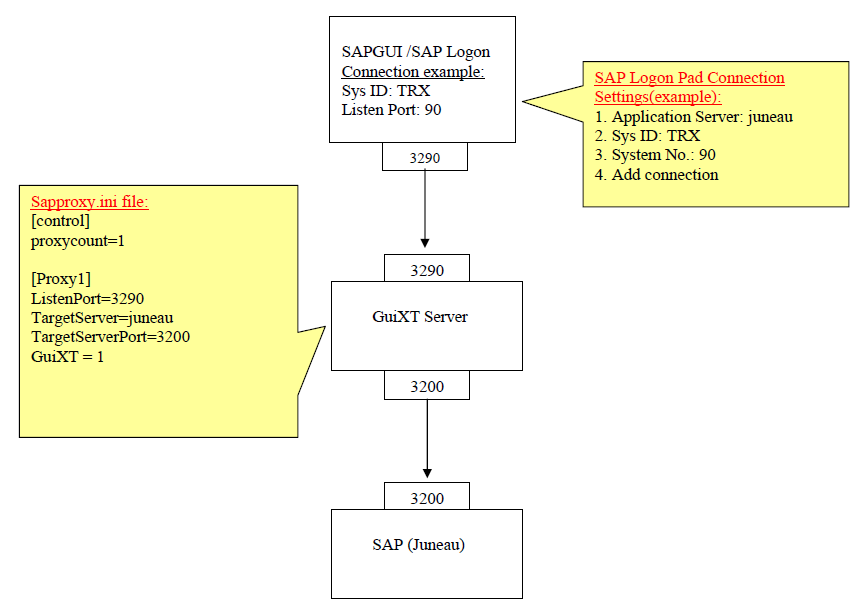
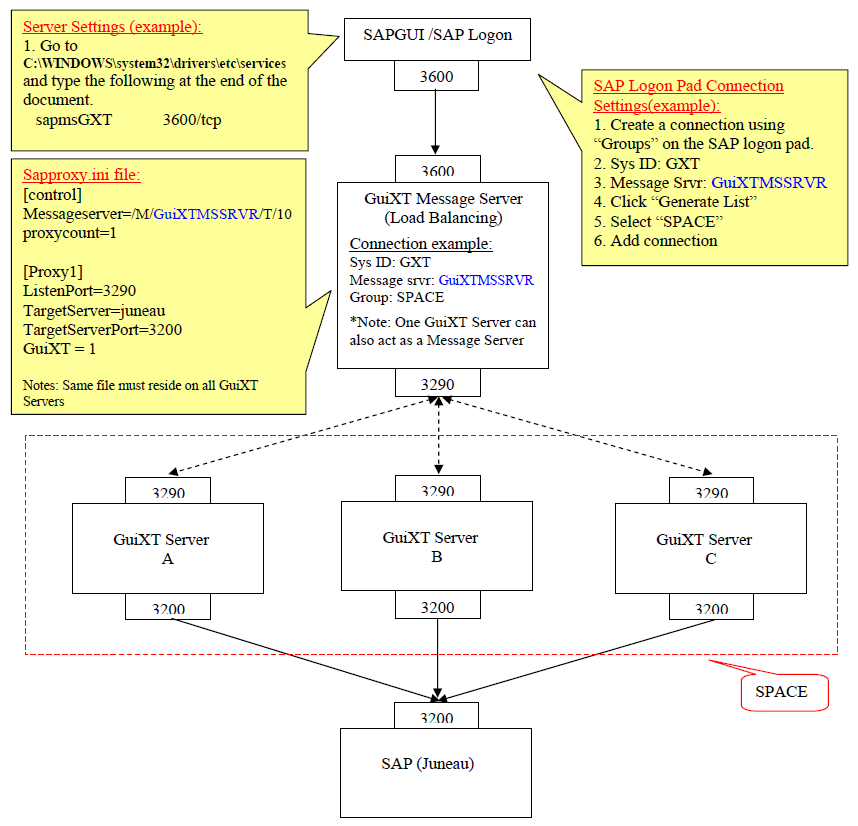
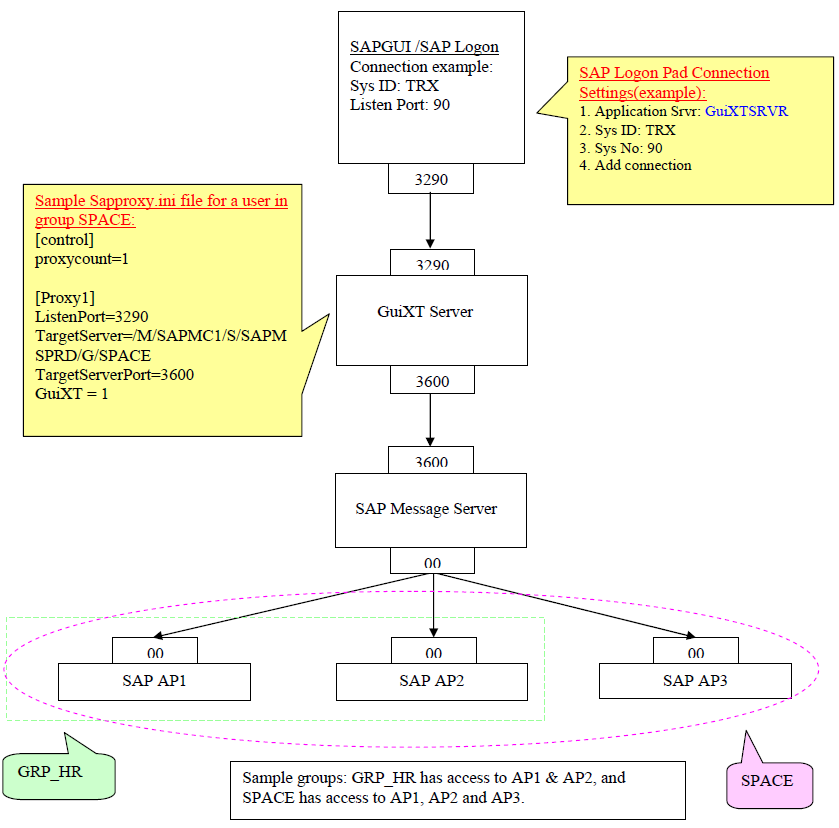
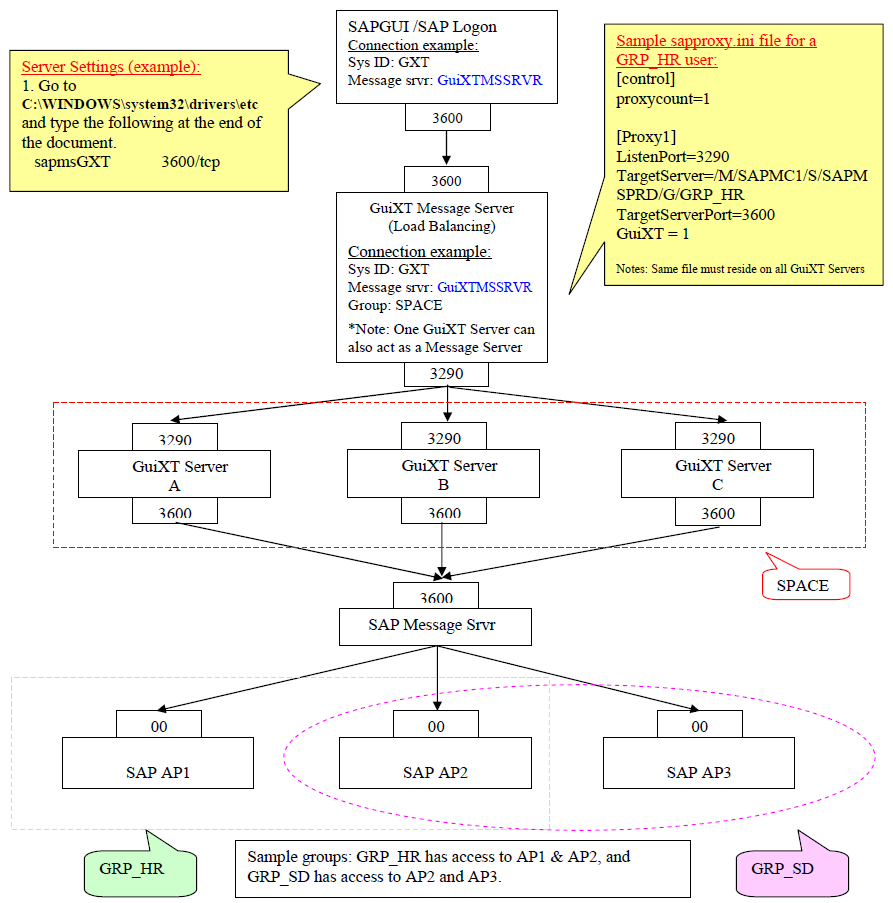
This document contains four connection scenarios (with and without load balancing) using Liquid UI Server.

Scenario 1 - Connection using a single Liquid UI Server, and no message servers
This creates a direct connection to the server, with all connections passing through the same server.


Scenario 2 - Connection schematic when using multiple Liquid UI Servers, and one message server
When a user tries to login, the message server will identify the Liquid UI server with the least amount of connections,
and allow a connection directly with the corresponding Liquid UI server.
In this example, "GuiXTMSSRVR" is the location of the message server.


Scenario 3 - Connection using one Liquid UI server, and a SAP message server
In this example, "GuiXTSRVR" is the location of the Liquid UI server.


Scenario 4 - Connection using a Liquid UI message server, Liquid UI server(s), and a SAP message server
In this example, "GuiXTMSSRVR" is the location of the Liquid UI server.


20
Purpose:
Creating Role with required RFC authorizations.
Creating and maintaining RFC user to be used for remote function calls.

Check attached document with screenshots!

Steps:
Navigate to Transaction "SU02"
- Click "To Profile Generator" pushbutton
Create Role
- Enter role name as "Z_GUIXTRFC"
- Click on "Role" or "Single Role" pushbutton
- Click on "Authorizations" tab
- This will give you a pop up screen to save the role
- Click "Yes" pushbutton
- Click "Change Authorization Data" pushbutton
- Click "Do not select templates" pushbutton
- Click "Manually" toolbar pushbutton
- Enter the below 3 Authorization Objects
   S_RFC
   S_USER_GRP
   S_USER_SYS
- Click "Open" toolbar pushbutton
- Click on the "write" or "change" icon next to the first "Activity" keyword on the screen
- Check the "Execute" on the pop up screen and then click on "Save" pushbutton
- Similarly, the parameters for "name of RFC to be protected" and "Type of RFC to protect" could be set
- Using Existing Remote Enabled SAP Function Modules, specify the function group for those function modules (Name of RFC to be protected)
- Alternatively, add the appropriate role to the RFC User
- Click "Generate" toolbar pushbutton
- Click "Save"
- Click "Back"
- Pop-up is displayed with Exit Authorization Maintenance
- Click "Generate" on the pop-up screen again

Navigate to Transaction "SU01"
- Enter the username and click on "Create Role" toolbar pushbutton
- Enter Last Name and First Name of the user
- Click on "Logon data" tab
- Enter the password
- Choose "communications" radio button in the "user type" group box
- Click on "Role" tab
- Add the role we just created "Z_GUIXTRFC"
- Click on "Profile" tab
- Check the profile by double-clicking on detail on the profile
- Verify the Authorizations
- Save the user


21
Purpose:
Liquid UI offers very flexible means of deploying the scripts.
Liquid UI supports 4 script directories.
These directories are specified in Liquid UI configuration "guixt.sjs" file or in User Catalog.
Following section discusses various locations Liquid UI scripts can reside.

1. Scripts on the Local drive
2. Scripts on Network file server or a file share
3. Scripts on FTP and/or Web server
4. Scripts on SAP web repository

1. Scripts on the Local drive:
Liquid UI script developers and small testing teams usually use this option.
Pros:
a) Easy setup and use.
b) Developers get complete control of scripts for modifications.
Cons:
a) Not meant for large group of users. High maintenance option.
b) User has control of scripts and users can modify or delete the scripts.
Example:
directory1="C:\\LiquidUI\\Scripts";

2. Scripts on Network file server or a file share:
Even this option can be used for developers, testing teams and end-users.
Pros:
a) Easy setup and use.
b) Centralized management of scripts.
c) Access to scripts can be easily administered with use of network policies, etc.
d) Network traffic can be reduced by using File Replication option in Liquid UI settings
Cons:
a) Additional dependency for using Liquid UI
b) Additional replication, etc must be setup if different servers are used across WAN
c) Additional users privileges must be setup for users to access these scripts
Example:
directory1="\\\\DemoServer\\LiquidUI\\Scripts";

3. Scripts on FTP and/or Web server:
Even this option can be used for developers, testing teams and end-users.
Pros:
a) Can be used across company's internal network.
b) Centralized management of scripts.
c) Network traffic can be reduced by using File Replication option in Liquid UI settings
Cons:
a) Additional dependency on web/ftp server.
b) Script download time can vary. The download time is dependent on server response time.
c) Web/Ftp server access must be setup for all the users.
Example:
directory1="http:\/\/www.demoserver.com\/LiquidUI\/Scripts";
[OR]
directory1="ftp:\/ftp.demoserver.com\/LiquidUI\/Scripts";

4. Scripts on SAP web repository:
This option can be used for developers, testing teams and end-users.
However, it is recommended that this deployment mechanism should not be used for developers.
Pros:
a) Centralized script administration with SAP's transport and correction mechanism.
b) Automatic caching for reducing script downloads.
c) No external dependencies.
d) Change access can be controlled using SAP's authorization mechanism.
Cons:
a) Additional RFC overhead as scripts are retrieved from SAP using Remote Function Calls (RFC).
b) Difficult setup for developers as it is not very easy to change uploaded scripts.
Example:
directory1="SAPWR:ZLUI.DEMO";


22
Mobile Products (Android, iOS and CE) / Change F4 Display Settings on iOS
« on: October 23, 2017, 01:50:16 PM »
Purpose:
Change the F4 Help Display to "Control(amodal)" or "Dialog(modal)".
Useful as it helps automate functionality on F4 pop-up if it is set to "Dialog(modal)".

Example Steps:
Step 1: Log in to SAP Easy Access, select the Settings (Wrench) icon on the top right corner.
Step 2: Click on Help -> Settings...
Step 3: Go to "F4 Help" tab.
Step 4: Set the Display to "Dialog(Modal)".
Step 5: Click OK (tick mark).


Attached document with screenshots!

23
Mobile Products (Android, iOS and CE) / Smartattributes - rf_validate
« on: October 05, 2017, 05:16:51 PM »
Purpose:
The Validation Smart Attribute determines whether or not the input you entered is valid.
This determination is performed by matching the user input to the pattern assigned to the field.
The key is rf_validate.

When SAPgui is used, the validation process is normally performed when a page is submitted to the SAP application server.
However, individual fields can be validated prior to this step by marking them for validation.
Marking a field for validation informs the application that the field should be validated immediately following any pattern matching.
The validation process is usually triggered by a 'done entering text' signal.
If a single field is to be validated, the application displays a 'post-validation' screen.
This can be either the previous screen with the user input or an entirely different screen.
When an entire page is displayed, the post-validation screen does not appear instead the ensuing screen in the process will display instead.

If validation is used then the value entered into the field must match the pattern in order for the validation to succeed and for the process to continue.

Any screens that already contain text are assumed by Mobile to be already validated.
However, if you alter or modify any input, then the field will be re-validated when the page is submitted for validation.
The validation process is mostly transparent to you. When the 'done entering text' signal is transmitted, the screen will clear and the validation will be performed by the script.
You can specify a number of variable actions, such as the following:
• Screen to display when the validation is complete.
• Field to have focus in the post-validation screen.
In addition, you can specify transaction codes, function codes (Fcodes) and internal Fcodes.
In the case of Fcodes or internal Fcodes, the script author can identify the Fcodes and perform validation on the input as shown in the below example.

NOTE:
Make sure the "Smart Attributes -> Validate" is checked in "Advanced Setting" tab in the Profile settings of a mobile device.

Syntax:
{"smartattributes":"rf_pattern=???^rf_validate=/[tcode]"}
The [tcode] would be replaced by a SAP transaction code.
   

Liquid UI Code:
----------------------------------------------------------------------------------------------------------------------------------------------
Script File Name: SAPLSMTR_NAVIGATION.E0100.sjs       // Easy Access
----------------------------------------------------------------------------------------------------------------------------------------------
clearscreen();
inputfield( [1,1], "Material", [1,23], {"name":"z_mm02_matl", "size":18, "required":true, "smartattributes":"rf_validate=/7"});
inputfield( [2,1], {"name":"z_mm02_matldesc", "size":40, "readonly":true, "nolabel":true});
pushbutton([4,1], "@2L@Get Material Description", "/nMM02", {"size":[2,26], "process":mm02_getDescription});
onUIEvents["/7"] = {"fcode":"/nMM02", "process":mm02_getDescription};

function mm02_getDescription(){
   onscreen 'SAPLMGMM.0060'
      set('F[Material]', '&V[z_mm02_matl]');
      enter("/5");
      
   onscreen 'SAPLMGMM.0070'
      set("cell[TABLE,0,1]","X");
      enter();
      
   onscreen 'SAPLMGMM.4004'
      set("V[z_mm02_matldesc]",'&F[MAKT-MAKTX]');
      enter("/n");
}


See attachments for code samples!

24
Mobile Products (Android, iOS and CE) / Smartattributes - rf_autotab
« on: October 05, 2017, 11:19:44 AM »
Purpose:
Smart Attributes are special settings that you can attach to a given edit field.
The auto-Tab smart attribute is designed to eliminate the necessity for users to manually tab after entering data into a field.
While it can be used for situations where users are manually entering text, the most common usage is with barcode readers where field entry is performed by doing a scan.

The auto-tab specifies a given number of seconds before the process will proceed to the next field.
The key is "rf_autotab" and the value will be an integer that specifies the time to wait in seconds.
The counter begins and resets when any character is entered into a field marked with this attribute.
The way it works is that once a character is entered, Mobile will automatically tab to the next field when the delay time is passed.
If a barcode scan is performed, Mobile will auto-tab to the next field one second after the scan is completed regardless of the value specified for the auto-Tab attribute.
If there is a significant pause in the data entry (currently set at five seconds), Mobile will assume the user is done entering text on that field, but will not tab to the next field.

Since auto-Tab is treated the same as a 'done entering text' signal, pattern-matching and validation can also be performed on the fields after an auto-Tab occurs.

NOTE:
Make sure the "Smart Attributes -> Auto Tab" is checked in "Advanced Setting" tab in the Profile settings of a mobile device.

Syntax:
{"smartattributes":"rf_autotab=3"}     // autotab set to 3 seconds
   

Liquid UI Code:
----------------------------------------------------------------------------------------------------------------------------------------------
Script File Name: SAPLSMTR_NAVIGATION.E0100.sjs       // Easy Access
----------------------------------------------------------------------------------------------------------------------------------------------
clearscreen();
inputfield( [1,1], "Material", [1,14], {"name":"z_cork_matl", "size":18, "required":true, "smartattributes":"rf_autotab=3"});
inputfield( [2,1], "Batch", [2,14], {"name":"z_cork_bat", "size":10, "required":true, "smartattributes":"rf_autotab=3"});
inputfield( [3,1], "Quantity", [3,14], {"name":"z_cork_qty", "size":10, "required":true, "numerical":true, "smartattributes":"rf_autotab=3"});
inputfield( [4,1], "Stor. Loc.", [4,14], {"name":"z_cork_sloc", "size":4, "readonly":true});
pushbutton([6,1], "@2L@Partial Confirm", {"size":[2,26], "process":cork_partialConfirm});


See attachments for code samples!
25
Purpose:
Collection SAPgui traces for debugging and providing it to Synactive Engineering team when required.

Please refer to the attached document for steps along with screen shots!

26
Purpose:
The "versionnumber" command is used principally to reduce web traffic when scripts are hosted in a SAP web repository, a FTP shared directory or a HTTP web share.
In action, the versionnumber command adds a version number to any scripts cached from SAPWR.
If the versionnumber is updated, then SAP will access SAPWR to recache scripts that are stored there.
This version number can be assigned as the user wishes and operates by causing both the logon script and the session script to be loaded each time from the designated script directory.

Syntax:
versionnumber("string", {"option":value});

Note::
For the versionnumber command to function correctly, you must have one of the following two files:
• elogon.sjs
• esession.sjs
   
Options:
{"systemid":"SAP_system_ID"}
If multiple SAP systems with the same name are being employed, users can specify a different system ID.
This system ID is then used to strengthen the cache directory name.

Example::
In the following example, we will demonstrate the versionnumber command in action.

1. Add the following entry to the guixt.sjs file.
directory0 = "C:\\guixt\\versions";
2. Add the following entry to either the "elogon.sjs" or "esession.sjs" files.
versionnumber("000");
3. Now, any time you increment the version number, WS will check the SAPWR directory and download the latest version of the script file.

27
WS aka Web Scripts (Attended RPA for SAP) / Liquid UI - "textbox" command
« on: September 27, 2017, 05:34:57 PM »
Purpose:
The textbox command creates text fields on a SAP screen.

Syntax:
textbox([startRow, startCol], [endRow, endCol], {"name":"name","option":"option"});
   
Options:
The textbox command takes the following options:

{"readonly":true}
With this option any default text in the textbox cannot be changed by a user.

{"nowordwrap":true}
The text will not wrap.
This option requires users to press 'Enter' to begin a new line.

{"textfont":"font_name"}
Specifies the selected font.
If this option is not specified, defaults to Arial.

{"textheight":x}
Sets the text height in pixels. The default is 16.

{"textweight":x}
Specifies text weight from 1 (thin) to 9 (heavy).
The default standard setting is 5 and the default bold setting is 7.


Liquid UI Code:
----------------------------------------------------------------------------------------------------------------------------------------------
Script File Name: SAPLSMTR_NAVIGATION.E0100.sjs       // Easy Access
----------------------------------------------------------------------------------------------------------------------------------------------
clearscreen();
var z_text1 = "This is textbox with no options.";
var z_text2 = "This is custom text in textbox with font options.";
copytext({"fromstring":"z_text1","totext":"z_textbox1"});
copytext({"fromstring":"z_text2","totext":"z_textbox2"});
textbox([1,2], [10, 100],{"name":"z_textbox1"});
textbox([11,2], [20, 100],{"name":"z_textbox2", "textfont":"Times", "textweight":8, "textheight":18});


See attachments for code samples!
28
WS aka Web Scripts (Attended RPA for SAP) / Liquid UI - "text" command
« on: September 27, 2017, 04:35:48 PM »
Purpose:
Displays text on a screen.
You can use the text command to perform the following actions:
• Display text on a SAP screen
• Change the name of any of the following SAP elements:
• checkbox
• context menus
• inputfield
• pushbutton
• radiobutton
• tab


Syntax:
text([row_number,col_number], "Text Label",{option:"optionvalue"});
- Adds text to a SAP screen.
- The row and column number specify the location on the screen where the text will appear.

var z_txt = "text"; text([rows, cols],+z_txt);
- Adds text to a SAP screen from a variable.

text("C[checkboxName]", "New Name");
- Changes a checkbox's name.

text("F[fieldName]", "New Name");
- Changes an inputfield's name.

text("O[optionMenu_label]","New option menu label");
text("O[functionKey_label]", "New function key label");
- Changes the label of a context menu or of a function key.

text("P[pushbuttonName]", "New Name");
- Changes a pushbutton's name.

text("R[radiobuttonName]", "New Name");
- Changes a radiobutton's name.

text("T[tabName]", "New Name");
- Changes a tab's name.

   
Options:
The text command takes the following options:

{"comment":true}
Changes both the default font and the default color, resulting in a fixed-font, blue color.

{"fixedfont":true}
Changes the font to a fixed-font.

{"intensified":true}
Changes the text color to blue.

{"left":true}
Draws a line from the text to the nearest screen element to the right of the text.


Liquid UI Code:
----------------------------------------------------------------------------------------------------------------------------------------------
Script File Name: SAPMV45A.E0101.sjs       // VA01 transaction
----------------------------------------------------------------------------------------------------------------------------------------------
text([12,2], "Custom text added by Liquid UI");
text([13,2], "Custom text with comment option", {"comment":true});
text([14,2], "Custom text with intensified option", {"intensified":true});
text([15,2], "Custom text with left option", {"left":true});

text("F[Order Type]","Order");  // Changes the field name


See attachments for code samples!

29
WS aka Web Scripts (Attended RPA for SAP) / Liquid UI - "comment" command
« on: September 19, 2017, 03:20:24 PM »
Purpose:
The comment command creates blue-colored comments on the current SAP screen.
The comment command indicates that the text in question is a comment.
The on-screen position of the text can also be specified with the comment command.

The syntax is as follows:
   comment([startRrow,startCol], "text");
   
Options:
The "comment" command takes the one option called "left".
The left option draws a line from the comment to the closest input control or dropdownlist located to the right of the text.

The syntax is as follows:
   {"left":true}

Liquid UI Code:
----------------------------------------------------------------------------------------------------------------------------------------------
Script File Name: SAPMV45A.E0101.sjs       // VA01 transaction
----------------------------------------------------------------------------------------------------------------------------------------------
comment([1,1], "Please fill out all required fields!");


See attachments for code samples!
30
Purpose:
The clearscreen command deletes all screen objects on the current SAP screen.
This is particularly useful when preparing a given screen for a custom appearance as in the case of a Mobile application.

The syntax is as follows:
   clearscreen();
   
Options:
The clearscreen command does not take any options.

Liquid UI Code:
----------------------------------------------------------------------------------------------------------------------------------------------
Script File Name: SAPLSMTR_NAVIGATION.E0100.sjs       // SAP Easy Access
----------------------------------------------------------------------------------------------------------------------------------------------
// Clears and displays blank screen
clearscreen();


See attachments for code samples!

Pages: 1 [2] 3 4 ... 7