The smart attributes option for inputfields adds functionality to the inputfield.
Inputfield smart attributes are a features that is specific to the Mobile solution - these attributes cannot be used in a Desktop, WebUI or Access implementation. Smart Attributes are special settings that the script editor attaches to a given edit field. There is one exception - the barcode smart attribute is supported in the Liquid UI for iOS solution. Multiple smart attribautes can be defined for a field by using the caret '^' character and the syntax is as follows:
{"smartattributes":"rf_pattern=???^rf_validate=/mnbe^rf_autotab=5^rf_page_autosend=
The various types of smart attributes are designed in the script files by using keys with the 'smartattribute' option. There are six available smart attribute keys, as follows:
- rf_pattern
- rf_validate
- rf_autotab
- rf_page_autosend
- rf_rfid
- rf_barcode
These keys are defined as follows:
Pattern Matching
Pattern-matching is used to mark a field as containing a specific pattern of alphanumeric characters. GuiXT Mobile can then check the input against the patterns for each field and only proceed if the entries match the assigned patterns. The way this works is that once a user enters input, the Mobile application will search each field for a match to the patterns contained in the user entry. Once a match is found, Mobile will check that the data entered in the field matches the assigned pattern. If the input does not match, or if no fields with matching patterns are discovered, the application will return an error in the Status bar at the bottom of the screen. The two possible syntaxes is as follows:
{"smartattributes":"rf_pattern=?||??||???..."}
{"smartattributes":"rf_pattern=string*||*string"}
The variables used to define field patterns are as follows:
- '?': Matches any alphanumeric single character. So three '???' could equal '100', 'cat', 'C1d', etc.
- '*': Matches the beginning or end of any string of characters. So 'cat*' could be the equivalent of 'catastrophe', 'cat15marin59x', 'cat1', etc. Similarly, '*bin' could be the equivalent of 'Fizzbin', 'etcbin', 'dustbin', etc.
The syntax is as follows:
{"rf_pattern":"?"}
{"rf_pattern":"string*||*string||"}
Validation
The Validation smart attribute determines whether or not the your input is valid. This determination is performed by matching the user input to the pattern assigned to the field. The syntax is as follows. The [tcode] would be replaced by a SAP transaction code.
{"smartattributes":"rf_pattern=???^rf_validate=/[tcode]"}
Auto-tab
The Auto-tab smart attribute eliminates the necessity for you to manually tab after entering data into a field. Whuile it is useful for situations where you need to manually enter text, auto-tab is especially useful with bar-code readers where field entry is performed by doing a scan.
In either case, the value that you set in the Auto-tab smart attribute specifies a delay time in seconds. The counter begins and resets when any character is entered into a field marked with the auto-tab attribute. The way it works is that once a character is entered, Mobile will automatically tab to the next field when the delay time is passed. For example, if the Auto-tab has a delay time of five seconds, then five seconds after the first character is entered, Mobile will automatically tab to the next field. Mobile also automatically detects whether a barcode is or is not being performed. If a barcode scan is performed, Mobile will auto-tab to the next field one second after the scan is completed regardless of the value specified for the Auto-tab attribute. If there is a significant pause in the data entry (currently set at five seconds), Mobile will assume the user is done entering text on that field, but will not tab to the next field.
Since Auto-tab is treated the same as a 'done entering text' signal, pattern-matching and validation can also be performed on the fields after an Auto-Tab occurs. The syntax for Auto-tab is as follows:
{"smartattributes":"rf_autotab=3"}
Auto-submit
The Auto-submit smart attribute is designed to execute a transaction code or function code after entering all data into all the fields on a specified page. It can be used for manual typing, but it is most commonly used in situations where barcode readings are being scanned. If any field on a given page is marked with the Auto-submit attribute, then Mobile will automatically execute the transaction or function codes assigned to the attribute as long as all fields on the page contain valid input.
Because Auto-submit takes place only when all fields on a given page contain valid entries, it can only occur after both pattern-matching and validation are performed. It is also mostly transparent to the user. Once pattern-matching and validation are performed on the screen in question, the script will clear the current screen, catch the instructions contained in the Auto-Submit attribute and then a new screen which can be either the same screen or a different screen will appear. The script author can specify what actually will occur when Auto-Submit is performed. The syntax for Auto-submit is as follows. Replace the '[tcode]' with a SAP transaction code.
{"smartattributes":"rf_page_autosend=/n[tcode]"}
RFID tag reading
WS can also read RFID tags and utilize the information contained therein within SAP transactions. This ability can be used with both Mobile and with the Offline solution when the Mobile client is used in conjunction with that product. The syntax is similar to the other smart attributes and is as follows:
{"smartattributes":"rf_rfid=TAG_NAME"}
RFID tag reading currently is available only on the GuiXT Mobile solution. It requires an extra file, as follows:
- SynRFUI.dll
The SynRFUI file must be installed in the same directory as the Mobile client files. This directory is usually \Program Files\GuiXTMobile.
You must also make the following change to the General section of the GuiXTMobile.sy3 file. there are two possible device types that you can use. these are as follows:
- Intermac
- TransCore
To use an Intermac devices, please add the following to the GuiXTMobile.sy3 file:
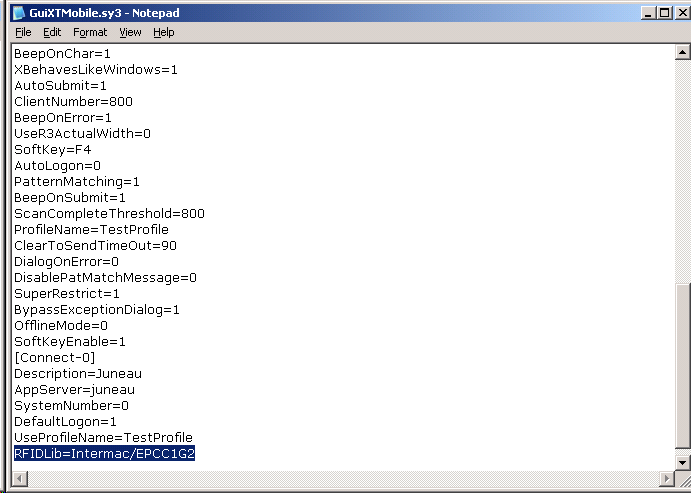
RFIDLib=Intermac/EPCC1G2
To use a TransCore device, please add the following line to the GuiXTMobile.sy3 file:
RFIDLib=TransCore/XXX
The ID following the forward slash in the example above specifies the type of tag the user wishes to read. TransCore devices do not require a tag type, so this can be designated with 'XXX' instead of an actual tag type.
A sample GuiXTMobile.sy3 file containing the Intermac RFID entry is shown below:
Developing with RFID Tags
Use the new transaction code '/rfid' with pushbuttons, toolbar pushbuttons, or menus to activate the RFID functionality. When a user clicks a button with this tcode attached, the RFID read will be executed. The behavior will be the same as if the user had pressed the device trigger, and this tcode actually will call the SynRFUI_CreateRFLIstWnd function which not only performs the actual RFID read but it also subsequently populates the edit field where the user's cursor resided when the RFID read was triggered.
To use this new tcode with Mobile pushbuttons or menus, developers can use the same syntax as before, simply adding the new tcode to a pushbutton or menu option. In the following Offline example, we created a script entitled 'rfid.sjs', wherein we have defined a new transaction object. To this object, we have added a function that calls the method do perform the RFID read. The code is shown below:
				var _objectRFID = new SR3TransactionObject("rfid");

_objectRFID.addScreen([
{type:SCR_CAPTION, label:"Scan RFID"},
{type: SCR_EDIT, label: "RFID Tag", position: {row: 5,col: 1,edcol: 15,edlen:30},style:EDIT_STYLE_NORMAL,maxtextlength:40, fieldname:"g_rfid", smartattributes:"rf_rfid=SYNTRUE"},
{type: SCR_PUSHBUTTON, label: "@2S@ Scan", position: {row:8,col:1,width:10,height:1},fieldname:"g_push_rfid",fcode:"/rfid"},
{type: SCR_ONAPPKEY, keyid:F8,keylabel:"@2S@RFID Scan",  keytooltip:"Scan RFID Tag",callback:scanRFID }, //F8 is reserved for RFID
{type:SCR_ONFKEY,keyid:EVENT_FKEY_EXIT,keytooltip:"Log off",  callback:SR3GenericFunctionKeySHIFTF3LogOff}
]);

function scanRFID()
{
	// API call to read RFID tags
	this.m_RealTimeScreen.Send();
}
The RFID smart attribute triggers the ability for users to read and obtain values from RFID tags.
Barcode reading
The barcode smart attibute must be set to true if it is present. Once the smart attribute is included in a field, you can scan any supported barcodes. The syntax is as shown below:
{"smartattributes":"rf_barcode=true"}
There are two different methods of reading barcodes with an iOS device, as follows:
- Using the built-in camera
- Using a third party hardware scanner, such as the Linea Pro 4
The supported barcode types are as follows:
Using the built-in camera- Code 39
- Code 93
- Code 128
- DataBar
- DataBar Expanded
- EAN-8
- EAN-13
- Interleaved 2 of 5
- QR Code
- UPC-A
- UPC-E
- Aztec code
- Code 11
- Code 39
- Code 93
- Code 128
- Codebar
- Data Matrix
- EAN-8
- EAN-13
- GS1
- IATA
- ISBN
- ISMN
- ISSN
- Industrial 2 of 5
- Interleaved 2 of 5
- Matrix 2 to 5
- Maxi code
- microPDF417
- Micro QR code
- MSI/Plessy
- UK/Plessy
- PDF417
- QR code
- RSS 14
- RSS Limited
- RSS-Expanded
- S-code
- Telepen
- UPC-A
- UPC-E
- UPC-E1
'Done Entering Text' Signals
After entering data into a field, you will typically execute a 'done entering text' action to signify that you are finished entering data. This action can take a number of forms. Some common examples are pressing the Tab or Enter key or moving the cursor into another field. Actions that change an attribute but do not cause any action to occur, such as selecting a radiobutton or checking a checkbox also are actions that will send the 'done entering text' signal. In addition to the actions that send the 'done entering text' signal, there are also some user actions that will override the Smart Attributes instead of performing them. These actions are typically those that are intended to cause an action to occur and therefore should not be interrupted by the Smart Attributes. Examples of these are as follows:
- Selecting a menu item
- Choosing a pushbutton
- Choosing a function key (F-key)
- Pressing the Enter or Return key